| Getting Started with WordStock |
All of the ordering for your store is done through the Ordering program. Purchase Orders [POs] are created and stored in the Ordering file. A PO is a list of items that you wish to order. Each PO is entered on the PO screen.
In Your Store
The PO screen is used to create or modify a PO. By entering an ISBN or SKU into the PO, all the information necessary for the PO is automatically retrieved from the Inventory file.
You will use the information in this chapter to:
1. Create a new PO.
2. Differentiate between the Discount Entry (DE) and Cost Entry (CE) costing methods.
3. Become familiar with WordStock's PO statuses.
4. Retrieve old POs.
5. Modify existing POs.
6. Send POs to a Vendor.
Purchase Orders
This section describes how to create a new PO, and how to look up and modify an existing PO.
| Please Note This section explains how to create a PO by manually entering information onto the PO screen. You can also generate POs from a sort. See Chapter 7 Reports. As you become familiar with WordStock, you will probably create most purchase from inventory sorts. |
Creating a New Purchase Order
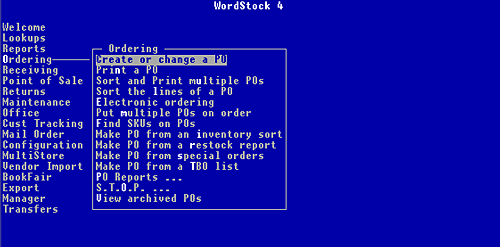
1. Use the board arrow method or the hot method to select 'Ordering' from the Main Menu.
The Ordering sub. menu is opened, and 'Create or change a PO' is highlighted.
2. Press <Enter>. The PO screen is displayed, and the cursor is flashing in the Command: box. See Figure 8–1 below.
![Figure 8-1, screen showing a new Purchase Order [empty]](images/8-1.gif)
Figure 8-1, screen showing a new Purchase Order [empty]
| Please Note The PO screen is divided into 3 sections: The top section displays inventory information about whichever item is being added to the PO. The middle section (the PO header) is used to enter Vendor information, and to keep track of the PO. The bottom section is used to enter the items (the detail lines) which are to be included on the PO. |
3. To have the PO # assigned by the system, type <new> and press <Enter>. The next available PO# is displayed in the "PO#" field.
To assign your own PO#, type <apo> and press <Enter>. The cursor is flashing in the "PO#" field. Type the PO # and press <Enter>. Your PO# is displayed in the "PO#" field.
The following are entered by default:
The current date is entered in the "Date" field.
'DE' (discount entry) is entered in the "Cost Meth" field.
'NEW' is entered in the "Status" field (see note below).
The cursor is flashing in the "Vend #" field.
| Please Note A PO's "Status" refers to its stage in the ordering process. The "Status" field is automatically updated as the PO is processed. There are four PO statuses: A status of NEW indicates that the PO has just been created. A status of SENT indicates that the PO has been printed or electronically sent to the Vendor. A status of ON ORDER indicates that the PO has been put on order. When a PO is put ON ORDER, the "On Order" fields of the Inventory, Vendor, Product, and Section records are updated. A status of FINISHED indicates that the items on the PO have been put on a Receiving Batch (see Chapter 9 Receiving). When a Receiving Batch is created for a PO, the PO status is automatically changed to FINISHED. A PO's "Type" provides information about the Vendor from whom you are ordering, and about the nature of the PO. |
There are four purchase order types:
PO indicates 'publisher order' or 'purchase order'. <PO> is used when you are ordering directly from a publisher or manufacturer.
WO indicates 'wholesale order'. <WO> is used when you are ordering from a wholesaler.
NO indicates 'new title order' or 'new item order'. <NO> is used when you are ordering items that you have never ordered before.
UO indicates 'undefined order'. <UO> is used for any order that does not fit into any of the other PO Types (for example, to create a PO for consignment goods which typically arrive in your store without your having ordered them).
You can use the board arrows to position the cursor in the "PO Type" field and change the PO type.
4. Type the Vendor number of the supplier with whom you are placing the order, and press <Enter>. If there is a Vendor record for the Vendor: The Vendor's name, address and phone number are retrieved from the Vendor's record and If there is not a Vendor record for the Vendor: 'Unknown vendor number' is displayed in the Message: box. displayed to the right of the Vendor number. The "PO Type" (see note box above) is retrieved from the Vendor's record. The cursor is flashing in the "Cost Meth" field, and 'DE' is displayed there. Skip to the note on page 8–6, and continue on step 8.
5. If you are at a computer. switch to another window (see Chapter 4 The Inventory File for more information about switching windows) and then follow the directions in Chapter 3 The Inventory File for "CREATING NEW VENDOR RECORDS".
If you are at a terminal: Press <F9>. The cursor is flashing in the Command: box.
Start over at step 4.
6. Press <q> and press <Enter>. The Main Menu is displayed with the Ordering sub-menu opened.
7. Follow the directions under 'CREATING NEW VENDOR RECORDS' in Chapter 3 The Inventory File, and start again at step 1.
| Please Note There are two costing methods: The Discount Entry (DE) method indicates that you receive a discount off of the list price when you order from this Vendor. When DE is used, you can alter the line item discounts for each item on the PO, and the cost price is automatically calculated. This is the usual method of ordering from a publisher. The Cost Entry (CE) method indicates that you pay a wholesale price when ordering from this Vendor. When CE is used, you can alter the cost price, and the discount is automatically calculated. This is the usual method of ordering merchandise at cost. |
8. If you are ordering items at cost: Type <ce> for 'cost entry', and press If you are ordering items at a discount off of the list price : Press <Enter>. The cursor is flashing in the "Discount" field.
9. If the costing method is CE (Cost Entry): Press <Enter>. If the costing method is DE (discount entry): Type the blanket discount percent (4 digits to accommodate a decimal point) to apply to the entire PO and press <Enter>. The cursor is flashing in the "Ship Via" field.
10. (Optional) Type the shipping method (UPS, US Mail, etc. – up to 15 characters) and press <Enter>. The cursor is flashing in the "Note" field.
11. (Optional) Type a comment about the PO (up to 40 characters) and press <Enter>. You have completed the PO header section, and are ready to enter the items you want to order in the detail line section. The cursor is flashing in the "ISBN/SKU" field.
12. Type or scan the ISBN or the SKU of the first item to be placed on this PO. If an Inventory record is on file for the item: The item's inventory If there is not an Inventory record on file for the item: information was retrieved from the Inventory file. The cursor is flashing in the "Qty" field.
Skip to step 24.
The ISBN or SKU you entered is displayed in the "ISBN/SKU" field in the top section of the screen. The cursor is flashing in the "Title" field in the top section of the screen.
13. Type the full title of the book or a description of the item and press <Enter>. The title (or item description) is displayed in the "Title" field. (the system may have abbreviated it.) The cursor is flashing in the "Pr" ( Product code) field.
14. Type the item's Product code and press <Enter>. The cursor is flashing in the "Author" field.
15. Type the name of the author, artist or designer <Last,First> and press <Enter>. The cursor is flashing in the "Price 1" field.
16. Type the retail price of the item and press <Enter>. The price you entered is displayed in the "Pr1" field and the cursor is flashing in the "Prc2" field.
| Reminder WordStock uses the price in the "Pr1" field at the Point of Sale ( POS) regardless of the price entered in the "Pr2" field. |
:17. (Optional) Type a secondary price (cost of the item, foreign price, discounted price, etc.) or leave this field blank, and press <Enter>. The cursor is flashing in the primary "Sections" field.
18. Type the item's Section number and press <Enter>. The cursor is flashing in the secondary "Sections" field.
| Reminder If an item has more than one Section number, ONLY the first Section record is updated; the second Section record is for reference only. Whenever an item is sold, ordered, received, or returned, its Section record is automatically updated. |
19. (Optional) Type a second Section number if the item is displayed in more than one Section, or leave this field blank. Press <Enter>. The cursor is flashing in the "Vend#" field.
20. Type the item's Vendor number and press <Enter>. The Vendor's name is displayed in parentheses to the right of the Vendor #. The cursor is flashing in the " NT" ( New Title) field.
| Hint A # sign in the New Title field alerts the receiver that the item is new to your inventory, and should get priority treatment. 21. If the item is new to your inventory: Type <#> and press <Enter>. Otherwise: Leave this field blank. Press <Enter>. (The # sign was arbitrarily chosen by WordStock to indicate a New Title). The cursor is flashing in the "AltVend" (Alternate Vendor) field. 22. (Optional) Type the Vendor # of an alternate Vendor from whom you could order this item or leave this field blank. Press <Enter>. The cursor is still flashing in the "AltVend" field. |
| Please Note At this point you can use the board arrows to position the cursor in any of the following optional fields: PubDate to enter a book's publication date or an item's expected arrival date (<MM/YY>). Comments to enter a note about the item (up to 22 characters). Imprint to enter the name of this item's Editorial Group. Press <Enter> after each field entry. |
23. Press <F10> to save the Inventory information you entered. You have just created a new Inventory record for the item. The Inventory information is displayed in the appropriate fields in the detail line section of the PO screen, and the cursor is flashing in the "Qty" field.
24. Type the quantity of the item that you are ordering, and press <Enter>. If the costing method is DE (discount entry): The cursor is flashing in the "Disc%" field, and the blanket discount is entered by default.
If the costing method is CE (cost entry): The cursor is flashing in the "Cost" field. Skip to step 26.
25. If the discount percent for the item is different than the blanket discount, type the discount percent for the item and press <Enter>.
Otherwise, press <Enter>. The cursor is flashing in the "Clm" (Claim) field. Skip to step 27.
26. Type the cost of the item and press <Enter>. The cursor is flashing in the "Clm" (Claim) field.
| Please Note The "Claim" field is automatically updated when WordStock adds a Special Order to a PO. See 'ADDING SPECIAL ORDERS TO POS' in Chapter 12 Special Orders. |
27. (Optional) When entering items manually, type the number of the item that are to be set aside (Special Orders, Mail Orders, etc.) when the order is received. Press <Enter>. The cursor is flashing in the "ISBN/SKU" field.
28. Repeat steps 12–27 for as many items as you want to include on this PO. The cursor is flashing in the "ISBN/SKU" field.
29. When you are done entering items onto the PO, press the <F10> to save the PO. The PO Commands Help Menu is displayed. See Figure 8–2 below.
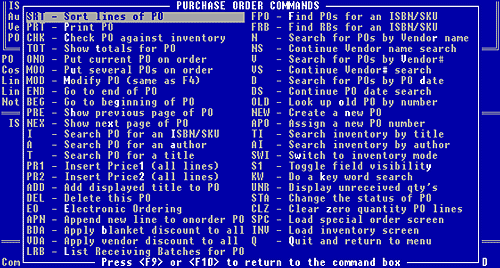
Figure 8-2, Ordering Commands Help menu
OR.The cursor is flashing in the Command: box on the PO screen. See Figure 8–3 below.
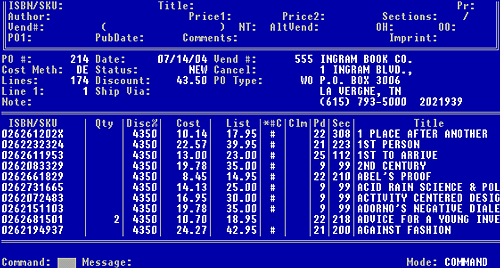
Figure 8-3, a new Purchase Order
| Remember Whenever a Command Help Menu is opened or the cursor is flashing in the Command: box, you can initiate any of the available commands. Detailed instructions for the commands most frequently executed after creating a new PO are provided below. |
30. TO ENTER ANOTHER PO: In the Command: box: Type <new> and press <Enter>. From the Command Help Menu, select 'Create a new PO'. A PO screen is displayed with the screen fields cleared. Start again at step 4.
TO GO BACK TO THE MAIN MENU, type <q> i n the Command: box: and press <Enter>. From the Command Help Menu, select 'Quit and return to menu'. The Main Menu is displayed with the Ordering sub-menu opened.
Printing the Purchase Order
1. Make sure your printer is on and that it has paper.
2. In the Command: box: Type <prt> and press <Enter>. From the Commmand Help Menu, select 'Print a PO'.
3. If there is more than one printer in your store, you are asked if you want to use your default printer. Press <n> and press <Enter> to select your main printer.OR.Press <n> and press <Enter> to display a list of your printers and select a printer from the list. The PO is printed.
If there is only one printer in your store: The PO is printed.
Sending the Purchase Order to the Vendor Using WordStock Electronic Ordering
Follow the directions under 'SOURCING THE PO' in Chapter 8 Ordering.
Putting the Purchase Order 'On Order'
Follow the directions under 'PUTTING THE PO(s) ON ORDER' in Chapter 8 Ordering.
Sourcing the Purchase Order (Sending the PO to the Vendor)
Sourcing the PO means getting your order to the source of your merchandise.
WordStock provides two ways to access the PROGRAM TO SOURCE A PURCHASE ORDER:
1. You can source POs from the Main Menu. This is useful when you want to source more than one PO at a time. See instructions below.
2. You can source a PO directly from the PO screen. This is usually done when you want to source a single PO which is displayed on the screen. See 'TO OPEN THE PROGRAM TO SOURCE A PURCHASE ORDER' in Chapter 8 Ordering.
This section provides instructions for the three main methods of sourcing a PO:
You can Print a hard copy of the PO to be called into the Vendor, mailed to the Vendor, or faxed from your fax machine to the Vendor's fax machine;
You can Fax the PO directly from your computer to the Vendor's fax machine;
You can Transmit the PO electronically directly to the Vendor or to PUBNET or TELEBOOK.
Sourcing POs from the Main Menu
1. Open the Program to Source A Purchase Order: Use the board arrow method or the hot method to select 'Ordering' from the Main Menu. The Ordering sub-menu is opened, and 'Create or change a PO' is highlighted.
2. Select 'Electronic ordering' from the Ordering sub-menu. The PROGRAM TO SOURCE A PURCHASE ORDER Menu is opened. See Figure 8–4 below.
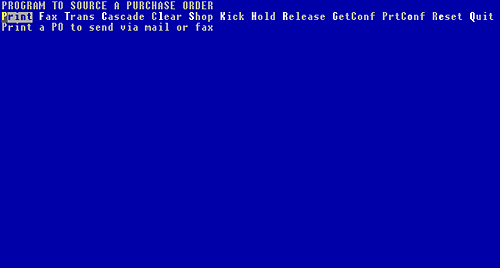
Figure 8-4, Command Menu for Program to Source a PO
Printing Purchase Orders
You can use the Print Method to print a hard copy of the PO even if you are going to place your order using the fax or transmit method.
1. Make sure that the printer is on and that it has paper.
2. Use the board arrow method or the hot method to select 'Print' from the PROGRAM TO SOURCE A PURCHASE ORDER menu.
If there is more than one printer in your store: If there is only one printer in your store: You are asked if you want to use your default printer. Press <n> and press <Enter> to select your main printer.
OR press <n> and press <Enter> to display a list of your printers and select a printer from the list.
The PROGRAM TO PRINT A PURCHASE ORDER List Box is displayed and you are prompted to 'Enter a PO number:' See Figure 8–5 below.
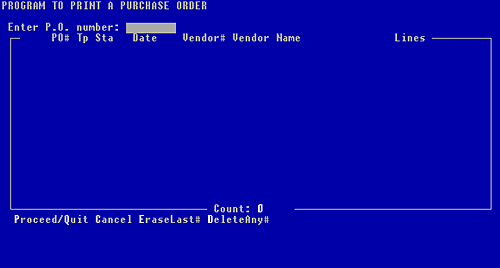
Figure 8-5, List box for Program to print a Purchase Order
3. Type the PO number of each PO that you want to print and press <Enter> after each one. The information about each PO is displayed in the PO List Box under the appropriate field headings.
| Please Note The Command Menu at the bottom of the screen lists 4 choices (See Figure 8–6 below). If you make a mistake at any time up to this point, you can select 'EraseLast #' to erase your last entry, or 'DeleteAny#' to erase any entry. |
![]()
Figure 8-6, list box Command Menu
4. When you are done, and are certain that all the PO numbers you entered are correct and that your printer is on and contains paper, type <p> or <q> (the commands for Proceed and quit) and press <Enter>. The POs are printed.
5. If you are not going to fax or transmit the PO(s), see Chapter 8 Ordering for instructions for PUTTING THE PO(S) ON ORDER.
Faxing Purchase Orders
When you use the Fax method to source a PO, you are essentially printing a copy of the PO on the Vendor's fax machine instead of on your printer.
You can only source one PO at a time to a Vendor's fax machine.
You must repeat the process for each PO you want to source using the Fax method.
1. Make sure the modem is available. If the modem is in use, you may have to schedule modem time with other staff members.
2. Use the board arrow method or the hot method to select 'Fax' from the PROGRAM TO SOUCE A PURCHASE ORDER menu. 'Fax a PO directly to a vendor' is displayed and you are prompted to Enter a PO#'. See Figure 8–7 below.
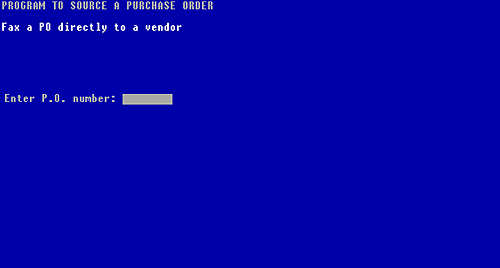
Figure 8-7, Program to Source a Purchase Order - FAX method
3. Type the number of the PO that you want to fax, and press <Enter>.
If the fax number is in the Vendor file: The system retrieves the fax number and asks you to confirm that it is correct. If the fax number is not in the Vendor file: You are prompted to enter the Vendor's fax number.
Type the Vendor's fax number, and press <Enter>.
(The PO's status is changed to 'SENT'). A series of messages is displayed as the fax is transmitted from your computer to the Vendor's fax machine. When the PO has been faxed to the Vendor, you are prompted to 'Press the <Enter> to continue'. See Figure 8–8 below. Skip to step 4.
4. If the displayed fax number is correct, press <Enter>.
If the displayed fax number is incorrect, press <n> and press <Enter>. Type the Vendor's fax number and press <Enter>.
(The PO's status is changed to 'SENT'). A series of messages is displayed as the fax is transmitted from your computer to the Vendor's fax machine.
When the PO has been faxed to the Vendor, you are prompted to 'Press <Enter> to continue'.
5. Press <Enter>. The PROGRAM TO SOURCE A PURCHASE ORDER is displayed.
6. Press <q>. You are prompted to 'Press <Enter> to return to the menu'.
7. Press <Enter>. The Main Menu is displayed with the Ordering sub-menu opened.
8. See Chapter 8 Ordering for instructions for PUTTING THE PO(S) ON ORDER.
Transmitting a Purchase Order
When you use the Transmit method to source a PO, you are sending the PO through a direct link between your store's computer modem and the Vendor's computer modem. The Vendor can then send a confirmation of its receipt of the PO directly back to your store.
The Transmit method can only be used to order from Vendors that accept electronic orders from WordStock.
See Figure 8–9 below for a list of available Vendors. If the Vendor from whom you are ordering does not appear in the List box, you can not use the Transmit method.
There are three parts to the process of transmitting a PO:
1. Preparing the PO for transmission
2. Transmitting the PO
3. Printing the Vendor confirmation
Preparing the Purchase Order for Transmission
1. Make sure the modem is available. If the modem is in use, you may have to schedule modem time with other staff members.
2. Select 'Transmit' from the PROGRAM TO SOURCE A PURCHASE ORDER menu.
A box containing a list of the Vendors available to receive transmitted POs is displayed. See Figure 8–9 below.
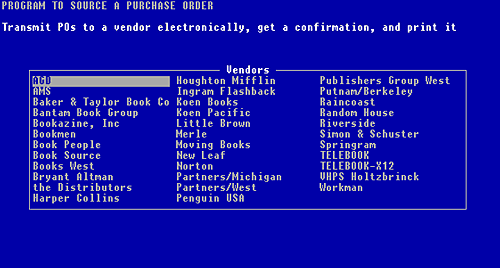
Figure 8-9, listing of electronic ordering Vendors
3. Use the board arrow method to select a Vendor from the list.
'Transmit POs to a vendor electronically, get a confirmation, and print it' is displayed above a PO List Box, and you are prompted to 'Enter a PO number:'. See Figure 8–10 below.
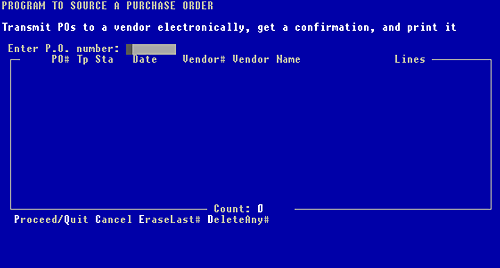
Figure 8-10, empty list box of POs to transmit
4. Type the PO number of each PO that you want to transmit to the Vendor's computer modem and press <Enter> after each one. Information about each PO is displayed in the PO List Box under the appropriate fields. See Figure 8–11 below.
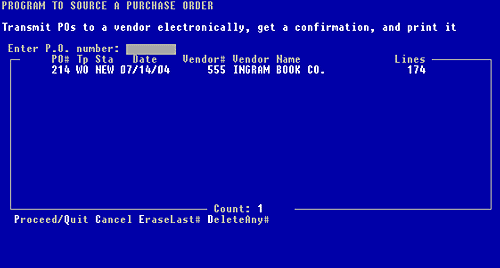
Figure 8-11, listing of POs to transmit electronically
| Please Note The Command Menu at the bottom of the screen lists 4 choices. (See Figure 8–11 above). If you make a mistake at any time up to this point, you can select 'EraseLast #' to erase your last entry, or 'DeleteAny#' to erase any entry. |
5. When you are done, and are certain that all the PO numbers you entered are correct, type <p> or <q> (the commands for Proceed and quit) and press <Enter>.
| Hint You can select a list of instructions to be sent to the Vendor. This is done by developing a list of profiles from which to choose. You can define a profile list for your Vendors. If you want to define a profile, call WordStock Support during business hours. |
6. If you have profiles defined, a list of your profiles is displayed and you are prompted to 'Select a profile'. Use the leyboard arrow method to select a profile.
Otherwise, WordStock uses a default profile.
You are notified that the PO will be converted to the Vendor's format. This is your last opportunity to make changes to the PO before it is transmitted to the Vendor. See Figure 8–12 below.
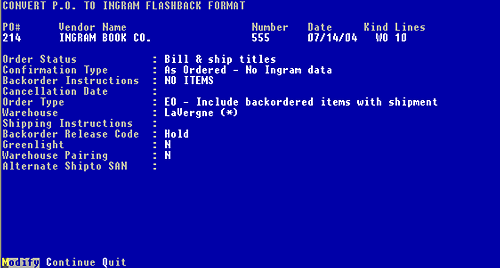
Figure 8-12, converting the PO to the Vendor's format
| Please Note If you are ordering directly from a publisher or manufacturer, the two choices usually available are described below. If you are ordering from a wholesaler, many other choices may be available. You can adapt the following procedures to any choices provided by other Vendors. |
Backorder Instructions and Special Offer Code
Your backorder instructions tell the Vendor what to do if some or all of the items you ordered are not immediately available.
A special offer code is a code that you previously received from the Vendor, and which you include if you want to take advantage of the special offer it represents.
Changing the Backorder Instructions and Special Offer Code
1. Use the board arrow method or the hot method to select Modify from the Command Menu.
2. Select 'Back Order Instructions'. The Backorder Instructions pop-up menu is opened.
| Please Note The following four options are the most common backorder instructions available. Depending on the Vendor, there may be additional backorder instructions. Select ALL ITEMS to tell the Vendor to backorder any and all items that are not immediately available. Select NO ITEMS to tell the Vendor not to backorder any items. Select NOT YET RELEASED to tell the Vendor to backorder only those books/items which are not yet published/available. Select VENDOR ARRANGEMENT to tell the Vendor to default to the backorder instructions that you have on file with the Vendor. |
Press <Enter>. Your backorder instructions appear in the "Backorder Instructions" field.
3. Use the board arrows to move to the "Special Offer Code" field and press <Enter>.
4. Type the Vendor's special offer code and press <Enter>.
5. Press <F10> to save your changes to the backorder instructions and special offer code, or press <F9> to restore the default instructions.
You are now ready to transmit your PO(s) to the Vendor.
| Please Note While WordStock is interacting with a Vendor's computer, miscommunication may occur causing an ERROR MESSAGE to appear on your screen. If you get an ERROR MESSAGE that you don't understand, write it down verbatim, and call WordStock Support for assistance. |
Transmitting the Purchase Order(s) to the Vendor
1. Use the board arrow method or the hot method to select 'Continue' from the Command Menu.
You are notified that the system is converting the PO to the Vendor's format.
A series of boxed messages describing the transmission is displayed:
1st Box: Your computer modem dials the Vendor's computer modem. Your computer modem connects to the Vendor's computer modem.
2nd Box: Your computer modem transmits the PO to the Vendor's computer modem.
3rd Box: The Vendor's computer modem transmits a confirmation back to your computer modem. You are prompted to 'Press <Enter> to continue'. See Figure 8–13 below.
2. Press <Enter>.
The system translates the confirmation from the Vendor's computer language to WordStock's computer language. When the translation is complete, a printing options screen is displayed enabling you to print a copy of the Vendor's confirmation. See Figure 8–14 below.
Printing a Vendor Confirmation
1. If you want to change any of the printing options: Otherwise: Skip to step 5.
Select Modify from the Command Menu at the bottom of the screen. The cursor is flashing in the "Print extra vendor data?" field.
If you choose this option, the confirmation will contain information from the Vendor about each item on the PO, including the title (item description), the author (artist designer, etc.), and the ISBN or SKU.
| Hint Because extra Vendor data requires 4 lines on the confirmation for every detail line on the PO, we recommend that you not select this option UNLESS the PO is very short (up to 10 items) or you suspect that your inventory information is inaccurate, and you want to correct it. |
2. Press <n> to select extra Vendor data, or <n> to reject this option, and press <Enter>. Use the board arrows to position the cursor in the "Print vendor messages?" field.
Some Vendors will send messages (usually containing marketing information) as part of their confirmations.
| Hint We recommend that you not select this option UNLESS you are interested in receiving messages from the Vendors about their products. |
3. Press <n> to select Vendor messages, or <n> to reject this option, and press <Enter>. Use the board arrows to position the cursor in the "Print price changes?" field.
| Hint Because price changes will be printed ONLY WHEN the item price on the confirmation is different from that on the PO, we recommend that you ALWAYS select this option. |
4. Press <n> to select price changes, or <n> to reject this option and press <Enter>.
5. Press <F10> to save your options or <F9> to restore the default options. The Command Menu is displayed at the bottom of the screen.
6. Select 'Continue' from the Command Menu. WordStock prepares the confirmation for printing. When the confirmation is prepared, '[Preparing confirmation done]' is displayed. You are asked if you want a printed copy of the confirmation.
| Hint Because it is easy to lose track of things, and sometimes you need a hard copy for your records, we recommend that you ALWAYS print a copy of the confirmation. |
7. If you want a printed copy of the confirmation, make sure that your printer is on and that it has paper. Press <n> and press <Enter>. The PROGRAM TO SOURCE A PO is displayed.
If you do not want a printed copy of the confirmation, press <n> and press <Enter>. Skip to step 8.
If there is more than one printer in your store, you are asked if you want to use your default printer. Press <n> and press <Enter> to select your main printer. OR press <n> to display a list of your printers and select a printer from the list.
If there is only one printer in your store, the confirmation is printed.
The PROGRAM TO SOURCE A PO is displayed.
8. Select 'Quit' from the PROGRAM TO SOURCE A PO menu. You are prompted to 'Press <Enter> to continue'.
9. Press <Enter>. The Main Menu is displayed with the Ordering sub-menu opened.
Sourcing Purchase Orders from the Command: box
You can initiate the sourcing process directly from a completed PO screen when the cursor is flashing in the Command: box. Unless you have just created a PO, and it is still displayed on the screen, you will have to access an existing PO. There are four ways to look up an existing PO:
- PO number
- Vendor name
- Vendor number
- date.
Looking Up Existing Purchase Orders
1. Use the board arrow method or the hot method to select 'Ordering' from the Main Menu. The Ordering sub-menu is opened.
2. Select 'Create or change a PO'. A blank PO screen is displayed and the cursor is flashing in the Command: box.
Looking Up a Purchase Order by Number
1. To enter a command in the Command: box: Type <old> and press <Enter>. To use the Ordering Commands Help Menu:
Hold down <Shift> and press <F1>. Select 'Look up old PO by number'. The cursor is flashing in the "PO#" field.
2. Type the PO number you are looking for, and press <Enter>. The PO Commands Help Menu is opened. Press <F9> or <F10>. The corresponding PO is displayed, and the cursor is flashing in the Command: box.
Looking Up a Purchase Order by Vendor Name
1. To enter a command in the Command: box: Press <n> and press <Enter>. To use the Ordering Commands Help Menu, hold down <Shift> and press <F1>. Select 'Search for POs by Vendor name'. The cursor is flashing in the field to the right of the "Vend#" field.
2. Type the name of the Vendor that appears on the PO you are looking for, and press <Enter>. The PO for the closest alphabetical match to the Vendor you entered is displayed, and the cursor is flashing in the field to the right of the "Vend#" field. You can now use the board arrows to scroll (alphabetically by Vendor) through your POs.
3. When you find the PO you are looking for, press <F10>. The OrderingCommands Help Menu is opened.
Press <F9> or <F10>. The corresponding PO is displayed, and the cursor is flashing in the Command: box.
Looking Up a Purchase Order by Vendor Number
1. To enter a command in the Command: box: Press <v> and press <Enter>. To use the Ordering Commands Help Menu, hold down <Shift> and press <F1>.
Select 'Search for POs by Vendor#'. A blank PO screen is displayed and the cursor is flashing in the "Vend #" field.
2. Type the Vendor number that appears on the PO you are looking for, and press <Enter>. The last PO for the Vendor you entered is displayed, and the cursor is flashing in the "Vend #" field. You can now use the board arrows to scroll (numerically by PO) through your POs.
3. When you find the PO you are looking for press the <F10>. The Ordering Commands Help Menu is opened.
Press <F9> or <F10>. The corresponding PO is displayed, and the cursor is flashing in the Command: box.
Looking Up a Purchase Order by Date
1. To enter a command in the Command: box: Press <d> and press <Enter>. To use the Ordering Commands Help Menu:
Hold down <Shift> and press <F1>.
Select 'Search for POs by PO date'. The cursor is flashing in the "Date" field.
2. Type the date of the PO you are looking for (<MM/DD/YY>), and press <Enter>. The first PO (numerically by PO#) from the date closest to the date you entered is displayed. You can now use the board arrows to scroll (by date, and within each date numerically by PO) through your POs.
3. When you find the PO you are looking for press <F10>. The Ordering Commands Help Menu is opened.
Press <F9> or <F10>. The corresponding PO is displayed, and the cursor is flashing in the Command: box.
Opening the Program to Source a Purchase Order
1. Make sure that an existing PO is displayed on the screen and that the cursor is flashing in the Command: box. See ' LOOKING UP EXISTING POS'.
To enter a command, type <eo> and press <Enter>.
To use the Ordering Commands Help Menu, hold down <Shift> and press <F1>.
Select 'Electronic ordering'.
WordStock remembers the method you used the last time you ordered from each Vendor, and defaults to that method. Therefore, the prompt will vary depending upon the last method you used to order from the displayed Vendor. See the directions for the various prompts under the three headings that follow:
IF YOU USED THE PRINT METHOD THE LAST TIME YOU ORDERED FROM THIS VENDOR:
'Print a PO to send via mail or fax' is displayed, and you are asked if you'd like to continue, and 'Y' is entered by default.
1. If you want to print this PO, press <Enter>.
If you want to use another method to source this PO, press <n> and press <Enter>. The PROGRAM TO SOURCE A PURCHASE ORDER is displayed.
See above for instructions to fax the PO.
See above for instructions to transmit the PO to the Vendor electronically.
2. If there is more than one printer in your store, you are asked if you want to use your default printer.If there is only one printer in your store, the PO is printed. Press <n> and press <Enter> to select your main printer. OR, press <n> and press <Enter> to display a list of your printers and select a printer from the list.
The PO is printed.
3. If you are placing your order by mailing or faxing this PO to the Vendor, see page 8–48 for instructions for PUTTING THE POs ON ORDER.
IF YOU USED THE FAX METHOD THE LAST TIME YOU ORDERED FROM THIS VENDOR:
The fax number and Vendor name you used is displayed, you are asked if you'd like to continue, and 'Y' is entered by default.
1. If you want to fax this PO, press <Enter>. The fax is transmitted from your computer to the Vendor's fax machine, and the PO's status is changed to 'SENT'.
If you want to use another method to source this PO, press <n> and press <Enter>. The PROGRAM TO SOURCE A PURCHASE ORDER is displayed.
See page 8–15 for instructions to print the PO.
See page 8–20 for instructions to transmit the PO to the Vendor electronically.
2. See page 8–48 for instructions for PUTTING THE PO(S) ON ORDER.
IF YOU USED THE TRANSMIT METHOD THE LAST TIME YOU ORDERED FROM THIS VENDOR: You are notified of the Vendor to whom the last PO for this Vendor was transmitted, and asked if you'd like to continue. For instance, if the Vendor is Random House, and you sent your last Random House PO to Ingram, that information is displayed.
1. If you want to transmit this PO, press <Enter>.
If you want to use another method to source this PO, press <n> and press <Enter>. The PROGRAM TO SOURCE A PURCHASE ORDER is displayed.
See page 8–15 for instructions to print the PO.
See page 8–17 for instructions to fax the PO.
A series of boxed messages describing the transmission is displayed:
1st Box: Your computer modem dials the Vendor's computer modem. Your computer modem connects to the Vendor's computer modem.
2nd Box: Your computer modem transmits the PO to the Vendor's computer modem.
3rd Box: The Vendor's computer modem transmits a confirmation back to your computer modem. You are prompted to 'Press <Enter> to continue'. See Figure 8–15 below.
2. Press <Enter>.
WordStock translates the confirmation from the Vendor's computer language to WordStock's computer language. When the translation is complete, a printing options screen is displayed enabling you to print a copy of the Vendor's confirmation. See page 8–26 for instructions for printing a Vendor confirmation.
3. See page 8–48 for instructions for PUTTING THE PO(S) ON ORDER.
Reconciling the Purchase Order(s) with the Confirmation
Much of the time, there are discrepancies between the confirmation and the PO (s). The Vendor may not have all the items that you ordered in stock. WordStock offers two options for dealing with these discrepancies: Review and Cascade
The Review process is very simple but requires that you manually compare the PO with the confirmation.
We recommend that you use the Cascade process to save time, and so that all aspects of your ordering process are recorded by WordStock.
The Review Process
If you have a printed copy of the confirmation, you can make manual changes to the PO(s) based on the confirmation (deleting those items which the Vendor has not confirmed as available). You must create another PO for the items that were canceled (not confirmed).
The Cascade Process
If you want to use the WordStock system to automatically create a new PO with the titles which were canceled off the PO you sent, you can use the cascade process to:
Create a PO for an alternate Vendor.
Create a to be ordered list.
1. Use the board arrow method or the hot method to select 'Cascade' from the PROGRAM TO SOURCE A PO menu. The box containing the list of the available Vendors is displayed.
2. Select the Vendor from whom you received the confirmation. You will be asked if you want to continue, and 'Y' is entered by default.
3. If you want to continue, press <Enter>. Otherwise, press <n> and press <Enter> to start over at step 1.
The box containing the list of the available Vendors is displayed again, and you are prompted to 'Select the vendor to cascade to'.
4. Select the Vendor for whom you want the new PO to be created. You will be asked to wait while the confirmation is processed. The PROGRAM TO PROCESS ELECTRONIC ORDER CONFIRMATIONS is displayed. See Figure 8–16 below.
| Please Note The screen is divided into 3 sections: The top section displays information about the most recent confirmation from the Vendor you chose. The middle section is used to enter information about the new PO being created (much like the PO header on the PO screen). The bottom section is used to enter information about any Special Orders that may appear on the new PO. See Chapter 7 (Special Orders) for more information. |
| Please Note The first seven items on the Command Menu correspond to the fields in the middle section of the screen. See Figure 8–16 above. WordStock automatically enters information in each of the fields based on information in other parts of the system. You use the Command Menu to change the information if necessary.
Note: By default, the note field displays that the PO being created originated from a cascade, along with the PO number of the PO that it cascaded from. The 'Specials' menu item refers to the Special Order section of the screen. Please refer to Chapter 7 (Special Orders) for more information. The last two items on the Command Menu represent a choice (See step 6):
|
5. If you want to make changes to any of the default values, use the keyboard arrow method or the hot method to make a selection from the Command Menu. See box below for instructions.
Otherwise: Skip to step 6.
To change the PO#: Select 'PO#' from the Command Menu (to add this order to an existing PO) type the PO number and press <Enter>.
To change the Vendor: Select 'Vendor' from the Command Menu, type the Vendor number, and press <Enter>. The new Vendor information is displayed.
To change the date: Select 'Date' from the Command Menu, type the new date and press <Enter>.
To change the PO type, i.e., from 'PO' (publisher or purchase order) to 'NO' (new title/item order): Select Type from the Command Menu, type the new PO type, and press <Enter>.
To change the blanket discount: Select 'Blanket Disc' from the Command Menu, type the new blanket discount and press <Enter>.
To enter a shipping method: Select 'ShipVia' from the Command Menu, type the new shipping method and press <Enter>.
To change the note: Select 'Note' from the Command Menu, type a new note (up to 40 characters) and press <Enter>.
6. To quit the program and cancel the cascade, use the board arrow method or the hot method to select 'Quit' from the Command Menu.
You are asked whether you want to 'Quit from the program without cascading?' and 'N' is To accept everything you've entered and proceed to cascade: Use the board arrow method or the hot method to select 'Accept' from the Command Menu. You are asked if you want to proceed with the cascade of the PO. Skip to step 9. entered by default
7. If you want to quit without cascading, press <n> and press <Enter>.
'No more processing will take place' is displayed beneath the Command Menu, and you are prompted to 'Press the Enter key to continue'.
If you do not want to quit, press <Enter>.
The current PROGRAM TO PROCESS ELECTRONIC ORDER CONFIRMATIONS remains displayed.
| Hint When the confirmation being cascaded is large, the cascade process can be time consuming. We recommend that you use your computer rather than a terminal for this process since you can switch windows and do something else while it runs. See Chapter 4 The Inventory File for information about WordStock windows. |
8. If you want to proceed with the cascade, press <n>.
WordStock 4 begins the cascade process, continuously displaying the percent complete. You are notified when the process is complete: the PO# of the new PO is displayed, and you are If you do not want to proceed with the cascade, press <n>.
The PROGRAM TO PROCESS ELECTRONIC ORDER CONFIRMATIONS is displayed. See Figure 8–16 above. Start over at step 5. asked whether you would like to 'Print a report of all cascade problems and changes?', and 'Y' is entered by default.
9. If you want to print a report of the cascade: Press <Enter>. Otherwise:
Press <n> and press <Enter>. You are prompted to 'Press <Enter> to continue.' Skip to step 12.
10. If there is more than one printer in your store: You are asked if you want to use your default printer. If there is only one printer in your store: The report is printed and you are asked 'Did the
Press <n> and press <Enter> to select your main printer. OR report print ok?', and 'N' is entered by default. Skip to step 11.
Press <n> and press <Enter> to display a list of your printers, and select a printer from the list. The report is printed and you are asked 'Did the report print ok?', and 'N' is entered by default.
11. If the report printed ok: Press <n> and press <Enter> Otherwise: Press <Enter>. The report is reprinted. Repeat this step until you answer <n>. You are prompted to 'Press <Enter> to continue.'.
12. Press <Enter>. You are prompted to 'Press any to continue'.
13. Press any board. The PROGRAM TO SOURCE A PO is displayed.
14. Press <q> and press <Enter> to quit out of the program and return to the Main Menu. The Main Menu is displayed with the Ordering sub-menu opened.
| Please Note You can look at the two POs (the original and the cascaded): Open the PO screen. Type <old> in the Command: box and press <Enter>. Type the PO number of the original PO and press <Enter>. To view the cascaded PO. repeat the process using the PO number of the newly cascaded PO. |
15. See the following section for instructions for putting the PO(s) 'On Order'.
Putting the Purchase Order(s) 'On Order'
When you put a PO 'On Order', the PO status changes to 'ON ORDER', and the 'On Order' quantity and dollar amount are updated in the Inventory, Vendor, Product, and Section files. Once a PO is put 'On Order' no further changes can be made to it, and it will no longer be possible to fax or transmit it to a Vendor. WordStock provides two ways to access the PROGRAM TO SOURCE A PURCHASE ORDER:
When you want to put multiple POs 'On Order', you can access the PROGRAM TO SOURCE A PURCHASE ORDER from the Main Menu.
When you want to put a single PO 'On Order', you can access the PROGRAM TO SOURCE A PURCHASE ORDER directly from the PO screen.
PUTTING THE PO(S) ON ORDER FROM THE MAIN MENU:
1. Use the board arrow method or the hot method to select 'Ordering'. The Ordering sub-menu is opened, and 'Create or change a PO' is highlighted.
2. Select 'Putting multiple POs on order'. The PROGRAM TO TRANSFER POs ORDERED TO INVENTORY FILE List Box is displayed and you are prompted to Enter a PO number.
3. Type the PO number of each PO that you want to put on order, and press <Enter> after each one. The information about each PO is displayed in the PO List Box under the appropriate field headings.
| Please Note The Command Menu at the bottom of the screen lists 4 choices (See Figure 8–17 below). If you make a mistake at any time up to this point, you can select 'EraseLast #' to erase your last entry, or 'DeleteAny#' to erase any entry. |
4. When you are done, and are certain that all the PO numbers you entered are correct, type <p> or <q> (the commands for Proceed and Quit) and press <Enter>.
You are notified as the POs are put on order. When all the POs you entered are put on order, you are prompted to 'Press <Enter> to return to the menu'.
5. Press <Enter>. The Main Menu is displayed with the Ordering sub-menu opened.
Putting a Purchase Order on Order
from the Command: box of a Displayed Purchase Order
| Please Note Unless you have just created a PO, and it is still displayed on the screen, you will have to access an existing PO. See "LOOKING UP EXISTING POS". |
1. To enter a command: Type <ono> and press <Enter>. To use the Ordering Commands Help: Hold down <Shift> and press <F1>.
Use the board arrows to select 'Put current PO on order'. You are asked 'Do you want to put this PO on order?'.
2. If you are sure you want to put the PO on order:
Press <n> and press <Enter>. After a brief delay, you are notified in the Message: Otherwise:
Press <n> and press <Enter>. 'PO' will not be put on order' is displayed in the Message: box. box that the PO has been put on order. The cursor is flashing in the Command: box OR The Ordering Commands Help Menu is opened.
3. In the Command: box: Press <q> and press <Enter>.
From the Ordering Commands Help Menu, use the board arrow method or the hot method to select 'Quit and return to menu'.
The Main Menu is displayed with the Ordering sub-menu opened.
|
|||||||||||||||||||||||||||