| Getting Started with WordStock |
WordStock's Special Order program is a critical customer service tool because it associates an item with a customer. In addition to facilitating Special Orders, the Special Order program can also be used to:
- Reserve an item that in stock.
- Reserve an item that on order.
- Reserve a yet to be published title.
- Add customer wishes to your database.
- Keep track of books that are on loan to employees.
The Special Order program interacts with the Receiving program so that whenever you receive against a PO, WordStock searches for all ISBNs or SKUs on the PO for which there are outstanding Special Orders, and will print a slip cross-referencing the Special Order.
The Special Order Program is highly flexible; many of its procedures can be customized to your specific needs so that the program is as efficient as possible in your business environment.
If you have questions about how the Special Order Program can be tailored to suit your needs, please call WordStock Support.
In Your Store
You will use the information in this chapter to:
1. Create a Special Order.
2. Become familiar with the Special Order pop-up menus.
3. Look up a Customer record from the Special Order Screen.
4. Create a Customer record from the Special Order screen.
5. Look up existing Special Orders.
6. Add a Special Order to an existing PO.
7. Create a new PO from a Special Order.
Creating a Special Order
| Please Note This section explains the simplest way to create a Special Order: by manually entering information onto the Special Order screen. As you become familiar with WordStock, you will also create Special Orders directly from an Inventory record, or from a CDROM listing. |
There are six steps involved in creating a Special Order:
1. Open the Special Order Screen.
2. Enter information about the item being placed on the Special Order.
3. Enter information about the customer placing the Special Order:
4. Retrieve information from the Customer file.
5. Create a new Customer record. Enter customer information for the Special Order without adding the customer to your database.
6. Enter Vendor information.
(Optional) Enter information about charges and payments.
(Optional) Enter comments about the Special Order.
Opening the Special Order Screen
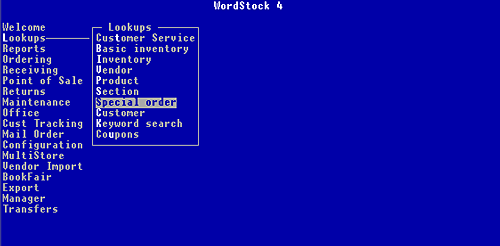
1. Use the keyboard arrow method or the hot key method to select Lookups from the Main Menu. The Lookups sub-menu is opened and Basic Inventory is highlighted.
2. Select Special order. The Special Order screen is displayed, and the cursor is flashing in the Command: box. See Figure 121 below.
![Figure 12-1, Special Order screen [empty]](images/12-1.gif)
Figure 12-1, Special Order screen [empty]
Please Note 1. The top section displays general information about the Special Order. 2. The second section is used to enter information about the item being special ordered. 3. The third section is used to enter customer information. 4. The fourth section is used to enter Vendor information. 5. The fifth section is used to keep track of charges and payments associated with the Special Order. 6. The bottom section is used to enter miscellaneous information about the Special Order. |
3. To enter a command: Type <new> and press <Enter>. To use the Special Order Commands Help Menu, hold down <Shift> and press <F1>.
Use the keyboard arrow method or the hot key method to select Create a new special order.
The fields in the top section of the screen are entered by default:
The next available "Spec#" (Special Order #) is assigned.
NEW is entered in the " Status" field.
SPECIAL is entered in the "Type" field.
OK is entered in the "Flag" field.
STORE is entered in the "Origin" field.
The following fields in the second section of the screen are entered by default:
1 is entered in the "Qord" (quantity ordered) field.
BEST is entered in the "Source" field.
ANY is entered in the "Match" field.
The current date is entered in the "Taken" field. The cursor is flashing in the "ISBN/SKU" field.
See Figure 122 below.

Figure 12-2, default entries for first 2 sections of the Special Order screen
| Please Note See the following section for details about the default entries. |
Special Order Pop-up Menus
There are six fields in the Special Order screen which have pop-up menus that offer a variety of choices for the field value. These choices are set by default based on the values most frequently used by WordStock stores. See the following six sections for information about the pop-up menus that contain the values for these fields.
| Please Note In some cases, it is possible to change the default entry for the pop-up menu fields. Please call WordStock Support for information on custom configuration. |
Special Order Statuses
The "Status" field is automatically updated as the Special Order progresses through the Ordering and Receiving steps.
NEW (the default entry) indicates that the Special Order has just been created.
SOURCED indicates that the Special Order has been put on a PO but has yet to be put On Order.
ON ORDER indicates that the Special Order has been put On Order with the Vendor.
INCOMPLETE indicates that some of the items that you special ordered for the customer have been received.
RECEIVED indicates that the entire Special Order has been received.
CANCELED indicates that the Special Order has been canceled.
FINISHED indicates that the customer has received the Special Order.
Special Order Types
| Please Note The "Type" field is used to indicate whether you are placing a Special Order, or using the program to associate an item with a customer another way. |
SPECIAL (the default entry) indicates a Special Order is being placed with a Vendor.
HOLD indicates that an item in your inventory is to be held aside for a customer.
RESERVE indicates that an item that is already on a PO is to be held for the customer when it arrives.
WISH indicates an item that a customer requested, but that you do not stock.
BORROW indicates that an item from your inventory is on loan (usually to an employee).
S.T.O.P. indicates Single Title Order Plan. S.T.O.P. is used to designate a Special Order for only one title. (See Appendix 7).
Special Order Flags
The "Flag" field is used to record an in store note about whether the Special Order may be put on order.
OK (the default entry) indicates that the Special Order is fine and you can proceed without any special action.
PROBLEM indicates that something is wrong with the Special Order, you should not proceed until the nature of the problem is determined and it is resolved.
REVIEW indicates that the Special Order is fine but needs to be okayed by somebody (the Special Order buyer, store manager, etc.) before you can proceed.
Special Order Origins
The "Origin" field is used to record how the customer placed the Special Order.
STORE (the default entry) indicates that the customer came into the store.
MAIL indicates that the customer placed the order through the mail.
PHONE indicates that the customer placed the order over the phone.
EMAIL indicates that the customer placed the order through email.
FAX indicates that the customer placed the order by fax.
UNKNOWN indicates that you do not know the origin of the Special Order.
Special Orders Sources
Source is used to record how the item(s) should be ordered.
BEST (the default entry) indicates that the item(s) should be ordered from the most reliable or expedient source.
PUBLISHER indicates that the item(s) should be ordered directly from the publisher.
WHOLESALER indicates that the item(s) should be ordered only if available from a wholesaler (i.e. Ingram, Koen, or Baker & Taylor, etc.).
Special Order Matches
Match is used to indicate which PO(s) can be used to fill the Special Order.
ANY (the default entry) indicates that there is no PO associated with the Special Order; it can be filled from the first PO on which it is received.
EXACT indicates that the Special Order is associated with a particular PO; it can only be filled from the PO on which it was ordered.
EXACT/ANY indicates that while there is a PO associated with the Special Order, it can be filled from the first PO on which it is received unless that PO contains other Special Orders of the item.
Changing One or More of the Default Entries
1. Use the keyboard arrows to position the cursor in the field you want to change. A pop-up menu is opened.
2. Hold down <Shift> and <F12> to move down one menu choice. Hold down <Shift> and <F11> to move up one menu choice. Press <Enter> when your selection is highlighted.
3. Use the keyboard arrows to position the cursor in the ISBN/SKU field.
Entering Item Information
1. Type or scan the ISBN or the SKU of the item to be special ordered. If an Inventory record is on file for the item: The items inventory If there is not an Inventory record on file for the item: information is retrieved from the Inventory file and entered in the appropriate The cursor is flashing in the "Title" field. fields.
If the item is in stock or on order, it is indicated in the Message: box. The cursor is flashing in the "Qord" (quantity ordered) field and 1 is entered there. Skip to step 9.
2. Type the title (up to 40 characters) and press <Enter>. The cursor is flashing in the "Pr1" field.
3. Type the price of the item and press <Enter>. The cursor is flashing in the "Author" field.
4. Type the name of the author (designer, artist, etc.) <Last,First> and press <Enter>. The cursor is flashing in the "Prod" field.
| Hint If you do not know the Product code and/or Section number, and you are working at your computer, you can open another window and look up the Product code, and/or Section number. |
5. Type the items Product code and press <Enter>. The cursor is flashing in the "Pr2" field.
6. (Optional) Type a secondary price for the item, or leave this field blank, and press <Enter>. The cursor is flashing in the "Imprt" ( Imprint) field.
7. (Optional) Type the name of the items editorial group or leave this field blank, and press <Enter>. The cursor is flashing in the "Sect" field.
8. Type the Section number for the item and press <Enter>.
| Please Note You have just created an Inventory record for the item with SPECIAL entered in the "Special Comments" field. The cursor is flashing in the "Qord" (quantity ordered) field and 1 is entered there. |
9. To place one of the item on the Special Order, press <Enter>.
To place more than one of the item on the Special Order, type the number being ordered, and then <Enter>. The cursor is flashing in the "TakenBy" field.
10. (Optional) Type the name or initials of the person who took the order (up to 11 characters) or leave this field blank, and then <Enter>.
The cursor is flashing in the "Cu#" ( Customer number) field in the third section (the Customer section) of the screen. The following fields in the Customer section of the screen are entered by default:
PICKUP is entered in the "Dest" (destination) field.
PHONE is entered in the "NfBy" (notify by) field. Steps 10 through 12 provide instructions for changing the default values for the above listed fields.
N (no) is entered in the "Notified" field.
Z (Zip Code) is entered in the "PTyp" ( postal code type) field. See Figure 123 below.

Figure 12-3, default entries for Customer section of the Special Order screen
Entering Customer Information
There are two ways to enter customer information onto a Special Order:
1. You can retrieve customer information from the Customer file or create a new Customer record while entering customer information onto the Special Order.
2. You can enter customer information onto the Special Order without creating a Customer record.
| Please Note Each of the following two sections contains information about one method of entering customer information onto a Special Order. |
Retrieving Customer Information from the Customer File
or Creating a New Customer Record
| Please Note You must have completed steps 1 through 10 to begin this section. |
This section provides instructions for retrieving information from the Customer file when:
- You know the Customer number.
- You do not know the Customer number, but are certain that there is a Customer record on file for the customer.
- You are unsure whether there is a Customer record on file for the customer, and if not, you want to create one.
1. If you do not know the Customer number, type <nc> (the command to search by customer name) and press <Enter>. A Customer File Information box is displayed and the cursor is flashing in the "NAME:" field.
If you know the Customer number, type the Customer number. The corresponding customer information is displayed in the Customer section of the Special Order screen. The cursor is flashing in the "NAME:" field. Skip to step 4.
2. Type the customer's last name.
To search by last name only, press <Enter>. To search by first and last name, ppress <Tab>. The cursor is flashing in the "1ST" field. Type the customer's first name and press <Enter>.
The closest alphabetical match to the name you entered is displayed in the name field(s) and corresponding customer information is displayed in the rest of the fields.
3. If the customer name you are looking for is displayed, press <F8>.
Otherwise, use the keyboard arrows to scroll alphabetically through your customer records. If you do not find the customer you are looking for: Skip to step 5. If you find the customer you are looking for, <F8> to add the displayed information to the Special Order.
The Special Order screen is displayed with the customers information inserted in the appropriate fields. The cursor is flashing in the "Name" field. See Figure 124 below.

Figure 12-4, sample completed Customer section of the Special Order screen
4. If you want to make changes to the displayed Customer record, use the keyboard arrows to position the cursor in the field(s) you want to change. Make your change(s). When you are done making changes, press <F10>. The Special Order screen is displayed with the customer information entered in the appropriate fields. Skip to step 10.
Otherwise, skip to step 9.
5. If you did not find the customer you are looking for, press <F9>.
Create a new customer? (Y or N) is displayed in the Message: box.
6. To create the Special Order without adding the customer to the database:
Press <n>. The cursor is flashing in the "Name" field on the To create a new Customer record:
Press <y>. Assign number for cust record? (Y or N) is displayed in the Message: box. Special Order screen. Skip to CREATING A SPECIAL ORDER WITHOUT CREATING A CUSTOMER RECORD.
7. To assign your own Customer number, press <y>. The cursor is flashing in the "Cust#" field. Type the customer number and press <Enter>.
To have the Customer number assigned by the system, press <n>. A new Customer record is displayed with the cursor flashing in the "Name" field.
8. Follow the instructions in Chapter 11 for creating a new Customer record.
The cursor is flashing in the 1st field in the INTERESTS box.
9. Press <F10> to save the Customer record. The cursor is flashing in the "NAME" field on the Special Order screen.
| Please Note Steps 1012 are optional, and should be completed ONLY if you want to change the default values for these fields. |
10. (Optional) Use the keyboard arrows to position the cursor in the "Dest" field. The Destinations pop-up menu is opened (or hold down the Shift key and <F1> to open it), and the default value PICKUP is highlighted.
11. Select SHIP if the customer wants you to ship the Special Order: press <Enter>. SHIP is displayed in the Dest field. The Notify Methods pop-up menu is opened (or hold down the Shift key and <F1> to open it), and the default value PHONE is highlighted. Hold down <Shift> and <F11> to move up one menu choice.
12. (Optional) Select a method by which to notify the customer if not by phone.
Hold down <Shift> and <F12> to move down one menu choice. Hold down <Shift> and <F11> to move up one menu choice.
Press <Enter> when your selection is highlighted. Your selection is displayed in the "NfBy" (Notify By) field. You have completed the Customer section of the screen and the system is ready to accept Vendor information.
If the item being ordered is not in your Inventory file, the cursor is flashing in the "#" (Vendor number) field.
Skip to Entering Vendor Information.
If the item being ordered is in your Inventory file, the Vendor information has been automatically entered. Press <F10>.
Skip to Entering Payment Information (OPTIONAL).
Creating a Special Order
Without Creating a Customer Record
| Please Note You must have completed steps 1 through 10 to begin this section. |
1. If the cursor is flashing in the "Name" field, type the customers last name and press <Enter>. The cursor is flashing in the "1st" field.
Otherwise: Use the keyboard arrows to position the cursor in the "Name" field.
2. Type the customer's first name and press <Enter>. The cursor is flashing in the "Init" field.
3. (Optional) Type the customers middle initial, or leave this field blank, and press <Enter>. The cursor is flashing in the first "Addr" field.
4. Type the first line of the customers street address (number and street) and press <Enter>. The cursor is flashing in the second "Addr" field.
5. (Optional) Type the 2 nd line of the customers street address (apartment number, PO box, etc.) or leave this field blank. Press <Enter>. The cursor is flashing in the City field.
6. Type the city name and press <Enter>. The cursor is flashing in the State field.
7. If the customer is from the USA, type the 2 letter state abbreviation and press <Enter>.
Otherwise, a "PC Types" (postal codes types) pop-up menu is opened (or hold down the <Shift> and <F1> to open it), and the default value ZIP CODE is highlighted. press <Enter>.
8. Select a postal code type: hold down <Shift> and <F12> to move down one menu choice; old down <Shift> and <F11> to move up one menu choice. Press <Enter> when your selection is highlighted.
Your selection is displayed in the "Ptyp" field. The cursor is flashing in the "PCode" (postal code) field.
9. Type the customer's Zip Code (standard, or Zip+4) and press <Enter>. WordStock will not accept invalid Zip Codes: if you do not know the Zip Code, leave this field blank and press <Enter>.
Type the customers postal code and press <Enter>.
The cursor is flashing in the Country field.
10. Type the name of the customers country and <Enter>. The cursor is flashing in the "Ph#1" tag field.
| Please Note Steps 11 through 16 are optional. If you do not want to include any phone numbers for this customer, use the keyboard arrows to position the cursor in the "Regn" (region) field. Skip to step 17. |
11. Type a label, such as 'home', 'work', 'fax', etc., for the Ph#1 field (up to 4 characters) and press <Enter>. The cursor is flashing in the "Ph1" field.
12. Type the phone number for the Ph#1 field (with or without area code) and press <Enter>. The cursor is flashing in the "Ph2" tag field.
13. Type a label (home, work, fax, etc.) for the Ph#2 field (up to 4 characters) and press <Enter>. The cursor is flashing in the "Ph2" field.
14. Type the phone number for the "Ph#2" field (with or without area code) and press <Enter>. The cursor is flashing in the "Ph3" tag field.
15. (Optional) Type a label (home, work, fax, etc.) for the "Ph#3" field (up to 4 characters) and then <Enter>. The cursor is flashing in the "Ph3" field.
16. (Optional) Type the phone number for the "Ph#3" field (with or without area code) and press <Enter>. The cursor is flashing in the "Regn" (region) field.
17. If the customer is from the USA, leave this field blank and press <Enter>.
If the customer is not from the USA, type the name of the customer's state, province or region and press <Enter>.
The cursor is flashing in the "AltAd" (alternate address) field.
18. (Optional) Type an alternate address for the customer (email, work address, etc.) and press <Enter> key.
The Destinations pop-up menu is opened (or hold down the <Shift> key and <F1> to open it), and the default value PICKUP is highlighted.
| Please Note The fields represented in steps 19 and 20 are optional, and should be completed ONLY if you want to change the default values for these fields. |
19. (Optional) Select SHIP if the customer wants you to ship the Special Order: press <Enter> SHIP is displayed in the Dest field.
Hold down <Shift> and <F11> to move up one menu choice.
The Notify Methods pop-up menu is displayed (or hold down <Shift> and <1> to open it), and the default value PHONE is highlighted.
20. (Optional) Select a method by which to notify the customer when the order arrives; press <Enter> when your selection is highlighted Your selection is displayed in the "Nfby" (notify by) field. You have completed the Customer section of the screen and the system is ready to accept Vendor information.:
Hold down the <Shift> key and <F12> to move down one menu choice.
Hold down the <Shift> and <F11> to move up one menu choice.
If the item being ordered is not in your Inventory file, the cursor is flashing in the "#" field in the Vendor section of the screen.
Skip to Entering Vendor Information, below.
If the item being ordered is in your Inventory file, the Vendor information has been automatically entered.
To modify the displayed Vendor information: hold down the <Shift> and <F2 key. A Full Vendor Information box is superimposed on the Special Order screen. See Figure 125 below.
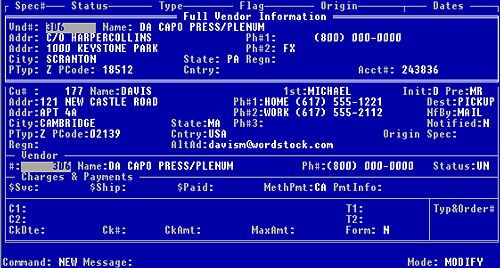
Figure 12-5, Special Order screen with overlaid Vendor information box
Use the keyboard arrows to position the cursor in the fields you want to change.
When you are done making changes, press <F10> . The cursor is flashing in the "#" field in the Vendor section of the Special Order screen.
Skip to Entering Payment Information (optional)
Entering Vendor Information
1. Type the Vendor # and press <Enter>. If there is not a record on file for the Vendor:
A Full Vendor Information box is superimposed on the Special Order screen. The cursor is flashing in the "Vnd#" (Vendor #) field and the Vendor number you entered in step 1 is displayed there. See Figure 125 above.
If there is a record on file for the Vendor: The Vendor name, address, and telephone number(s) are retrieved from the Vendor file: The cursor is flashing in the "Name" field.
Use the keyboard arrows to position the cursor in the "St" field. Skip to step 18.
2. To accept the Vendor number: To change the Vendor number: press <Enter>. Type the Vendor number and then <Enter>. The cursor is flashing in the "Name" field.
3. Type the Vendors name and press <Enter>. The cursor is flashing in the 1 st "Addr" field
4. Type the Vendors street address and then <Enter>. The cursor is flashing in the 2 nd "Addr" field.
5. (Optional) Type the Vendors secondary address information (Suite number, Box number, etc.) and press the <Enter>. The cursor is flashing in the "City" field.
6. Type the city name and press <Enter>. The cursor is flashing in the "State" field.
7. If the Vendor is located in the USA: Type the 2 letter abbreviation of the Vendors state and then press <Enter>. If the Vendor is not located in the USA: Leave this field blank and press <Enter>. The cursor is flashing in the "Regn" field.
8. Leave this field blank or use it to store other information, and press <Enter>. Type the name of the Vendors state, province or region and press <Enter>. The PC Types pop-up menu is opened (or hold down the shift key and <F1> to open it), and the default value ZIP is highlighted.
9. Select a postal code type:
Hold down <Shift> and <F12> to move down one menu choice.
Hold down <Shift> and <F11> to move up one menu choice.
press <Enter> when your selection is highlighted. Your selection is displayed in the "Ptyp" field. The cursor is flashing in the "PCode" (postal code) field.
10. Type the Vendors postal code and press <Enter> key. The cursor is flashing in the Country field.
11. Type the country in which the Vendor is located, and then <Enter>. The cursor is flashing in the "Ph#1" tag field.
12. Type the tag for the 1 st phone field (home, work, etc.up to 4 characters) and press <Enter>. The cursor is flashing in the "Ph#1" field.
13. Type the phone number for the 1 st phone field (with or without area code) and press <Enter>. The cursor is flashing in the "Ph#2" tag field.
| Important If you know the Vendor's fax number, we recommend that you tag the 2nd phone field FAX and enter the fax number, so that WordStock can access it for ordering. |
14. Type the tag for the 2nd phone field (fax, car, etc. up to 4 characters) and press <Enter>. The cursor is flashing in the "Ph#2" field.
15. Type the phone number for the 2 nd phone field (with or without area code) and press <Enter>. The cursor is still flashing in the "Ph#2" tag field. You have just created a new Vendor record.
16. press <F10> to save the Vendor information. The Special Order Commands Help Menu is displayed. See Figure 126 below.
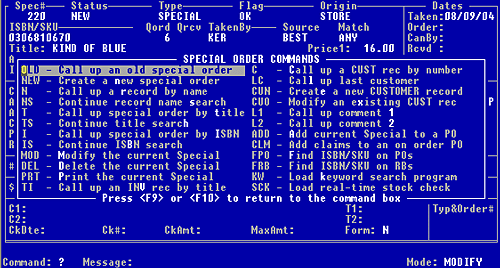
Figure 12-6, Command Help menu for Special Order program
OR
The cursor is flashing in the "#" field in the Vendor section of the Special Order screen, and the Vendor information is entered in the appropriate fields. See Figure 127 below. Skip to step 18.
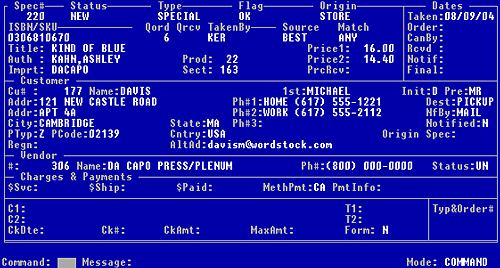
Figure 12-7, Special Order screen with Vendor information
17. Select Modify the current Special from the Special Order Commands Help Menu. The cursor is flashing in the ISBN/SKU field.
18. (Optional) If you know the items status at the Vendor (i.e. if the book is not yet published), use the keyboard arrows to move the cursor to the "Status" field.
The Vendor Order Statuses pop-up menu is opened (or hold down <Shift> and <F1> to open it) and the default value UNKNOWN is highlighted.
19. Select a status for the item: Hold down <Shift> and <F12> to move down one menu choice.Hold down <Shift> and <F11> to move up one menu choice.
press <Enter> when your selection is highlighted. Your selection is displayed in the "Status" field. You have completed the Vendor section of the screen and the system is now ready to accept information regarding deposits and charges. The cursor is flashing in the "$Svc" field.
Entering Payment Information (Optional)
| Please Note Payment information on the Special Order screen is for your reference only, it is not used by your WordStock system. |
If you do not want to enter payment information, Use the keyboard arrows to position the cursor in the "C1" field, and skip to Entering Commands and Miscellaneous Information (OPTIONAL).
1. If there is a service charge, type the service charge amount and press <Enter>. Otherwise, press <Enter>. The cursor is flashing in the "$Ship" field.
2. If the customer is to be charged for shipping, type the shipping charge amount and press <Enter>. Otherwise: press <Enter>. The cursor is flashing in the "$Paid" field.
3. If the customer has made a deposit, type the deposit amount and press <Enter>. Otherwise: press <Enter>.
The Payment Methods pop-up menu is opened (or hold down <Shift> and <F1> to open it) and the default value CASH is highlighted.
4. (Optional) Select a payment method: Hold down <Shift> and <F12> to move down one menu choice. Hold down <Shift> and <F11> to move up one menu choice.
Press <Enter> when your selection is highlighted. Your selection is displayed in the "MethPmt" field and the cursor is flashing in the "PmtInfo" field.
5. (Optional) Type any information about the payment method (tax exempt number, etc.) or leave this field blank, and press <Enter>.
You have completed the Charges and Payments section of the screen and the system is ready to accept comments and miscellaneous information about the Special Order. The cursor is flashing in the "C1" field.
Entering Comments and Miscellaneous Information (Optional)
| Please Note The Comments section of the Special Order screen displays two fields for comments ("C1" and "C2") and two fields for miscellaneous information ("T1" and "T2"). There are 2 additional comments fields and 2 additional miscellaneous fields that are not visible on the screen. |
To access these fields, hold down <Shift> and press <F3>. A Full Comment Information box will be superimposed on the Special Order screen. Use the keyboard arrows to position the cursor in the field(s) into which you want to enter information. press <F10> to save your additional comments and notes.
1. (Optional) With the cursor flashing in the "C1" field of a displayed Special Order, type a comment about the Special Order (up to 50 characters) or leave this field blank and press <Enter>. The cursor is flashing in the "T1" field. The "T1" field is a free field; you can use it for anything you want (date book expected, if the item is to be gift wrapped, etc.).
2. Type any useful note about this Special Order (up to 10 characters) or leave this field blank, and then <Enter>. The cursor is flashing in the "C2" field.
3. (Optional) Type a secondary comment about the Special Order (up to 50 characters) or leave this field blank and then <Enter>. The cursor is flashing in the "T2" field. The "T2" field is a free field; you can use it for anything you want (date book expected, if the item is to be gift wrapped, etc.).
4. Type any useful note about this Special Order (up to 10 characters) or leave this field blank, and then <Enter>.
The Order Types pop-up menu is opened (or hold down <Shift> and <F1> to open it).
| Please Note The "Type&Order#" fields are used to store information about associated Mail Orders or POs. |
If the Special Order is generated by a Mail Order which is processed through WordStock, these fields are automatically entered by WordStock. We do not recommend that you enter information into these fields.
5. press <F10> to save the Special Order. The Special Order Commands Help Menu is displayed. See Figure 128 below.
OR The cursor is flashing in the Command: box on the Special Order screen. See Figure 129 below.
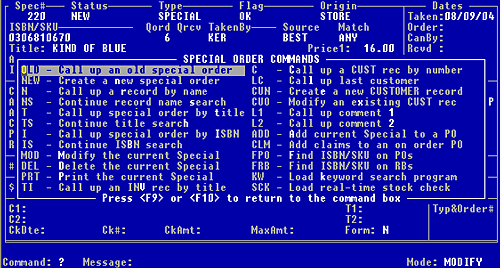
Figure 12-8, Command Help menu for Special Order program
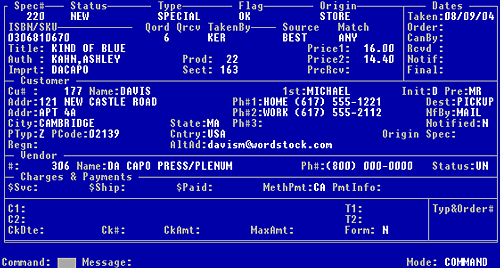
Figure 12-9, sample completed special order
Adding Special Orders to Purchase Orders
WordStock provides two ways to add Special Orders to PO(s):
You can add Special Orders to POs from the Main Menu. This is useful when you want to add more than one Special Order to one or more PO(s) at a time.
You can add a Special Order to a PO directly from the Special Order screen. This is done when you want to add a single Special Order to a single PO.
Unless you have just created a Special Order, and it is still displayed on the screen, you will have to access an existing Special Order. There are four ways to access an existing Special Order:
- By Special Order number.
- By customer name.
- By title (or item description).
- By ISBN or SKU.
Looking Up Existing Special Orders
1. Use the keyboard arrow method or the hot key method to select Lookups from the Main Menu. The Lookups sub-menu is opened.
2. Select Special order. A blank Special Order screen is displayed and the cursor is flashing in the Command: box.
Looking Up a Special Order by Special Order Number
1. To look up a Special Order by entering a command in the Command: box, type <old> and press <Enter>. A blank Special Order screen is displayed and the cursor is flashing in the "Spec#" field. Type the number of the Special Order you are looking for and press <Enter>. The corresponding Special Order is displayed, and the cursor is flashing in the Command: box.
OR to use the Special Order Commands Help Menu to look up a Special Order, hold down <Shift> and <F1>. Select Call up an old special order. A blank Special Order screen is displayed and the cursor is flashing in the "Spec#" field. Type the number of the Special Order you are looking for and press <Enter>.The corresponding Special Order is displayed, and the cursor is flashing in the Command: box. The Special Order Commands Help Menu is opened. Press <F9> or <F10>.The corresponding Special Order is displayed, and the cursor is flashing in the Command: box.
Looking Up a Special Order by Customer Name
1. To look up a Special Order by entering a command in the Command: box, type <n> and press <Enter>. A blank Special Order screen is displayed and the cursor is flashing in the "Name" field in the Customer section of the screen.
OR to use the Special Order Commands Help Menu to look up a Special Order, hold down <Shift> and <F1>. Select Call up a record by name. A blank Special Order screen is displayed and the cursor is flashing in the "Name" field in the Customer section of the screen.
2. Type the customers last name and press <Enter> key. The Special Order for the closest alphabetical match to the customer you entered is displayed, and the cursor is flashing in the "Name" field. You can now use the keyboard arrows to scroll (alphabetically by customer) through your Special Orders.
3. When you find the Special Order you are looking for, press <F10>. The cursor is flashing in the Command: box.
Looking Up a Special Order by Title (or Item Description)
1. To look up a Special Order by entering a command in the Command: box, press <t> and press <Enter>. A blank Special Order screen is displayed and the cursor is flashing in the "Title" field.
OR To use the Special Order Commands Help Menum hold down <Shift> and <F1>. Select Call up a special order by title. A blank Special Order screen is displayed and the cursor is flashing in the "Title" field.
2. Type the title (or description) of the item that appears on the Special Order you are looking for, and press <Enter>. The Special Order for the closest alphabetical match to the title you entered is displayed, and the cursor is flashing in the "Title" field. You can now use the keyboard arrows to scroll (alphabetically by title) through your Special Orders.
3. When you find the Special Order you are looking for, press <F10>. The cursor is flashing in the Command: box.
Looking Up a Special Order by ISBN or SKU
1. To look up a Special Order by entering a command in the Command: box, type <i> and press <Enter>. A blank Special Order screen is displayed and the cursor is flashing in the "ISBN/SKU" field.
OR To use the Special Order Commands Help Menu, hold down <Shift> and <F1>. The Special Order Commands Help Menu is opened. Press <F9> or <F10>. Select Call up special order by ISBN. A blank Special Order screen is displayed and the cursor is flashing in the "ISBN/SKU" field.
2. Type the ISBN or SKU of the item that appears on the Special Order you are looking for, and press <Enter>.
The most recent corresponding Special Order is displayed, and the cursor is flashing in the ISBN/SKU field. You can now use the keyboard arrows to scroll (chronologically) through your Special Orders.
Adding A Special Order To A PO
There are two ways to put a Special Order on a PO:
1. Sort out a group of Special Orders and add them all to a PO at once.
2. Manually add one Special Order at a time to a PO.
Putting a single Special Order on a PO
| Please Note Unless you have just created a Special Order, and it is still displayed on the screen, you will have to access an existing Special Order. See Looking up Existing Special Orders. |
There are three ways to order a single Special Order:
1. You can add the Special Order to an existing PO (PO status must be NEW).
2. You can create a new PO.
3. You can create a Reserve Special Order: make a claim on an existing PO on which the item on the Special Order appears. (Special Order match cannot be EXACT.)
Putting the Special Order on a Purchase Order
1. To enter a command in the Command: box, type <add> and press <Enter>.
To use the Special Order Commands Help Menu, hold down <Shift> and <F1>. Select Add displayed title to.
You are prompted to Enter the PO# to add special to:
2. To add the Special Order To create a new PO for the Special Order: to an existing PO, type the PO# to which you want to add the Special Order. Special added to PO is displayed in the Message: box. The cursor is flashing in the Command: box. Skip to step 7.
To have the system assign a PO#:
Type <new> and press <Enter> key. are prompted to Enter the type for the new
To assign your own PO#, type <apo> and then <Enter> key. You are prompted to Enter the new PO# to assign. PO. Skip to step 4.
3. Type the number that you want to assign to the PO (up to 8 digits) and press <Enter>. You are prompted to Enter the type for the new PO.
4. Type the PO type (see Chapter 8 Ordering) and press <Enter>. You are prompted to Enter a costing method for the new PO:
5. Type <de> for discount entry, or <ce> for cost entry (see Chapter 8 Ordering for more information) and press <Enter>. You are prompted to Enter the discount for the new PO.
6. Type the discount percentage (4 digits to accommodate a decimal point) and press <Enter>. Special added to PO (the PO#) is displayed in the Message: box. The Special Orders "Status" field has been updated to SOURCED. The PO type is entered in the "Type" field. The PO number is entered in the "Order" field. The cursor is flashing in the Command: box.
7. Press <q> and press <Enter>. The Main Menu is displayed with the Lookups sub-menu opened.
Creating a Reserve Special Order
You create a Reserve Special Order when the item on the Special Order is already on a PO, and you want to reserve it when it arrives.
1. In the Command: box: Type <clm>. From the Command Help Menu: Select Add claims to an on order PO. You are prompted to Enter the PO# to add the claims to:.
2. Type the number of the PO from which you are reserving the Special Order item(s), and press <Enter>. Special added to PO (the PO#) is displayed in the Message: box.
The Special Orders "Status" field has been updated to ON ORDER.
The POtype is entered in the "Typ" (PO type) field. The PO number is entered in the "Order" field. The cursor is flashing in the Command: box.
3. Press <q>. The Main Menu is displayed with the Lookups sub-menu opened.
Putting Multiple Special Orders on Order
1. Use the keyboard arrow method or the hot key method to select Reports from the Main Menu. The Reports sub-menu is opened. Sort a data file is highlighted. Press <Enter>.
2. The PROGRAM TO SORT A DATA FILE is displayed, and a Data Files list menu is opened.
3. Select Special Order. The program to SORT THE SPECIAL ORDER FILE is displayed and an Include Specifications box is opened.
4. Use the keyboard arrows to select stat_new_ok (to tell WordStock to sort out all the Special Orders that have a status of NEW and a flag of OK ) and press <Enter>. An Order Specifications box is opened.
5. Use the keyboard arrow method to select vendor (to tell WordStock to present the sorted information in numerical order by Vendor number).
You are prompted to Enter a name for this sort output.
6. Type <spec_new_vendor> (to indicate that you are sorting all the Special Orders with a status of new arranged in numerical order by Vendor number). Press <Enter>.
If you have used this name in the past: You are informed that the name you entered already exists, and asked if you want to recreate it.
If you have not used this name in the past, press <y> and <Enter>.
A series of messages about the sort is displayed. When the sort is done, you are prompted to press <ENTER> to return to the menu.
7. press <Enter>. The Main Menu is displayed with the Reports sub-menu opened.
8. Use the keyboard arrows or the hot key method to select Ordering from the Main Menu. The Ordering sub-menu is opened. Create or change a PO is highlighted.
9. Use the keyboard arrows or the hot key method to select Make PO from special orders from the Ordering sub-menu. If you have more than one sort of your Special
Otherwise: Order file in the System: A Special Order sort files menu box is displayed.
Select "spec_new_vendor".
The program TO CREATE PURCHASE ORDERS FROM SPECIAL ORDER FILE SORTED OUTPUT is opened. See Figure 1210 below.
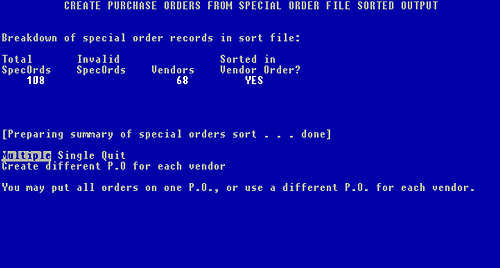
Figure 12-10, Program to create Special Orders from sorted Special Order file output
Information about the Special Orders in your sort is displayed in the fields beneath the words Breakdown of special order records in sort file.
Total SpecOrds = the total number of Special Orders that were sorted out.
Invalid SpecOrds = the total number of invalid (wrong status or wrong flag) Special Orders in the sort.
WordStock will not put Invalid Special Orders on a PO. If there are any Invalid Special Orders in your sort, you will need to print a log of actions performed by the program when prompted to do so.
Vendors Indicates the total number of Vendors in the sort.
Sorted in Vendor Order Indicates whether the Special orders are sorted numerically by Vendor.
The Command Menu displayed beneath the words [Preparing summary of special orders sort. . done] offers three choices:
Multiple allows you to create a different PO for each Vendor.
Single allows you to put all the Special Orders in the sort onto a single PO.
Quit allows you to exit the program.
Putting all the Special Orders from the Sort
onto One Purchase Order
If all the Special Orders in the sort are for the same Vendor, or if you want to order all the Special Orders from the same wholesaler, you will put them all on a single PO. Otherwise, follow the directions under TO PUT THE SPECIAL ORDERS FROM THE SORT ONTO SEPARATE POS ACCORDING TO VENDOR.
1. Select Single from the Command Menu. "Special Order Information" is displayed on the CREATE PURCHASE ORDERS FROM SPECIAL ORDER FILE SORTED OUTPUT screen.
The Vendor information from the first Special Order in the sort entered in the "Vendor #" and "Vendor Name" fields.
The total number of Special Orders in the sort is displayed in the "SpecOrds To Add" field.
The total number of items on the Special Orders in the sort is entered in the "Total Units" field.
The total number of Special Orders for the displayed Vendor that cannot be added to a PO (wrong status and/or wrong flag) is entered in the "Invalid SpecOrd" field.
The order of the displayed Vendor in the sort is displayed in the "Vendor Counter" field. See Figure 1211 below.
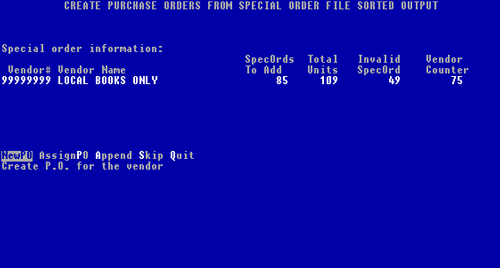
Figure 12-11, Special Order information
The Command Menu offers five choices:
NewPO allows you to create a new PO using the next available PO number in the system.
AssignPO allows you to create a new POand assign your own PO number.
Append allows you to add the sorted Special Orders to an existing PO.
Skip allows you to skip the displayed Vendor. (only used when placing the Special Orders on multiple POs).
Quit allows you to quit out of the program and return to the Main Menu.
2. Use the keyboard arrows or the hot key method to make a selection from the Command Menu.
IF YOU SELECT NEW PO:
The next available PO# is displayed in the "P.O. #" field and the Vendor information from the first Special Order in your sort is displayed beneath "Purchase Order Information". You are asked whether you want to Use this vendor. See Figure 1212 below.
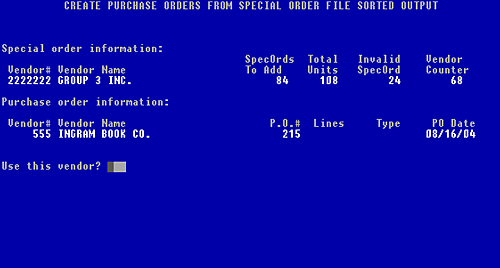
Figure 12-12, Purchase Order information
1. If you want to use the displayed Vendor, press <y> and <Enter>. You are prompted to Select the PO type for this Vendor (see Chapter 8 Ordering for details).
If you do not want to use the displayed Vendor, press <n> and <Enter>. You are prompted to Enter a Vendor number. Type the number of the Vendor you want to use and <Enter> key. You are asked whether you want to Use this vendor? Repeat step 1.
2. Use the keyboard arrow method to select a PO type. You are prompted for the costing method for the PO and DE is entered by default. See Chapter 8 Ordering for details.
3. If you are ordering items at cost, type <ce> for cost entry, and press <Enter>.
If you are ordering items at a discount off of the list price, press <Enter>. You are prompted for the expected discount for the PO.
4. If the costing method is CE (cost entry), press <Enter>.
If the costing method is DE (discount entry), type a discount percent (4 digits to accommodate a decimal point) and press <Enter>.
After a brief delay, you are notified that WordStock is Done creating purchase orders from special orders. You are asked if you want to Print a log of actions performed by this program.
| Important If there are invalid Special Orders in your sort, you will need a printed list of all the Special Orders in the sort in order to determine the invalid Special Orders [those which do not have a status of new and/or a flag of OK], so that you can make sure they get put on a PO. |
5. If you want a printed list of all the Special Orders in the sort, and the PO onto which they were put, press <y> and press <Enter>. Otherwise, press <n> and press <Enter>. The Main Menu is displayed with the Ordering sub-menu opened.
6. If there is more than one printer in your store, a list of your printers is displayed and you are asked To which printer should the output be sent? Select a printer from the list. The log of actions is printed and the Main Menu is displayed with the Ordering sub-menu opened.
If there is only one printer in your store, the log of actions is printed, and then the Main Menu is displayed with the Ordering sub-menu opened.
IF YOU SELECT ASSIGN PO: You are prompted to Enter PO# to assign.
1. Type the PO number you want to assign (up to eight digits) and press <Enter>.
The PO number is displayed in the "P.O. #" field and the Vendor information from the first Special Order in your sort is displayed beneath "Purchase Order Information". You are asked whether you want to Use this vendor. See Figure 1213 below.
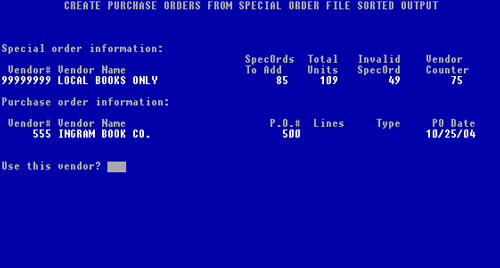
Figure 12-13, Purchase Order information
2. If you want to use the displayed Vendor. press <y> and <Enter>.
If you do not want to use the displayed Vendor, press <n> and <Enter>. You are prompted to Enter a Vendor number for the PO. Type the number of the Vendor you want to use and <Enter>. You are asked whether you want to Use this vendor?. Start over at step 1.
You are prompted to Select the PO type for this Vendor (see Chapter 8 Ordering for details).
3. Select a PO type. You are prompted for the costing method for the PO, and DE is entered by default. See Chapter 8 Ordering for details.
4. If you are ordering items at cost, type <ce> for cost entry, and press <Enter>.
If you are ordering items at a discount off of the list price, press <Enter>.
You are prompted for the expected discount for the PO.
5. If the costing method is CE (cost entry) press <Enter>.
If the costing method is DE (discount entry), type a discount percent (4 digits to accommodate a decimal point) and press <Enter>.
After a brief delay, you are notified that WordStock is Done creating purchase orders from special orders. You are asked whether you would like to Print a log of actions performed by this program.
| Important If there are invalid Special Orders in your sort, you will need a printed list of all the Special Orders in the sort in order to determine the invalid Special Orders (those which do not have a status of new and/or a flag of OK), so that you can make sure they get put on a PO. |
6. If you want a printed list of all the Special Orders in the sort, and the PO on which they were put, press <y> and press <Enter>.
Otherwise, press <n> and press the <Enter>.
The Main Menu is displayed with the Ordering sub-menu opened.
7. If there is more than one printer in your store, a list of your printers is displayed and you are asked To which printer should the output be sent? Select a printer from the list. The log of actions is printed and the Main Menu is displayed with the Ordering sub-menu opened
If there is only one printer in your store, the log of actions is printed, and then the Main Menu is displayed with the Ordering sub-menu opened.
IF YOU SELECT APPEND, you are prompted to Enter PO# to append to.
1. Type the number of the PO to which you want to add the Special Orders, and <Enter>.
The PO number is displayed in the "P.O. #" field and the Vendor information from the PO you entered is displayed beneath "Purchase Order Information". You are asked whether you want to Use this PO. See Figure 1214 below.
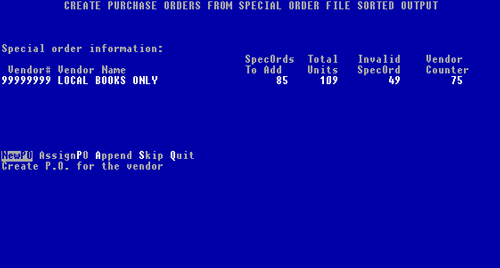
Figure 12-14, Special Order information
2. If you want to use this PO, press <y> and <Enter>. You are notified that WordStock is appending the Special Orders from your sort onto the PO number you selected. After a brief delay, you are notified that WordStock is Done creating POs from Special Orders. You are asked whether you would like to Print a log of actions performed by this program.
If you do not want to use this PO, press <n> and <Enter>. You are prompted to Enter a PO# to append to.
Start over at step 1.
| Important If there are invalid Special Orders in your sort, you will need a printed list of all the Special Orders in the sort in order to determine the invalid Special Orders (those which do not have a status of new and/or a flag of OK), so that you can make sure they get put on a PO. |
3. If you want a printed list of all the Special Orders in the sort, and the PO on which they were put, press <y> and press <Enter>. Otherwise, press <n> and press <Enter>. The Main Menu is displayed with the Ordering sub-menu opened.
4. If there is more than one printer in your store, a list of your printers is displayed and you are asked To which printer should the output be sent? Select a printer from the list. The log is printed and the Main Menu is displayed with the Ordering sub-menu opened.
If there is only one printer in your store, the log is printed, and then the Main Menu is displayed with the Ordering sub-menu opened.
Putting the Special Orders from the Sort onto Separate Purchase Orders, according to Vendor
Because you sorted your Special Orders by Vendor, the Sort Outcome is displayed in numerical order by Vendor number, and you can place the Special Orders on separate POs according to Vendor. For example, all Special Orders for which the Vendor of record is Random House can be placed on a PO to Random House.
1. Select Multiple from the Command Menu. "Special Order Information" is displayed on the CREATE PURCHASE ORDERS FROM SPECIAL ORDER FILE SORTED OUTPUT screen.
The Vendor information from the first Special Order in your sort is entered in the "Vendor#" and "Vendor Name" fields.
The total number of Special Orders in the sort is displayed in the "SpecOrds To Add" field.
The total number of items on the Special Orders in the sort is entered in the "Total Units" field.
The total number of invalid Special Orders (wrong status and/or wrong flag) for the displayed Vendor is entered in the "Invalid SpecOrd" field.
| Please Note WordStock will not put Invalid Special Orders on a PO. If there are any Invalid Special Orders in your sort, you will need to print a log of actions performed by the program (see AT THE END OF THE SORT). |
The order of the displayed Vendor in the sort is displayed in the "Vendor Counter" field. See Figure 1215 below.
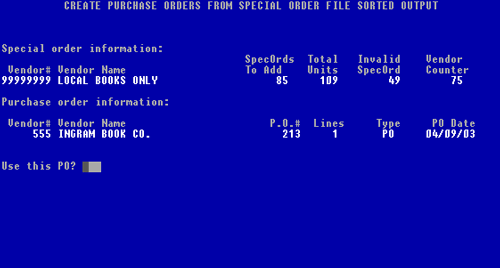
Figure 12-15, Purchase Order information
The Command Menu offers five choices:
NewPO allows you to create a new PO using the next available PO number in the system.
AssignPO allows you to create a new PO and assign your own PO number.
Append allows you to add the sorted Special Orders to an existing PO.
Skip allows you to skip the displayed Vendor.
Quit allows you to quit out of the program and return to the Main Menu.
2. Use the keyboard arrows or the hot key method to make a selection from the Command Menu.
IF YOU SELECT NEW PO, the next available PO# is displayed in the "P.O. #" field and the Vendor information from the Special Order is displayed beneath "Purchase Order Information". You are asked if you want to Use this vendor?.
1. If you want to use the displayed Vendor, press <y> and <Enter>. You are prompted to Select the PO type for this Vendor (see Chapter 8 Ordering for details).
If you do not want to use the displayed Vendor, press <n> and <Enter>. You are prompted to Enter a Vendor number for the PO. Type the Vendor number of the Vendor you want to use and <Enter>. You are asked whether you want to Use this vendor? Repeat step 1.
2. Use the keyboard arrow method to select a PO type. You are prompted for the costing method for the PO, and DE is entered by default. See Chapter 8 Ordering for details.
3. If you are ordering items at cost, type <ce> for cost entry, and press <Enter>.
If you are ordering items at a discount off of the list price, press <Enter>. You are prompted for the expected discount for the PO.
4. If the costing method is CE (cost entry), press <Enter>.
If the costing method is DE (discount entry), type a discount percent (4 digits to accommodate a decimal point) and then <Enter>.
After a brief delay, you are notified that WordStock is creating the PO. When a PO has been created for the Special Orders for the displayed Vendor: The next Vendor in the sort is displayed.
Start over at step 1.
OR
If you have reached the end of the sort, you are notified that WordStock is Done creating purchase orders from special orders. See AT THE END OF THE SORT below.
IF YOU SELECT ASSIGN PO, you are prompted to Enter PO# to assign.
1. Type the PO number you want to assign (up to eight digits) and press <Enter>.
The PO number is displayed in the "P.O. #" field and the Vendor information from the first Special Order in the sort is displayed beneath "Purchase Order Information". You are asked whether you want to Use this vendor. See Figure 1216 below.
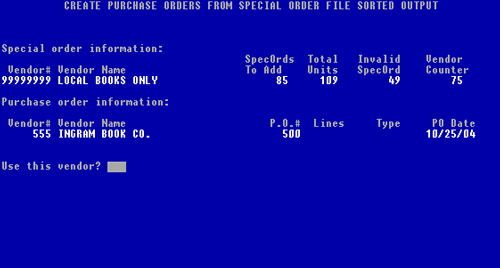
Figure 12-16, Purchase Order information
2. If you want to use the displayed Vendor, p ress <y> and <Enter>. You are prompted to Select the PO type for this Vendor (see Chapter 8 Ordering for details).
If you do not want to use the displayed Vendor, press <n> and <Enter>. You are prompted to Enter a Vendor number for the PO. Type the Vendor number of the Vendor you want to use and press <Enter>. You are asked whether you want to Use this vendor?. Start over at step 1.
3. Use the keyboard arrow method to select a PO type. You are prompted for the costing method for the PO and DE is entered by default. See Chapter 8 Ordering for details.
4. If you are ordering items at cost, type <ce> for cost entry, and press <Enter>.
If you are ordering items at a discount off of the list price, press <Enter>. You are prompted for the expected discount for the PO.
5. If the costing method is CE (cost entry), press <Enter>.
If the costing method is DE (discount entry), type a discount percent (4 digits to accommodate a decimal point) and press <Enter>.
After a brief delay, you are notified that WordStock is creating the PO.
When a PO has been created, the next Vendor in the sort is displayed. Start over at step 1.
OR
If you have reached the end of the sort, you are notified that WordStock 4 is Done creating purchase orders from special orders. See AT THE END OF THE SORT.
IF YOU SELECT APPEND, you are prompted to Enter PO# to append to.
1. Type the PO number of the PO to which you want to add the Special Orders, and <Enter>. The PO number is displayed in the "P.O. #" field and the Vendor information from the PO you entered is displayed beneath "Purchase Order Information". You are asked whether you want to Use this PO. See Figure 1217 below.
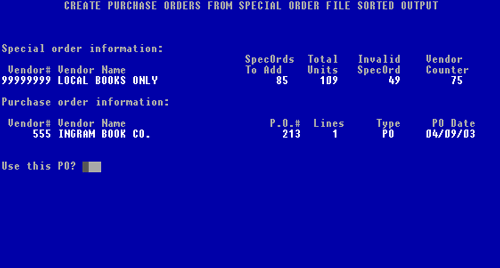
Figure 12-17, Purchase Order information
2. If you want to use this PO, press <y> and <Enter>. You are notified that WordStock is appending the Special Orders from the displayed Vendor onto the PO number you selected.
If you do not want to use this PO, press <n> and <Enter>. You are prompted to Enter a PO# to append to. Repeat step 1.
After a brief delay, you are notified that WordStock 4 is appending the Special Order(s) to the PO you selected. When the Special Order(s) has been appended to the PO:
The next Vendor in the sort is displayed. Start over at step 1. OR
If you have reached the end of the sort, you are notified that WordStock 4 is Done creating purchase orders from special orders. See AT THE END OF THE SORT.
IF YOU SELECT SKIP, the Special Orders for the displayed Vendor are skipped, and the next Vendor in the sort is displayed. The next Vendor in the sort is displayed. Start over at step 1.
OR
If you have reached the end of the sort, you are notified that WordStock is Done creating purchase orders from special orders. See AT THE END OF THE SORT below.
AT THE END OF THE SORT, you are asked if you would like to Print a log of actions performed by this program.
| Important If there are invalid Special Orders in your sort, you will need a printed list of all the Special Orders in the sort in order to determine the invalid Special Orders (those which do not have a status of new and/or a flag of OK), so that you can make sure they get put on a PO. |
1. If you want a printed list of all the Special Orders in the sort, and the PO on which they were put, press <y> and press <Enter>.
Otherwise, press <n> and press <Enter>. The Main Menu is displayed with the Ordering sub-menu opened.
2. If there is more than one printer in your store, a list of your printers is displayed and you are asked To which printer should the output be sent? Select a printer from the list. The log of actions is printed and the Main Menu is displayed with the Ordering sub-menu opened.
If there is only one printer in your store, the log of actions is printed, and then the Main Menu is displayed with the Ordering sub-menu opened.
| Please Note When the item on the Special Order is received, you can print a Customer Reserve Slip to keep with the item. |
Please see PRINTING CUSTOMER RESERVE SLIPS FROM THE MAIN MENU in Chaper 9 Receiving.
|
|||||||||||||||||||||||||||