| Getting Started with WordStock |
The Customer file is a collection of Customer records. Each Customer record contains information about one customer (name, address, purchase history , etc. The Customer file is linked to the Special Order file and the optional Mail Order Program. It is a useful tool for organizing your mailing list, and keeping track of your customers' Special Orders and mail orders. The Customer file is also useful for identifying your customers at the POS.
In Your Store
You will use the information in this chapter to:
1. Create a new Customer record.
2. Become familiar with the ways in which the Customer file interacts with the Special Order and Mail Order programs.

Creating a New Customer Record
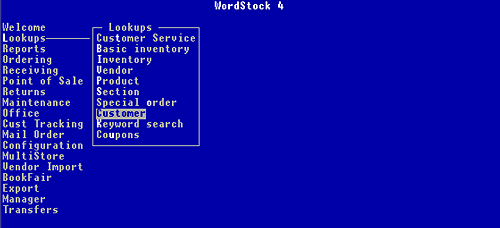
1. Use the keyboard arrow method or the hot key method to select 'Lookups' from the Main Menu. The Lookups sub-menu is opened and 'Basic Inventory' is highlighted.
2. Use the keyboard arrow method or the hot key method to select 'Customer' from the Lookups sub-menu.
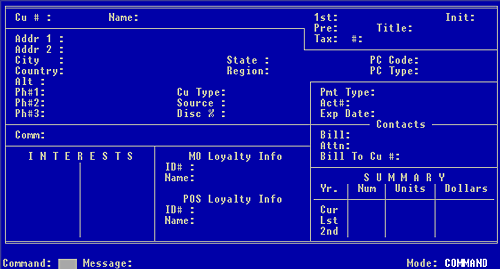
A blank Customer screen is displayed and the cursor is flashing in the Command: box. See Figure 11-1 below.

Figure 11-1, empty Customer screen
3. To have the Customer # assigned by the system: To assign your own Customer #: Type <new> and press <Enter>.
Type <acn> and press <Enter>.
Type the Customer # and press <Enter>. The cursor is flashing in the 'Name' field.
4. Type the customer's last name and press <Enter>. The cursor is flashing in the '1st' field.
5. Type the customer's first name and press <Enter>. The cursor is flashing in the "Init" field.
6. (Optional) Type the customer's middle initial or leave this field blank. Press <Enter>. The cursor is flashing in the "Pre" field.
7. (Optional) Type a prefix for the customer (Ms., Mr., Miss, Dr., etc.) or leave this field blank. Press <Enter>. The cursor is flashing in the "Title" field.
8. (Optional) Type the customer's title (Esq., Teacher, Director, etc.) or leave this field blank. Press <Enter>. The cursor is flashing in the "Addr 1" field.
9. Type the first line of the customer's street address (number and street) and press <Enter>. The cursor is flashing in the "Tax" field and 'Y' is displayed there.
10. If items sold to this customer are taxable: Press <Enter>. If items sold to this customer are not taxable: Press <n> and press <Enter>. The cursor is flashing in the "#" field.
11. (Optional) Type the customer's tax exempt number if he/she has one, or leave this field blank. Press <Enter> key. The cursor is flashing in the "Addr 2" field.
12. (Optional) Type the 2 nd line of the customer's street address (apartment number, PO box, etc.) or leave this field blank. Press <Enter>. The cursor is flashing in the "City" field.
13. Type the city name and press <Enter>. The cursor is flashing in the "State" field.
14. If the customer is from the USA: If the customer is not from the USA: Type the state name (or Press <Enter>. the 2 letter state abbreviation) and press <Enter>. The cursor is flashing in the "PC Code" field.
15. If the customer is from the USA:
Type the customer's Zip Code (or Zip+4). WordStock will not accept invalid Zip If the customer is not from the USA: Type the customer's postal code and press <Enter>. Codes; if you do not know the Zip Code, leave this field blank.
Press <Enter>.
The cursor is flashing in the "Country" field, and the name the country in which your store is located is displayed there.
| Please Note At this point WordStock searches all your Customer records for the Postal Code you just entered, and searches those records for the last name of the customer you just entered. |
If a match is found, the Customer number of the match is displayed. It is recommended that you check the matching Customer number against the customer for whom you are creating a record to avoid duplicates.
16. If the customer is from the country in which your store is located: If the customer is not from the country in which your store is located: Press <Enter>. Type the name of the customer's country and press <Enter>. The cursor is flashing in the "Region" field.
17. If your store is located in the USA: If your store is not located in the USA: Leave this field blank or use it to store other information. Press <Enter>. Type the name of the customer's state, province or region and press <Enter>. The cursor is flashing in the "PC Type" field and your default postal code type is displayed there.
| Please Note WordStock supports four Postal Code Types: Z = Zip Code. It is the postal code type for the USA. B = British postal code type. C = Canadian postal code Type. O = Other. |
18. If the postal code type displayed pertains to the customer's address: Press <Enter>. To change the postal code type for this customer: Press <F3> to clear the field. Type the customer's postal code type and press <Enter>. The cursor is flashing in the "Alt" field.
19. (Optional) Type the customer's alternate address ( email, work, etc.) or leave this field blank. Press <Enter>. The cursor is flashing in the "Ph#1" tag field, and 'HOME' is displayed there.
20. If you want to use the 'Ph#1' field for the customer's home phone number: If you do not want to use the 'Ph#1' field for the customer's home phone number: Press <Enter>. Press <F3> to clear the field. Type the tag for the "Ph#1" field (up to 4 characters) or leave the field blank. Press <Enter>. The cursor is flashing in the "Ph#1" field.
21. Type the phone number for the "Ph#1" field (with or without area code) and press <Enter>. The cursor is flashing in the "Cu Type" field.
22. If you divide your customers into types (school, corporate, book club, etc.), type the customer type (up to 11 characters). Press <Enter>. If you do not divide your customers into types, leave this field blank or use it to store other information (up to 11 characters). Press <Enter>.
The cursor is flashing in the "Pmt Type" field and 'CASH' is displayed there.
23. If the customer generally pays with cash, press <Enter>. If the customer generally pays with a method other than cash, press <F3> to clear the field and type the payment method generally used by the customer, or leave this field blank. Press <Enter>.
The cursor is flashing in the "Ph#2" tag field and 'WORK' is displayed there.
24. If you want to use the 'Ph#2' field for the customer's work phone number, press <Enter>. If you do not want to use the 'Ph#2' field for the customer's work phone number, press <F3> to clear the field.
Type the tag for the "Ph#2" field (up to 4 characters) or leave the field blank.
Press <Enter>. The cursor is flashing in the "Ph#2" field.
25. (Optional) Type the phone number for the "Ph#2" field (with or without area code) and press <Enter>. The cursor is flashing in the "Source" field.
26. (Optional) Type the source for the customer (up to 11 characters: catalogue, referral, newspaper, phone book, etc.), or leave this field blank. Press <Enter>. The cursor is flashing in the "Act#" field.
27. If the customer's preferred payment method is a credit card or Accounts Receivable: Otherwise: Leave this field blank or use it to store other information (up to .Type the customer's account number. 23 characters). Press <Enter>. OR .Leave this field blank or use it to store other information (up to 23 characters).
Press <Enter>. The cursor is flashing in the "Ph#3" tag field.
28. (Optional) Type the tag for the "Ph#3" field (most commonly used for 'FAX'), or leave this field blank. Press the <Enter>. The cursor is flashing in the 'Ph#3' field.
29. (Optional) Type the phone number for the "Ph#3" field or leave this field blank. Press <Enter>. The cursor is flashing in the "Disc%" field'.
30. If the customer receives a discount: Otherwise: Press <Enter>. Type the discount percent (4 digits to accommodate a decimal point) and press <Enter>. The cursor is flashing in the "Exp Date" field.
31. If the payment method is a credit card. Otherwise Press <Enter>. Type the expiration date and press <Enter>. The cursor is flashing in the "Comm" field.
32. (Optional) Type a comment about this customer (up to 40 characters) or leave this field blank. Press <Enter>. The cursor has moved to the 'Contacts' box and is flashing in the "Bill" field.
| Please Note The Contacts box is useful if the customer is an institution (library, school, etc.) rather than an individual. It is used to store information about people within an organization. |
33. (Optional) Type the name of the person to whom bills are to be addressed, or leave this field blank. Press <Enter> key. The cursor is flashing in the "Attn" field.
34. (Optional) Type the name of the person to whose attention mail orders are to be directed, and press <Enter>. The cursor is flashing in the "Bill Cust #" field.
35. If the customer's purchases are to be Otherwise Press <Enter>. billed to another Customer number: Type the Customer number and press <Enter>. The cursor is flashing in the 1 st field in the 'INTERESTS' box.
| Please Note The INTERESTS box contains 14 fields. Each field is used to store the name of a Section from which the customer has made a purchase (see Chapter 3 Organizing Your Store for information about Sections). |
The INTERESTS box is automatically updated only by the WordStock optional Mail Order program. Steps 36-39 are directions for manually adding an interest to a Customer record.
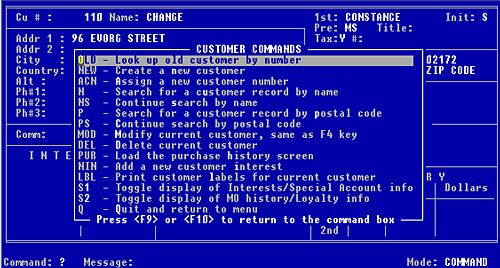
36. Press <F10> to save the Customer record.The Customer Commands Help Menu is displayed. See Figure 11-2 below.

Figure 11-2, the Customer commands help menu
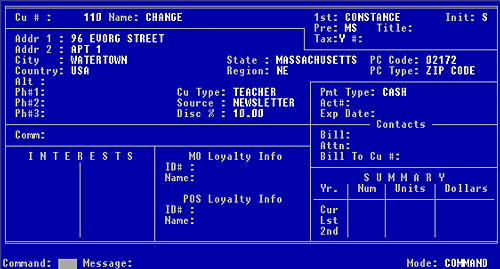
OR .The cursor is flashing in the Command: box. See Figure 11-3 below.

Figure 11-3, sample completed Customer record
37. If the cursor is flashing in the Command: box: Type <nin> (the command for 'new interest') and press <Enter> If the Customer Commands Help Menu is displayed: Use the keyboard arrow method or the hot key method to select 'Add a new customer interest'. The cursor is flashing in the first 'INTEREST' field.
| Please Note The Section name is always entered in this first field, even if the field is already occupied by another Section name. Once the new Section name is entered, the other Section name(s) in the 'INTEREST' box move to the left and down so that the most recently entered Sections always appear first. |
38. Type the beginning of the Section name (up to 11 characters) and press <Enter>. WordStock displays the Section name that is alphabetically closest to the name you entered.
39. If the displayed Section name is correct, press <F8> Otherwise, use the keyboard arrows. to scroll through the Section names.
When you find the Section name you are looking for, press the <F8> to add it. The Section name is displayed in the first 'INTEREST' field.The cursor is flashing in the Command: box. OR .The Customer Commands Help Menu is opened.
40. To enter another interest, repeat steps 37–39.
To go back to the main menu, in the Command: box: Type <q> and press <Enter>. From the Customer Commands Help Menu: Select 'Quit and return to menu'. The Main Menu is displayed with the Customer sub-menu opened.
| Reminder Whenever a Command Help Menu is opened or the cursor is flashing in the Command: box, you can initiate any of the available commands. Detailed instructions for the commands most frequently executed after entering a new INTEREST are provided below. |
Entering history and/or summary information manually
| Please Note The fields in the 'HISTORY' and 'SUMMARY' boxes are used to store information about what the customer has ordered through the Mail Order programs and are automatically updated by WordStock. If you want to enter information into these fields manually, follow the directions below. |
1. In the Command: box, type <mod> and press <Enter>
OR From the Customer Commands Help Menu: Select 'Modify current customer'. Press <F4>.
2. Use the keyboard arrows to position the cursor in the appropriate field
3. Type the information you want to enter, and press <Enter>.
4. Press <F10> when you are done. The cursor is flashing in the Command: box. OR The Customer Commands Help Menu is opened.
5. In the Command: box, type <q> and press <Enter>. From the Command Help Menu: Select 'Quit and return to menu'. The Main Menu is displayed with the Customer sub-menu opened.
| Please Note Reports can be designed based on any field or combin-ation of fields on the Customer screen. See Chapter 7 Reports. |
|
|||||||||||||||||||||||||||