| Getting Started with WordStock |
In Your Store
Use these links for quick access to key POS functions :
Discount all or part of a sale
Access other programs from within the POS program
Search for an item by title or author at the POS
Record petty cash removed from the drawer
Record deposits made toward a purchase or on accounts receivable
Generate a Sales by Product Summary Report
Settle your Credit Card Authorizations (If you have WordStock CCA)
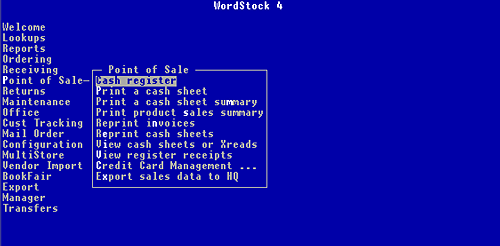
Starting the Cash Register
1. Use the keyboard arrow method or the hot key method to select 'Point of Sale' (POS) from the Main Menu. The Point of Sale sub-menu is opened and 'Cash register' is highlighted.
2. Press <Enter>. The POS screen is displayed. See Figure 6-1 below.
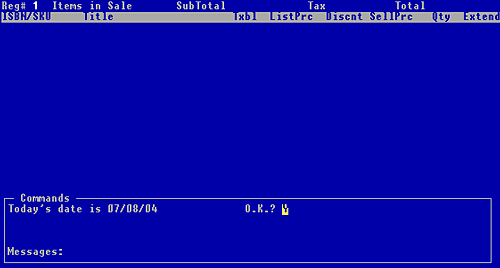
Figure 6-1, WordStock POS screen [empty]
Please Note 1. The top section accumulates up-to-the-minute summary information about the transaction in progress. 2. The middle section displays information about the individual items (the detail lines) in the transaction. 3. The bottom section (the Command: box) is where you enter the transaction. Figure 6-2 shows the POS screen with information displayed. |
3. You are asked to confirm that the date displayed in the Command: box is correct. If the date displayed is correct, press <Enter>.
| If the date displayed is incorrect, call WordStock Support because a wrong date indicates a problem with your system clock. |
You are prompted to enter your cashier number.
4. If you have been assigned a cashier number, type your cashier number and press <Enter>.
If you have not been assigned a cashier number, press any number and press <Enter>.
If you are starting a new cash drawer, you are prompted to 'Enter the amount of cash float.' Otherwise, you are prompted to 'Enter a command, SKU or ISBN'.
Skip to 'RINGING IN A SALE (BASIC PROCEDURE)'.
5. Type the amount of money that you are starting with in the cash drawer and press <Enter>.
You are prompted to 'Enter a command, SKU or ISBN:'
Ringing in Sales [basic procedure] - back to top >>>
1. Type the item's SKU or ISBN and press <Enter>, or scan the item's barcode. The SKU or ISBN and title (or description) and price information about the item are displayed on the POS screen and you are prompted to 'Enter a command or quantity:' See Figure 6-2 below.
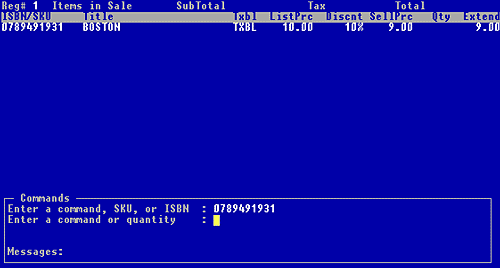
Figure 6-2, WordStock POS screen with information displayed
2. If you are selling one of the item, press <Enter>. If you are selling more than one of the item, type the number of the item that you are selling, and press <Enter>. The quantity is displayed on the POS screen, and you are prompted to 'Enter a command, SKU, or ISBN:'.
3. Repeat steps 1 and 2 for every item you are ringing in.
When all items have been 'rung in', you are prompted to 'Enter a command, SKU, or ISBN:'.
Totaling a Sale
1. Press <t> and press <Enter>. You are prompted to 'Enter the method of payment:'.
2. Enter the payment method: Type <ca> for cash or <ch> for check and press <Enter>.
If you have WordStock Credit Card Authorization, swipe the customer's credit card. Otherwise, type:
- <ca> for cash
- <ch> for check
- <mc>for Mastercard
- <vs> for Visa
- <ax> for American Express
- <ds> for Discover
- Press <Enter>.
Or for more choices, open the Payments pop-up menu. Hold down the <Shift> key and press <F1>. Help Options are displayed above the Command: box, with 'Payments' highlighted. Press <Enter> to open the Payments pop-up menu and select a payment method from the menu.
If the payment method is cash or check, you are prompted to 'Enter payment amount:'.
If the payment method is a credit card. Skip to step 4.
If the payment method is accounts receivable, you are prompted to 'Enter the customer's name:'. Skip to step 7.
If the payment method is a gift certificate, you are prompted to 'Enter payment amount:' Skip to step 9.
If the payment method is a credit slip, you are prompted to 'Enter payment amount:' Skip to step 12.
3. Type the amount the customer gives you and press <Enter>. The Payment box is opened displaying the payment method and amount along with the change due. The cash drawer opens and a receipt is printed. The transaction is complete and the system is ready for the next sale.
4. If you have WordStock Credit Card Authorization, you are prompted to 'Press Enter for the second receipt'. Otherwise, follow store policy regarding credit card transactions.
5. Press <Enter> and a second receipt is printed.
6. Have the customer sign the receipt that has a signature line. Put the signed receipt in your drawer, and give the other receipt to the customer. The transaction is complete and the system is ready for the next sale.
7. Type the customer's full name, and press <Enter>. 'Printing receipt.' is displayed. When the receipt is printed, you are prompted to 'Press <Enter> for second receipt'.
8. Press <Enter>. The second receipt is printed. Give the first receipt to the customer, and put the second receipt in the drawer for record keeping. The transaction is complete and the system is ready for the next sale.
9. Type the amount of the gift certificate, and press <Enter>. You are prompted to 'Enter Gift Certificate document control number:'
10. Type the number that is printed on the gift certificate, and press <Enter>.
A receipt is printed. If the gift certificate was worth more than the purchase amount, tell the customer to keep the receipt as it represents a store credit for the difference. The transaction is complete and the system is ready for the next sale.
11. Type the amount of the credit slip, and press <Enter>.
A receipt is printed. If the credit slip was worth more than the purchase amount, tell the customer to keep the receipt as it represents a store credit for the difference. 'Printing receipt.' is displayed. When the receipt is printed, you are prompted to 'Press <Enter> for second receipt'.
12. Press <Enter>. The second receipt is printed. Give the first receipt to the customer, and put the second receipt in the drawer for record keeping. The transaction is complete and the system is ready for the next sale.
Discounts - back to top -
| Please Note If a discount has been applied to an entire Section number or Product code, it will be applied automatically at the POS. There are 3 basic methods for applying a discount at the POS: |
1. Single Line Discount: You can discount an item at any time during a sale.
2. Total Sale Discount: You can apply a discount to an entire sale.
3. Partial Sale Discount: You can apply a discount to a group of items within a sale.
Applying a Single Line Discount
| Please Note The POS prompt to ''Enter a command, SKU or ISBN:' must be displayed on the screen in order to begin this section. If it is not, please follow the directions under 'STARTING THE CASH REGISTER' before beginning this section. |
If your scanners are set to automatically enter "1" in the Quantity field, you will not be able to scan single line discounts; you will have to enter them manually.
1. Type the SKU or ISBN of the item being discounted and press <Enter>, or scan the item's barcode.
The SKU or ISBN, the title (or description), and the price information for the item are displayed. You are prompted to 'Enter a command or quantity:'.
2. Press <d> (the command for 'discount'), and press <Enter>. 'Discount' is displayed beneath the Messages: field. The Discount pop-up menu is superimposed on the screen. See Figure 6-3 below.
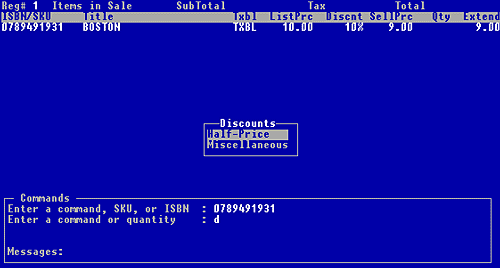
Figure 6-3, pop-up Discount menu
| Please Note The Discount pop-up menu can be configured to your specifications; your Discount pop-up menu may contain different or additional items. |
3. If the discount you want appears in the menu, select the discount you and press <Enter>.
Skip to step 5.
If the discount you want does not appear in the menu: want to apply, select "Miscellaneous" and press <Enter>. You are prompted to 'Enter discount % or 'dol''.
4. To discount by a dollar amount, type <dol> and press <Enter>. You are prompted to 'Enter the discount dollar amount:'. Type the discount dollar amount and press <Enter>.
To discount by a percentage, type the discount percentage (2 digits) and press <Enter>.
You are prompted to 'Enter a command or quantity:'.
5. If you are discounting one of the item, press <Enter>. If you are discounting more than one of the item, type the quantity of the item that you are discounting, and then press <Enter>.
The corresponding "Discnt" field displays the discount amount, and the "SellPrc" field reflects the discount
You are prompted to 'Enter a command, SKU, or ISBN:'.
6. To discount another item, repeat steps 1-5.
To sell an item, follow the directions under 'RINGING IN A SALE'.
To total the sale, follow the directions under 'TOTALING A SALE'.
Applying a Total Sale Discount
You can apply a blanket discount to the entire sale.
| Please Note The POS prompt to 'Enter a command, SKU or ISBN:' must be displayed on the screen in order to begin this section. If it is not, please follow the directions under 'STARTING THE CASH REGISTER' before beginning this section. |
1. After you have entered all the items being sold, type <td> (the command for total discount) at the prompt to 'Enter a command, SKU, or ISBN:' and press <Enter>. The Discounts pop-up menu is displayed. See Figure 6-3 above.
2. If the discount you want appears in the menu: Select the discount you want to apply, and press <Enter>.
If the discount you want does not appear in the menu: Skip to step 4.
- Select "Miscellaneous" and press <Enter>. You are prompted to 'Enter discount % or 'dol''
3. To discount by a dollar amount, type <dol> and press <Enter>.You are prompted to 'Enter the discount dollar amount:'. Type the discount dollar amount and press <Enter>.
To discount by a percentage, type the discount percentage (two digits) and press <Enter>.
You are prompted to 'Enter method of payment:'.
4. Follow steps 2-6 (totaling a sale).
Applying a Partial Sale Discount
You can discount items at any time during a sale. When you type <disc> at the prompt to 'Enter a command, SKU or ISBN:', the WordStock 4 POS system discounts all subsequent items in the transaction until you type <undisc> at the prompt to 'Enter a command, SKU or ISBN:'
| Please Note The POS prompt to 'Enter a command, SKU or ISBN:' must be displayed on the screen in order to begin this section. If it is not, please follow the directions under 'STARTING THE CASH REGISTER' before beginning this section. |
1. Type <disc> and press <Enter> at the prompt to 'Enter a command, SKU or ISBN:' whenever you want to discount a group of items during a sale. The Discounts pop-up menu is displayed.
2. If the discount you want appears in the menu: Select the discount you want to apply, and then press <Enter>.
If the discount you want does not appear in the menu, select "Miscellaneous" and press <Enter>. You are prompted to 'Enter discount % or 'dol:''. Skip to step 4
You are prompted to 'Enter a command SKU or ISBN'.
3. To discount by a dollar amount, type <dol> and then press <Enter>. You are prompted to 'Enter discount dollar amount:'. Type the discount dollar amount and press <Enter>.
To discount by a percentage, type the discount percentage (four digits to accommodate a decimal point) and press <Enter>.
You are prompted to 'Enter a command SKU or ISBN:'.
4. Type (or scan) the SKU or ISBN of an item you want to discount, and press <Enter>. You are prompted to 'Enter a command or quantity:'.
5. If you are selling one of the item, press <Enter>. If you are selling more than one of the item, type the quantity being sold and press <Enter>.
You are prompted to 'Enter a command SKU or ISBN:'.
6. Repeat step 4 and 5 until all the items that you want to discount have been rung in.
7. When you are finished selling discounted items:
To ring in undiscounted items, type <undisc> and press <Enter>. You are prompted to 'Enter a command SKU or ISBN:'. Follow the directions under 'RINGING IN A SALE'.
To total the sale: Follow the directions under 'TOTALING A SALE'.
Refunds - back to top -
The same three methods for applying discounts at the POS can be applied to refunding items at the POS:
Single Line Refund: You can refund an item at any time during a sale.
Total Sale Refund: You can refund an entire sale.
Partial Sale Refund: You can refund a group of items within a sale.
Applying a Single Line Refund
| Please Note The POS prompt to ''Enter a command, SKU or ISBN:' must be displayed on the screen in order to begin this section. If it is not, please follow the directions under 'STARTING THE CASH REGISTER' before beginning this section. |
If your scanners are set to automatically enter "1" in the Quantity field, you will not be able to scan single line refunds; you will have to enter them manually.
1. Type the SKU or ISBN of the item being refunded and press <Enter> or scan the item's barcode. The SKU or ISBN, the title (or description), and the priceinformation for the item are displayed. You are prompted to 'Enter a command or quantity:'.
2. Press <r> (the command to 'refund' the item), and press <Enter>. 'Refund' is displayed beneath the 'Messages' field. You are prompted to 'Enter a command or quantity:'
3. If the customer is returning one item, press <Enter>. If the customer is returning more than one of the item, type the quantity of the item that the customer is returning and press <Enter>.
A negative sign (-) is displayed in front of the item's price and quantity and the subtotal reflects that the item is being refunded.
You are prompted to 'Enter a command, SKU, or ISBN:'.
4. To refund another item: Repeat steps 1-3.
To sell an item: Follow the directions under Ringing in a sale.
To total the sale, follow the directions. under TOTALING A SALE.
Applying a Total Sale Refund
| Please Note The POS prompt to ''Enter a command, SKU or ISBN:' must be displayed on the screen in order to begin this section. If it is not, please follow the directions under 'STARTING THE CASH REGISTER' before beginning this section. |
1. Before you enter any items, type <refund> and press <Enter>. 'Refund' is displayed in the Message: box, and you are prompted to 'Enter a command or quantity:'.
2. Proceed as if ringing in a sale, above.
Applying a Partial Sale Refund
You can refund items at any time during a sale. When you type <refund> at the prompt to 'Enter a command, SKU or ISBN:', the WordStock POS system refunds all subsequent items in the transaction until you type <sale> at the prompt to 'Enter a command, SKU or ISBN:'. This allows you to sell some items and refund others in a single transaction.
| Please Note The POS prompt to ''Enter a command, SKU or ISBN:' must be displayed on the screen in order to begin this section. If it is not, please follow the directions under 'STARTING THE CASH REGISTER' before beginning this section. |
1. Whenever you want to refund a group of items during a sale, type <refund> before the items to be refunded, and press <Enter> at the prompt to 'Enter a command, SKU or ISBN:'. 'Refund' is displayed beneath the "Messages" field and you are prompted to 'Enter a command, SKU or ISBN:'.
2. Type the SKU or ISBN of the items to be refunded and press <Enter> or scan the item's barcode. You are prompted to 'Enter a command or quantity:'.
3. If the customer is returning one of the item, press <Enter>.
If the customer is returning more than one of the item, type the quantity of the item that is being refunded, and press <Enter>.
You are prompted to 'Enter a command SKU or ISBN:'.
4. Repeat step 2 and 3 until all the items that you want to discount have been rung in.
You are prompted to 'Enter a command SKU or ISBN:'
5. When you are finished refunding items:
To sell items, type <sale> and press <Enter>. You are prompted to 'Enter a command SKU or ISBN:'. Follow the directions under RINGING IN A SALE.
To total the sale, follow the directions under TOTALING A SALE.
Voiding a Sale
| Please Note The POS prompt to ''Enter a command, SKU or ISBN:' must be displayed on the screen in order to begin this section. If it is not, please follow the directions under 'STARTING THE CASH REGISTER' before beginning this section. |
There are two basic methods for voiding a sale:
- Voiding the current sale: You can void a sale in mid-transaction.
- Voiding a past sale: You can void a sale that took place earlier.
| Please Note You can only void sales that were rung on the register you are currently running. You cannot void a sale once the Cash Sheet on which it appears has been printed and cleared. |
Voiding the Current Sale
| Please Note The POS prompt to 'Enter a command, SKU or ISBN:' must be displayed on the screen in order to begin this section. If it is not, please follow the directions under 'STARTING THE CASH REGISTER' before beginning this section. |
1. Type <vo> and press <Enter>. You are asked whether you want to 'Void the current sale'.
2. Press <y> and press <Enter>. The void is complete, you are now ready to begin the next transaction.
Voiding a Prior Sale
| Please Note The POS prompt to 'Enter a command, SKU or ISBN:' must be displayed on the screen in order to begin this section. If it is not, please follow the directions under 'STARTING THE CASH REGISTER' before beginning this section. |
1. Type <vo> and press <Enter>. You are asked whether you want to 'Void the current sale'.
2. Press <n>. You are prompted to 'Enter the receipt number of the sale to void'.
3. Type the receipt number of the sale (the first number in the upper left corner of the receipt) that you want to void and press <Enter>.
A receipt is printed indicating that the sale has been voided
Modifying a Sale
You can use the modify command to make changes to a sale in the middle of a transaction; the following modifications are available:
- Change the quantity
- Change the price
- Change a sale to a return
- Change a return to a sale
- Change the sale from taxable to tax exempt
- Change the sale from tax exempt to taxable
- Delete all or part of the sale
| Please Note The POS prompt to 'Enter a command, SKU or ISBN:' must be displayed on the screen in order to begin this section. If it is not, please follow the directions under 'STARTING THE CASH REGISTER' before beginning this section. |
The following instructions explain how to change the quantity; the same instructions apply to all modifications at the POS.
1. Type <mod> and press <Enter> (or press the <F4> key). You are prompted to 'Press <Enter> to select an item to modify or <F8> to quit'.
2. Use the keyboard arrow method to select the item for which you want to modify the quantity. The Modify Commands Help Menu is superimposed on the screen. See Figure 6-4 below.
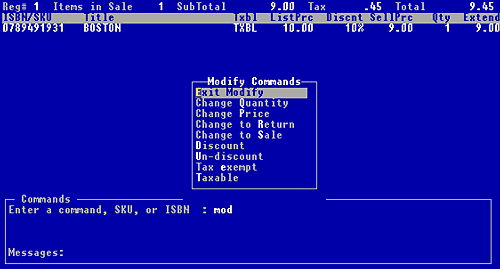
Figure 6-4, pop-up Modify commands menu
3. Select 'Change Quantity' from the menu. You are prompted to 'Enter a new quantity:'.
4. Type the new quantity. The quantity is changed and you are prompted to 'Enter a command SKU or ISBN:'.
5. You are now ready to continue the transaction: To sell an item, follow the directions under 'RINGING IN A SALE' above.
To discount an item or items, follow the directions under 'APPLYING A SINGLE LINE DISCOUNT' or 'APPLYING A PARTIAL SALE DISCOUNT'.
To refund an item or items, follow the directions under 'APPLYING A SINGLE LINE REFUND', or 'APPLYING A PARTIAL SALE REFUND' .
To total the sale, follow the directions under 'TOTALING A SALE'.
Printing a Duplicate Receipt
You can print a duplicate receipt from the POS program as long as a transaction is not in progress.
| Please Note The POS prompt to 'Enter a command, SKU or ISBN:' must be displayed on the screen in order to begin this section. If it is not, please follow the directions under 'STARTING THE CASH REGISTER' before beginning this section. |
1. Type <rcpt> and press <Enter>.
You are asked whether you want to 'Reprint last receipt?'.
2. To print the most recent receipt, press <y>.
To print a receipt from a previous sale, press <n>. You are prompted to 'Enter the receipt number to reprint'. Type the number of the receipt that you want to print and press <Enter>.
The receipt is printed, and 'REPRINTED RECEIPT' is printed on the receipt. You are prompted to 'Enter a command, SKU, or ISBN:'. You are now ready to begin the next transaction.
Printing an 'X-Read'
An X-read provides a running total of the transactions that have taken place at your register. You can print an X-read at any time from the POS program. An X-read is very easy to print; it takes about a minute. An X-read contains some of the information that is on a Cash Sheet.
| Please Note The POS prompt to ''Enter a command, SKU or ISBN:' must be displayed on the screen in order to begin this section. If it is not, please follow the directions under 'STARTING THE CASH REGISTER' before beginning this section. |
1. Type <xread> and press <Enter>. An X-read is printed by your receipt printer
Other Features of WordStock's POS Program
WordStock's POS program facilitates customer service by providing access to other programs directly from the POS. The programs that are most commonly accessed at the POS are: Special Orders, the Customer file, Keyword Search, and the Inventory file.
Accessing the Special Orders Program
Occasionally a customer may want to place a Special Order at the POS. WordStock will accept the Special Order and print a receipt for it at the POS.
| Please Note The POS prompt to #145;Enter a command, SKU or ISBN:' must be displayed on the screen in order to begin this section. If it is not, please follow the directions under 'STARTING THE CASH REGISTER' before beginning this section. |
1. Type <spc> and press <Enter>. A blank Special Order screen is displayed.
2. Follow the directions in Chapter 12 Special Orders to create a new Special Order or to look up an existing Special Order.
Accessing the Customer Screen
| Please Note The POS prompt to ''Enter a command, SKU or ISBN:' must be displayed on the screen in order to begin this section. If it is not, please follow the directions under 'STARTING THE CASH REGISTER' before beginning this section. |
1. Type <cus> and press <Enter>. A blank Customer screen is displayed.
2. Follow the directions under 'CREATING A NEW CUSTOMER RECORD' or to look up an existing Customer record.
Accessing the Keyword Search Program
| Please Note The POS prompt to ''Enter a command, SKU or ISBN:' must be displayed on the screen in order to begin this section. If it is not, please follow the directions under 'STARTING THE CASH REGISTER' before beginning this section. |
1. Type <kw> and press <Enter>. The Keyword Search program is displayed.
2. Follow the directions in the Chapter 5 Keyword Search to perform a Keyword Search.
| Please Note When you quit a program that you have accessed from the POS, the POS screen on which you had been working will reappear, and you can continue a transaction or begin a new transaction |
Searching for Items at the POS
You can search your inventory for specific items at any point during a transaction. There are two methods for searching for an item at the POS.
- Search by title (description) or author: when the customer is interested in an item, and wants information about it.
- Search and sell: when the customer has the item at the register, but you can't find the ISBN or SKU on the item in order to sell it.
Searching by Title or Author
| Please Note The POS prompt to ''Enter a command, SKU or ISBN:' must be displayed on the screen in order to begin this section. If it is not, please follow the directions under 'STARTING THE CASH REGISTER' before beginning this section. |
There are 2 ways to view Inventory records on the screen: You can view the entire Inventory record for the item (see Figure 6-5 below), or you can look at the item's Basic Inventory screen. The Basic Inventory screen provides the most commonly sought-after information about an item (see Figure 6-6 below.)
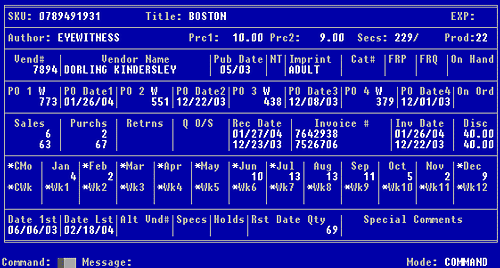
Figure 6-5, a WordStock Inventory record
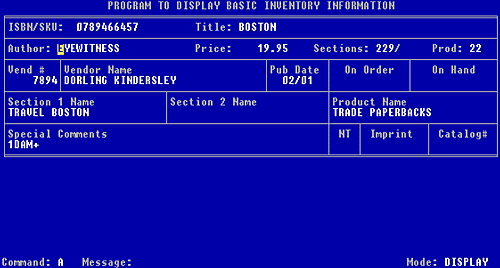
Figure 6-6, WordStock's Basic Inventory screen
1. To view the Basic Inventory screen, type <show> and press <Enter>. A blank Basic Inventory screen is displayed. To view the full Inventory screen, type <inv> and press <Enter>. A blank Inventory screen is displayed. The cursor is flashing in the Command: box.
2. To search by title (or item description), press <t> and press <Enter>. The "Title" field is highlighted and the cursor is flashing there. Type the first two or three words of the title. WordStock finds the closest alphabetical match.
To search by author (or artist, etc.), press <a> and press <Enter>. The "Author" field is highlighted and the cursor is flashing there. Type the author's name (<Last,First>) WordStock finds the closest alphabetical match.
The result of your search is displayed. You can now use the keyboard arrows to scroll forward or backward alphabetically through your Inventory records
3. When you are done searching, press <F10>. The Inventory Commands Help Menu is displayed. OR The cursor is flashing in the Command: box.
4. To initiate another search: In the Command: box, type <t> for a title search or <a> for an author search and press <Ente>.
| Reminder Whenever a Command Help Menu is opened or the cursor is flashing in the Command: box, you can initiate any of the available commands. Detailed instructions for the commands most frequently executed after searching from the POS are provided below. |
From the Command Help Menu, select 'Search for an item by title', or 'Search for an item by author'. Start again at step 2.
To go back to the POS program:
1. Type <q> in the Command: box and press <Enter>.
2. From the Command Help Menu, select 'Quit and return to menu'.
The POS program is displayed.
Search and Sell
| Please Note The POS prompt to ''Enter a command, SKU or ISBN:' must be displayed on the screen in order to begin this section. If it is not, please follow the directions under 'STARTING THE CASH REGISTER' before beginning this section. |
1. To search by title (or description), type <ti> and press <Enter>. You are prompted to 'Enter a title to search for'. Type the first 2 or three words of the title; WordStock finds the closest alphabetical match.
To search by author (or artist, etc.), type <ai> and press <Enter>.You are prompted to 'Enter an author to search for'. Type the author's name (<Last,First>). WordStock finds the closest alphabetical match.
You are prompted to press <F8> to sell the currently displayed item.
2. If the displayed item is the item you are searching for, press <F8>. Otherwise, use the keyboard arrows to scroll forward or backward alphabetically through your Inventory records until you find what you are looking for. You are prompted to 'Enter a command or quantity:'
3. If you are selling one of the item, press <Enter>. If you are selling more than one of the item, yype the quantity and press <Enter>.
You are prompted to 'Enter a command SKU or ISBN:'.
You are now ready to begin the next transaction.
Recording Petty Cash Removed from a Register
When you take money out of a register for a reason other than a business transaction (to buy office supplies, etc.), you need to inform the system so that the petty cash transaction is recorded on your Cash Sheet.
| Please Note The POS prompt 'Enter a command, SKU or ISBN" must be displayed on the screen in order to begin this section. If it is not, please follow the directions under 'STARTING THE CASH REGISTER' before beginning this section. |
1. Type <pc> and press <Enter>. The Cash Disbursements pop-up menu is opened. See Figure 6-7 below.
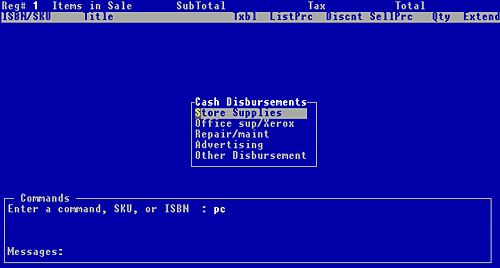
Figure 6-7, pop-up Cash Disbursements menu
| Please Note The Cash Disbursements pop-up menu can be configured to your specifications; your Cash Disbursements pop-up menu may contain different or additional items. |
2. Make a selection from the Cash Disbursements pop-up menu based on the reason that you are removing money from the register. You are prompted to 'Enter descriptive information:'.
3. Type a description of what you are using the money for (copies, paper clips, sales signs, etc., up to forty characters, and press <Enter>. You are prompted to 'Enter disbursement amount:'.
4. Type the amount of money that you are removing from the register, and press <Enter>.
'Transaction completed, begin next sale' is displayed in the Message: box. You are prompted to 'Enter a command, ISBN, or SKU:'. You are now ready to begin the next transaction.
| Please Note A petty cash transaction cannot be combined with any other POS transaction |
Recording Miscellaneous Income to a Register
When you put money into a register for a reason other than a sale to a customer (shipping charges, or service charges, etc.), you need to inform the system so that the miscellaneous income will be recorded on the register's Cash Sheets).
| Please Note The POS prompt 'Enter a command, SKU or ISBN:' must be displayed on the screen in order to begin this section. If it is not, please follow the directions under 'STARTING THE CASH REGISTER' before beginning this section. |
1. Type <in> and press <Enter>. The Miscellaneous Incomes pop-up menu is opened. See Figure -8, below.
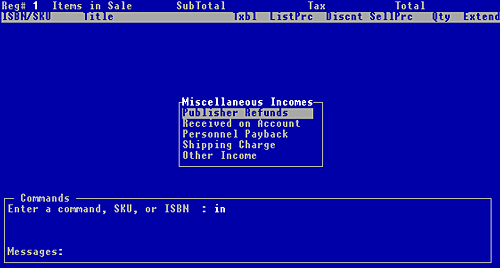
Figure 6-8, pop-up Miscellaneous Incomes menu
| Please Note The Miscellaneous Incomes pop-up menu can be configured to your specifications; your Miscellaneous Incomes pop-up menu may contain different or additional items. |
2. Make a selection from the Miscellaneous Incomes pop-up menu based on the reason that you are putting money into the register. You are prompted to 'Enter descriptive information:'.
3. Type a description of what you are bringing in the money for (employee pay back, etc., up to forty characters, and press <Enter>. You are prompted to 'Enter income amount:'.
4. Type the amount of money that you are putting into the register, and press <Enter>. You are prompted to 'Enter a command, ISBN, or SKU:'. You are now ready to begin the next transaction
Recording a Deposit towards a Purchase
When you receive a deposit towards a purchase you need to inform the system so that the deposit is recorded on your Cash Sheets (see above).
WordStock does not record the reason for the deposit; if you want to keep track of deposits, you will have to keep separate notes.
| Please Note The POS prompt 'Enter a command, SKU or ISBN:' must be displayed on the screen in order to begin this section. If it is not, please follow the directions under 'STARTING THE CASH REGISTER' before beginning this section. |
1. Type <de> and press <Enter>. You are prompted to 'Enter deposit amount:'.
2. Type the amount of the deposit, and press <Enter>. You are prompted to 'Enter a command, ISBN, or SKU:'. You are now ready to begin the next transaction.
| Please Note The receipt from the deposit is the customer's proof that the deposit was made. We recommend that you remind the customer to keep the receipt as a record of the deposit. |
End of the Day Procedures
A Cash Sheet is a series of reports about the transactions carried out at a single register in the course of a day. It includes a breakdown of your transaction totals by method of payment, taxes, discounts, and refunds, as well as information about other factors affecting your drawer and your merchandising strategies.
| Please Note 1. A Cash Sheet should only be printed directly from the register. 2. Make sure that your printer is turned on, on line, and loaded with paper BEFORE printing a Cash Sheet. |
1. Use the keyboard arrow method or the hot key method to select 'Point of Sale' from the Main Menu. The Point of Sale sub-menu is opened.
2. Select 'Print a cash sheet'. You are notified that 'After the report is printed, the Cash Sheet totals will be cleared automatically' and asked whether you want to 'Continue'.
3. If you want to print the Cash Sheet, press <y> and press <Enter>. If you want to return to the Main Menu, press <n> and press <Enter>. The Main Menu is displayed with the POS sub-menu opened
4. If there is more than one printer in your store, you are asked if you want to use your default printer. Press <Enter> to select your main printer. OR press <n> and press <Enter> to display a list of your printers and select a printer from the list.
If there is only one printer in your store, press <y> and press <Enter> to select your main printer
You are prompted to 'Enter the date the report is for'. Today's date is displayed.
5. To accept today's date for the Cash Sheet, press <Enter>. To change the date, type a date for the Cash Sheet and press <Enter>.
You are asked whether the Cash Sheet printed OK.
| Important Do not press <y> unless you are certain that the report printed correctly. Once you press <y> the Cash Sheet totals are cleared, and you will not be able to reprint them. CHECK THE PRINTED CASH SHEET RIGHT AWAY because the printer is 'locked up' until you press <y> or <n>, so no one else will be able to use the printer. |
6. If you are SURE that the Cash Sheet printed OK, press <y> and press <Enter>. The Cash Sheet totals are cleared and the Main Menu is displayed with the Point of Sale sub-menu opened.
If the Cash Sheet did not print OK, press <n> and press <Enter>. You are asked whether you want to reprint the Cash Sheet. Press <y> to reprint the Cash Sheet. Repeat this step until the Cash Sheet prints OK.
| Please Note You can print an X-read at any time from the POS program. An X-read provides a running total of the transactions that have taken place at your register. An X-read is very easy to print; it takes about a minute. Most of the information that appears on a Cash Sheet report is provided in condensed form on an X-read. |
At the prompt to 'Enter a command SKU or ISBN', type <xread> and press <Enter>. An X-read is printed by your receipt printer
Cash Sheet Summary Report
A Cash Sheet Summary Report combines the information from the Cash Sheets of all your registers onto one report.
| Please Note A Cash Sheet Summary should be printed from the main computer after all Cash Sheets for the day have been run from the registers. If you have not printed all of your individual Cash Sheets before printing a Cash Sheet Summary, the Cash Sheet information from the registers for which a Cash Sheet was not printed will not be included in the Cash Sheet Summary. |
Make sure that your printer is turned on, on line, and that it has paper BEFORE printing a Cash Sheet.
1. Use the keyboard arrows or the hot key method to select 'Point of Sale' from the Main Menu. The Point of Sale sub-menu is opened.
2. Select 'Print a cash sheet summary'. The PROGRAM TO PRINT A CASH SUMMARY REPORT displays a pop-up menu. See Figure 6-9 below.
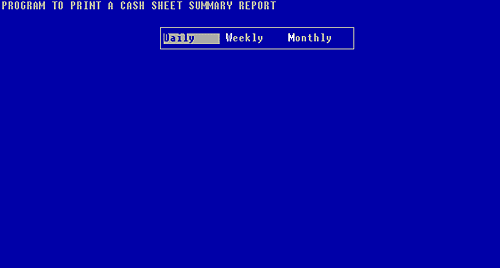
Figure 6-9, print a Cash Sheet Summary Report menu
3. Select a time increment for the report. You are notified that the system is 'clearing very old cash sheets'.
4. If there is more than one printer in your store, you are asked if you want to use your default printer.
Press <Enter> to select your main printer OR press <n> and press <Enter> to display a list of your printers and select a printer from the list.
If there is only one printer in your store, press <y> and press <Enter>.
You are prompted to 'Enter the date the report is for'. Today's date is displayed.
5. To accept today's date for the Cash Sheet, press <Enter>. To change the date, type a date for the Cash Sheet and press <Enter>. You are asked whether the Cash Sheet printed OK
| Important Do not press <y> unless you are certain that the report printed correctly. Once you press <y> the Cash Sheet totals are cleared, and you will not be able to reprint them. CHECK THE PRINTED CASH SHEET RIGHT AWAY because the printer is 'locked up' until you press <y> or <n>, so no one else will be able to use the printer. |
6. If you are SURE that the Cash Sheet printed OK, press <y> and press <Enter>. The Cash Sheet totals are cleared.
If the Cash Sheet DID NOT print OK, press <n> and press <Enter>. You are asked whether you want to reprint the Cash Sheet. Press <y> to reprint the Cash Sheet. Repeat this step until you answer <y> for this step.
The Cash Sheet totals are cleared. The Main Menu is displayed with the Point of Sale sub-menu opened.
Sales by Product Summary Report
The Sales By Product Summary Report provides a breakdown of your register activity according to Product type. Whenever you run a Sales By Product Summary report, you receive up-to-the-minute information about the kinds of merchandise that have been sold since the last time you ran the report.
| Please Note A Product By Sales Summary Report should be printed from the main computer AFTER the Cash Sheet Summary has been printed in order to insure that the change in inventory figures on the two reports match. If they do not match, you may not have printed all the Cash Sheets. Make sure that your printer is turned on, on line, and that it has paper BEFORE printing a Product by Sales Summary Report. |
1. Use the keyboard arrows or the hot key method to Select 'Point of Sale' from the Main Menu. The Point of Sale sub-menu is opened.
2. Select 'Print product sales summary'. The PROGRAM TO PRINT A SALES BY PRODUCT SUMMARY REPORT displays a pop-up menu. See Figure 6-10 below.
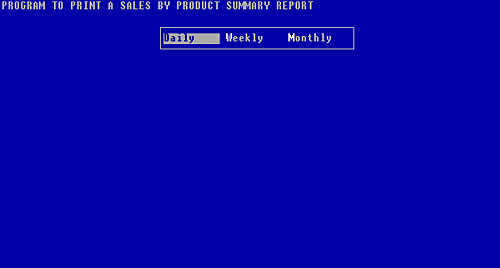
Figure 6-10, print a Sales by Product Summary Report menu
3. Select a time increment for the report.
4. If there is more than one printer in your store, you are asked if you want to use your default printer.Press <y> and press OR press <n> and press <Enter> to display a list of your printers and select a printer from the list.
If there is only one printer in your store, press <Enter> to select your main printer.
You are prompted to 'Enter the date the report is for'. Today's date is displayed.
5. To accept today's date for the report, press <Enter>. To change the date, type a date for the Cash Sheet and press <Enter>.
A series of messages is displayed while the report is compiled and printed. See Figure 6-11 below.
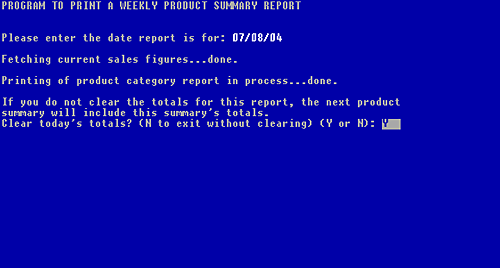
Figure 6-11, program to Print a Product Summary Report
You are asked whether you want to 'Clear today's totals?', and 'Y' is entered by default.
| Important Once you press <y> and the totals are cleared, WordStock clears the report and starts accumulating data again. Do not press <y> unless you are certain that you want to clear the totals and start the figures accumulating again. |
6. If you are SURE that you want to clear the totals, press <y> and press <Enter>. You are notified that the totals are cleared, and then the Main Menu is displayed with the Point of Sale sub-menu opened.
If you DO NOT want to clear the totals, press <n> and press <Enter>. You are notified that you will have to reprint the report and clear the totals. The Main Menu is displayed with the Point of Sale sub-menu opened. Start over at step 1.
Credit Card Authorization Settlement
If you have WordStock's optional Credit Card Authorization (CCA) program, you will have to settle your credit card transactions at the end of each business day. As you receive credit card authorizations throughout the course of the day, a settlement file is built which contains all the pertinent data about the transactions (customer's name, account number, amount of sale, and authorization code).
This file needs to be sent to NPC (the settlement company) in order for your account to be credited for the amount of your credit card transactions. There are three steps involved in the settlement of your credit card transactions:
1. Printing the Transaction Log Summary.
2. Checking the Transaction Log against the actual credit card slips to ensure that no slips are missing.
3. Sending the Transaction Log to NPC for settlement.
Printing the Transaction Log Summary
1. Use the keyboard arrow method or the hot key method to select 'Point of Sale' from the Main Menu. The Point of Sale sub-menu is opened, and 'Cash register' is highlighted.
2. Select 'Credit Card Management'. The Credit Card Management sub-menu is opened, and 'Print transaction log' is highlighted.
3. Press <Enter>.
4. If there is more than one printer in your store, you are asked if you want to use your default printer. Press <y> and press <Enter> OR Press <n> and press <Enter> to display a list of your printers and select a printer from the list.
If there is only one printer in your store, press <Enter> to select your main printer.
The Transaction Log is printed.
Checking the Transaction Log Summary
1. Make sure that you have a credit card slip for every transaction listed on the log, and that every transaction on the log has a corresponding credit card slip.
| Important If there are credit card slips in the drawer that do not appear on the transaction log, call WordStock Support before sending the Transaction Log for settlement. |
Sending the Transaction Log for Settlement
1. Use the keyboard arrow method or the hot key method to select 'Point of Sale' from the Main Menu. The Point of Sale sub-menu is opened, and 'Cash register' is highlighted.
2. Select 'Credit Card Management'. The Credit Card Management sub-menu is opened, and 'Print transaction log' is highlighted.
3. Select 'Send transactions for settlement'. The Transaction Log is sent to NPC.
| Please Note If you get an error message that you don't understand, write it down and call WordStock Support right away. |
|
|||||||||||||||||||||||||||