| Getting Started with WordStock |
WordStock's Keyword Search program allows you to perform simple or sophisticated searches of your inventory based on a string of letters called a keyword.When you type a keyword, WordStock searches your entire Inventory file and displays every item that contains the string of letters that make up your keyword.
For example, if you type the string of letters "cat", your search will yield a list of every item that contains "cat" as part of it's title (cat, catalogue, catch, duplicate etc.). Therefore, we recommend that you use keywords that are as specific as possible.
If you have the optional software, you can also use WordStock's Keyword Search program to search third-party databases, such as those offered by Baker & Taylor, Book Data, Bowker, and Ingram.
In Your Store
You will use the information in this chapter to:
1. Open the Keyword Search program.
2. Search your store's Inventory file:
- Search the "Title" field.
- Search the "Author" field.
- Search the " ISBN/ SKU" field.
- Search the "Comments" field.
- Search the "Title", "Author", and "Comments" fields simultaneously.
3. Become familiar with the Inventory File Information box.
Recognize the Inventory File Information box menu items
4. Search the Books In Print Plus (BIP+.) database.
- Search by a single criteria
- Search by multiple criteria.
5. Become familiar with the WordStock Keyword Search Command Menu.
- View detailed information for an item in a Search Outcome
- Print all or some of the Search Outcome
- Sort the lines of a Search Outcome
- Create a Special Order for an item on a Search Outcome
- Place one or more items from a Search Outcome on a PO
- Access Help
Searching Your Store's Inventory
1. Open the Keyword Search program: In the Command: box on the Basic Inventory, Inventory, Special Order, POS, Receiving or Ordering screens: Type <kw>.
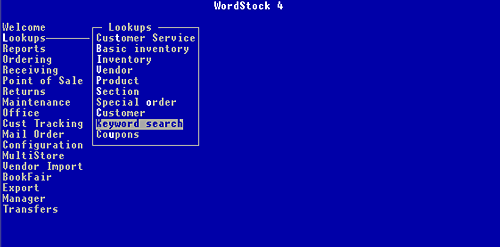
From the Main Menu, select 'Lookups' and then select 'Keyword search' from the Lookups sub-menu.
The 'WordStock Keyword Search' program is opened. See Figure 51 below.
![]()
Figure 5-1, WordStock Keyword Search Menu
2. If you have Books in Print+ [BIP+.], select 'WordStock'. Otherwise, do nothing. The WordStock Keyword Search Menu is displayed.
| Please Note WordStock provides two ways to search your database: Keyword produces an alphabetical list of items that contain a certain string of letters anywhere within the "Title" field. See instructions below. List produces an alphabetical list of items that begin with a certain string of letters. See instructions below. |
Searching the Title Field
1. Use the keyboard arrow method or the hotkey method to select 'Keyword'. The 'Keyword Lookups:' Menu is displayed, with "Title" highlighted. See Figure 52 below.
![]()
Figure 5-2, Keyword Lookups menu
2. Select 'Title'. You are prompted to 'Enter a keyword'.
3. Type a string of letters for which you'd like to search, and press <Enter>. After a short delay, all of the titles that contain the string of letters you entered are listed in a Search Outcome. See Figure 53 below.
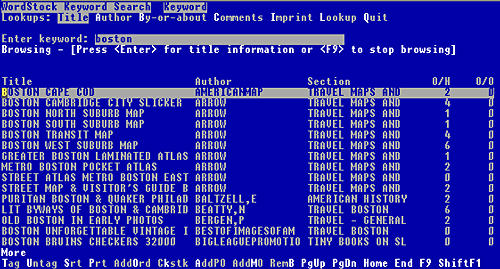
Figure 5-3, Title Search results for 'boston'
| Please Note The Search Outcome lists information about the item's title, author and Section, as well as on hand and on order information so that you can immediately tell your customers whether the item is in stock, and where to find it. |
The Command Menu at the bottom of the Search Outcome screen lists 8 choices (See Figure 53 above).
Searching the Author Field
1. Use the keyboard arrows or the hotkey method to select 'Keyword'. The 'Keyword Lookups:' Menu is displayed.' See Figure 52, above..
2. Select 'Author'. The 'WordStock Keyword Search' program is displayed. You are prompted to 'Enter a keyword'.
3. Type a string of letters for which you'd like to search, and press <Enter>.
After a short delay, all of the titles written by the author(s) whose names contain the string of letters you entered are listed in a Search Outcome. See Figure 54 below.
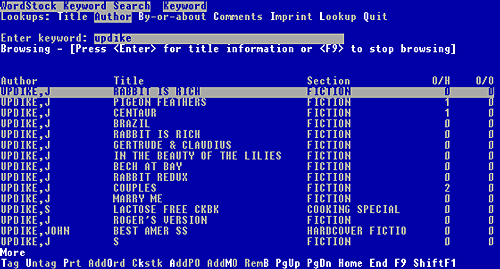
Figure 5-4, Author Search results for 'updike'
| Please Note The Search Outcome lists information about the item's title, author and Section, as well as on hand and on order information so that you can immediately tell your customers whether the item is in stock, and where to find it. The Command Menu at the bottom of the Search Outcome screen lists 8 choices (See Figure 54 above). |
Searching the Comments Field
1. Use the keyboard arrow method or the hot key method to select 'Keyword'. The 'Keyword Lookups:' Menu is displayed.
2. Select 'Comments'. You are prompted to 'Enter keyword'.
3. Type a string of letters by which to search the "Comments" fields of your Inventory records.
After a short delay, all of the items that contain the keyword you entered in the "Comments" field are listed in a Search Outcome. See Figure 55 below.
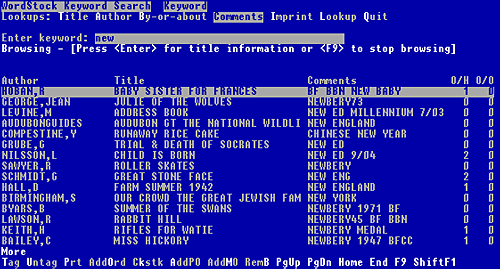
Figure 5-5, Comments Search results for 'new'
| Please Note The Search Outcome lists information about the item's title, author and Section, as well as on hand and on order information so that you can immediately tell your customers whether the item is in stock, and where to find it. The Command Menu at the bottom of the Search Outcome screen lists 8 choices (See Figure 5-5 above). |
Searching the Title, Author, and Comments Fields
1. Select 'Keyword'. The 'Keyword Lookups:' Menu is displayed.
2. Select 'By or about'. You are prompted to 'Enter keyword'.
3. Type a string of letters by which to search the "Title", "Author", and "Comments" fields of your Inventory records. After a brief delay, all of the items that contain the keyword you entered in the "Title", "Author", and "Comments" field are listed in a Search Outcome. See Figure 56 below.
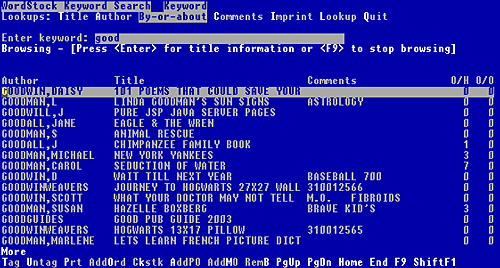
Figure 5-6, By-or-about Search results for 'good'
| Please Note The Search Outcome lists information about the item's title, author and Section, as well as on hand and on order information so that you can immediately tell your customers whether the item is in stock, and where to find it. |
The Command Menu at the bottom of the Search Outcome screen lists 8 choices (See Figure 56 above).
Searching for a List of Items that begin with a Keyword
While conducting a keyword search using the 'Keyword' function produces an alphabetical list of items that contain your keyword anywhere within the "Title" field, using the 'List' function produces an alphabetical list of items that begin with your keyword.
Searching the Title Field
1. Use the keyboard arrow method or the hot key method to select 'List'. The 'List Lookups' Menu is displayed. See Figure 57 below.
![]()
Figure 5-7, the 'List' lookups menu
2. Select 'Title'. The 'WordStock Keyword Search' program is displayed and you are prompted to 'Enter title:'.
3. Type a string of letters for which you'd like to search, and press <Enter>.
After a short delay, all of the titles that begin with the string of letters you entered are listed in a Search Outcome. See Figure 58 below.
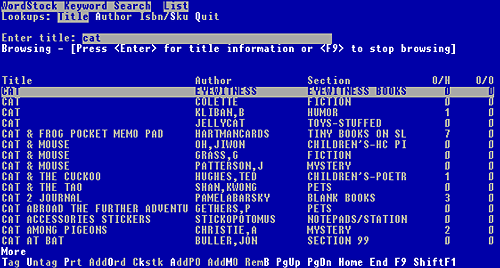
Figure 5-8, Title Search results for 'cat'
| Please Note All of the items in the Search Outcome begin with the keyword you entered. |
The Search Outcome lists information about the item's title, author and Section, as well as on hand and on order information so that you can immediately tell your customers whether the item is in stock, and where to find it.
The Command Menu at the bottom of the Search Outcome screen lists 8 choices (See Figure 58 above).
Searching the Author Field
1. Use the keyboard arrow method or the hot key method to select 'List'. The 'List Lookups' Menu is displayed. See Figure 59 below.
![]()
Figure 5-9, the 'List' lookups menu
2. Select 'Author'. The 'WordStock Keyword Search' program is displayed. You are prompted to 'Enter author'.
3. Type a string of letters for which you'd like to search, and press <Enter>.
After a short delay, all of the titles written by the author(s) whose names begin with the string of letters you entered are listed in a Search Outcome. See Figure 510 below.
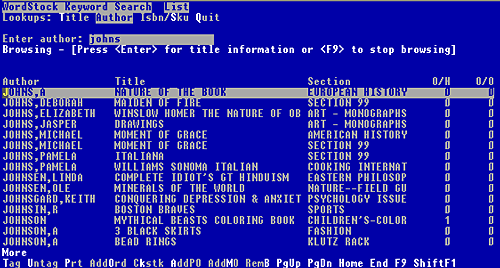
Figure 5-10, Author Search results for "Johns"
| Please Note The Search Outcome lists information about the item's title, author and Section, as well as on hand and on order information so that you can immediately tell your customers whether the item is in stock, and where to find it. The Command Menu at the bottom of the Search Outcome screen lists 8 choices (See Figure 510 above). |
Searching the ISBN/SKU Field
1. Use the keyboard arrow method or the hot key method to select 'List'. The 'List Lookups:' Menu is displayed. See Figure 59 above.
2. Select 'Isbn/Sku'. The 'WordStock Keyword Search' program is displayed and you are prompted to 'Enter ISBN/SKU:'.
3. Type an ISBN/SKU to search by and press <Enter>. If the ISBN/SKU is in your inventory: The title, Section, On Hand, and On Order information for the ISBN/SKU are displayed.
Press <Enter> to see detailed Inventory information for the ISBN.
If the ISBN/SKU is not in your inventory: You are notified that no records were found for the ISBN you entered. The 'List Lookups:' Menu is displayed. An Inventory File Information box is displayed.
Key Word Search Outcome Command Menu
You can use the Command Menu (see Figure 511 below) at the bottom of the WordStock Search Outcome screen to:
- View detailed inventory information for an item in a Search Outcome
- Print the Search Outcome
- Sort the lines of a Search Outcome
- Create a Special Order for an item on a Search Outcome
- Tag a selection of items from the Search Outcome in order to print a list of specific titles
- Place one or more items from a Search Outcome on a new or existing PO
- Access Help
![]()
Figure 5-11, Search Results Command Menu
Viewing Detailed Information for an Item
1. Use the keyboard arrows to highlight a title, and press <Enter>. An Inventory File Information box is superimposed on the screen. See Figure 512 below.
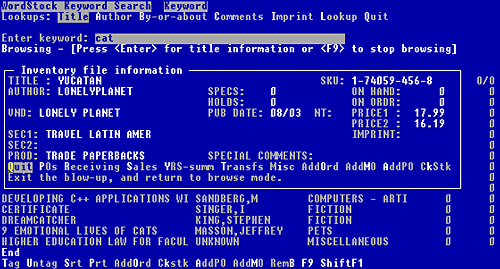
Figure 5-12, an Inventory File information box
The Inventory File Information Box Command Menu
You can use the Command Menu at the bottom of the Inventory File Information box to view more information about the history of the title.
Select 'POs' to view the PO type, number, date, and quantity ordered for the last four POs on which the title appears.
Select 'Receiving' to view the receiving date, invoice number, invoice date, and discount percentage for the last two invoices on which the title appears.
Select 'Sales' to view sales information for the title for each month in the past year and each of the last thirteen weeks.
Select 'Yrssummary' to view consolidated sales, purchases, returns, and over/short information for the title for this year and last year. Select ' Transfers' to view information about transfers of this title in and out of your store for this year and last year.
Select 'Misc' to view frequency reorder point and quantity information, restock information, store number [#], the title's catalogue number [#] and the date the title was first received in your store.
Select 'Order' to create a Special Order for the title. See Chapter 12 Special Orders.
Select 'AddPO' to add the title to a new or existing PO.
When you are done with the Inventory file information box, select 'Quit' to return to the Search Outcome.
Printing the Search Outcome
You can print your Search Outcome on your regular printer paper (standard format) or on a receipt (receipt format).
1. With the result of your search displayed on the WordStock Keyword Search Program screen, press <p> or use the keyboard arrows to select 'Print' from the Command Menu.
2. To print the entire search outcome: Press <Enter>.
To print a single page of the search outcome, use the keyboard arrows or the hot key method to select 'Single page'. A "Format:" popup menu field appears above the search outcome list, and 'Receipt' is highlighted.
3. To print the search outcome in receipt format at a POS terminal, press <Enter>.
To print the search outcome in standard format: Select 'Standard format'.
Skip to step 5.
You are asked whether you want to 'Send the report to this terminal's printer'.
4. Press <y> to use your POS terminal's receipt printer: Press <n> for printer options: A Printers Menu box is displayed in the upper right corner of the screen and your default printer is highlighted. Select a printer. Your Search Outcome is printed.
5. If there is only one printer in your store, your Search Outcome is printed.
If there is more than one printer in your store: A Printers Menu box is displayed in the upper right corner of the screen and your default printer is highlighted. Select a printer.
Sorting the Lines of a Search Outcome
You can make it easier for a customer to find a title in your store by sorting the lines of a Search Outcome alphabetically by title or author, before printing the Search Outcome.
1. With the result of your search displayed on the WordStock Keyword Search Program screen, press <s> or use the keyboard arrows to select 'Sort' from the Command Menu. A "Sort by:" popup menu field appears above the Search Outcome list, and 'Title' is highlighted.
2. To sort by title, press <Enter>.
To sort by author: Use the keyboard arrows or the hot key method to select 'Author'. The Search Outcome is sorted alphabetically.
Creating a Special Order for an Item
1. With the result of your search displayed on the WordStock Keyword Search Program screen, use the keyboard arrows to highlight the item for which you want to make a Special Order.
2. Use the keyboard arrow method or the hot key method to select 'Order' from the Command Menu. A new Special Order Screen is displayed with the highlighted item's information entered into the appropriate fields.
3. See Chapter 12 Special Orders for instructions.
Tagging a Group of Items
You can use the 'Tag' function to print a list of specific items from your Search Outcome without printing the entire Search Outcome.
1. With the result of your search displayed on the WordStock Keyword Search Program screen, use the keyboard arrows to highlight an item that you want to include on your printed list.
2. Select 'Tag'. The highlighted item is 'tagged' for your list.
3. Repeat steps 1and 2 for each item you want to include on your printed list.
4. When you are done, select 'Print'. A Print menu is displayed, and 'Taggedall' is highlighted. See Figure 513 below.
![]()
Figure 5-13, Search results print menu, 'tagged-all' selected
5. To print a list of all the tagged items, press <Enter>.
To print a list of all the tagged items on the displayed page, select 'Page-tagged' .Follow steps 2 through 5 above.
To print the entire Search Outcome, or a single page of the Search Outcome, a "Format:" pop-up menu field appears above the search outcome list, and 'Receipt' is highlighted.
6. To print the search outcome in receipt format at a POS terminal, press <Enter>. You are asked whether you want to 'Send the report to this terminal's printer'. To print the search outcome in standard format, select 'Standard format'. Skip to step 8.
7. Press <y> to use your POS terminal's receipt printer and your selection is printed. Press <n> for printer options: A Printers Menu box is displayed in the upper right corner of the screen and your default printer is highlighted. Select a printer.
8. If there is only one printer in your store, your selection is printed.
If there is more than one printer in your store, a Printers Menu box is displayed in the upper right corner of the screen and your default printer is highlighted. Select a printer.
Placing an Item from a Search Outcome
on a Purchase Order
1. With the result of your search displayed on the WordStock Keyword Search Program screen, use the keyboard arrows to highlight the item that you want to order.
2. Press <a> (the command for 'AddPO'). 'Enter how many copies to order:' is displayed across the screen, and '1' is entered by default.
3. If you want to order one of the item, press <Enter>. If you want to order more than one of the item, type the number that you want to order and press <Enter> You are prompted to enter the PO to add the item to, and 'NEW' is entered by default.
4. If you want the system to assign the next available PO#, press <Enter>.
If you want to assign a PO#, type <apo> and press <Enter>. You are prompted to 'Enter the new PO# to assign'. Type the PO# and press <Enter>.
If you want to add the item to an existing PO, type the PO# and then and press <Enter>.
You are notified that the item has been added to the PO, and prompted to 'press the ENTER key to continue'.
Skip to step 8.
You are prompted to 'Enter the type for the new PO', and PO (Purchase/Publisher Order) is entered by default.
| Please Note See Chapter 8 Ordering for a description of PO types and a description of costing methods. |
5. If 'PO' is the correct PO type: Press <Enter>. Otherwise: Type the PO type and press <Enter>.
You are prompted to 'Enter the costing method for the new PO', and 'DE' (Discount Entry) is entered by default.
6. If the costing method is DE (discount entry): Press <Enter>. If the costing method is CE (cost entry): Type <ce> and press <Enter>. You are prompted to 'Enter the discount for the new PO'. Type the discount percentage (4 digits to accommodate a decimal point) and press <Enter>.
7. You are notified that the item has been added to the PO, and prompted to 'press the ENTER key to continue'. Press <Enter>.
8. Press <Enter>. Your Search Outcome is displayed with the cursor flashing on the ordered title.
Accessing Help
1. With the result of your search displayed on the WordStock Keyword Search Program screen, hold down the <Shift> key and press <F1>. The Search Outcome Help pop-up menu is superimposed on the Search Outcome screen. See Figure 514 below.
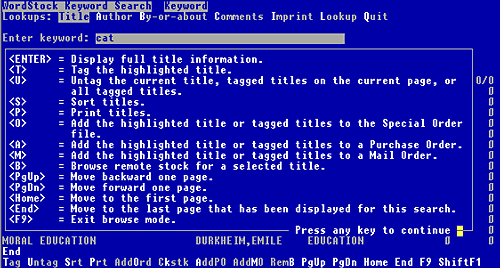
Figure 5-14, Search results pop-up Help menu
2. Make a selection from the menu, or press <F8> to return to the WordStock Keyword Search Program screen.
Books-in-Print [BIP+] Key Word Search
If you do not find the item(s) you are looking for in the WordStock Keyword Search program (if the items are not in your inventory) and you have the optional software, you can search the BIP+ database.
| Please Note If 'BIP+' is not a choice on your WordStock Keyword Search Program Menu, you do not have the optional software necessary to run BIP+. To find out more about BIP+. software, phone WordStock Sales at (800) 7539673. |
When you type a keyword to search by, WordStock will search every citation in the entire BIP+. program and display a list of each item that contains the string of letters that make up your keyword.
| Hint A BIP+ citation is more extensive than a WordStock 4 Inventory record. Because a citation may contain a commentary, a review, a brief summary of the book, and/or biographical information about the author, we recommend that you choose keywords that are as specific to the title/author that you are searching for as possible. |
Opening the BIP+ Key Word Search Program
1. In the Command: box in the Basic Inventory, Inventory, Special Order, POS, Receiving or PO screens, type <kw>.
From the Main Menu: Select 'Lookups' and then select 'Keyword search' from the lookups submenu and select. The WordStock Keyword Search program is opened.
2. Select 'BIP+'. The 'WordStock Keyword Search BIP+.' Menu is displayed.
A Search Criteria box is displayed and the 'Keyword' field is highlighted. See Figure 515 below.
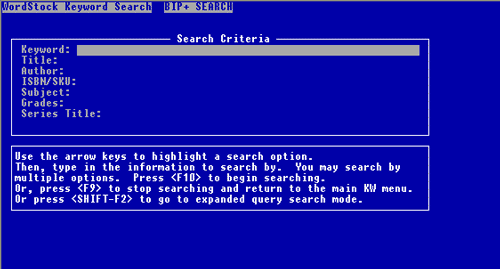
Figure 5-15, WordStock BIP+ Keyword Search
The Search Criteria Box
Because a BIP+ keyword search typically yields a large number of titles, we recommend that you use more than one keyword and/or base your keyword search on more than one criteria. The BIP+. Search Criteria box contains a list of search criteria:
Keyword: A search based on the 'Keyword' criteria will yield a list of every book in the BIP+ database that contains the keyword anywhere in the citation (including a summary of the book, a review about the book, and/or biographical information about the author).
Title: A search based on the 'Title' criteria will yield a list of every book in the BIP+ database that contains the keyword(s) in its title.
Author: A search based on the 'Author' criteria will yield a list of every book in the BIP+ database that was written by every author whose name contains the keyword(s) you enter. To search by both first and last name, type the name using the <Last,First> format.
ISBN: A search based on the 'ISBN' criteria will yield a list of every book in the BIP+ database that begins with the portion of the ISBN that you enter.
Subject: A search based on the 'Subject' criteria will yield a list of every title in the BIP+ database that contains as its subject the keyword(s) you enter.
Series: A search based on the 'Series' criteria will yield a list of titles that the publisher has identified as part of a series. Even if a title is generally recognized as part of a series, it will not appear in the Search Outcome unless the publisher has identified it as such. If a search based on the 'Series' criteria is unsuccessful, try using the series name as the keyword for a title search.
Grades: A search based on the 'Grades' criteria will yield a list of titles that the publisher has identified as appropriate for the grade level you enter.
Even if a title is generally recognized as appropriate for a certain grade level, it will not appear in the search outcome unless the publisher has identified it as such.
Selecting Search Criteria
1. To search by a single criterion, use the keyboard arrows to position the cursor in a criterion field , type the keyword information you want to search by and press <F10>.
To search by multiple criteria, use the keyboard arrows to position the cursor in each criterion and type the keyword information you want to search by. Press <F10>.
A list of titles which contain the keyword(s) you entered is displayed in a BIP+. Search Outcome. See Figure 516 below
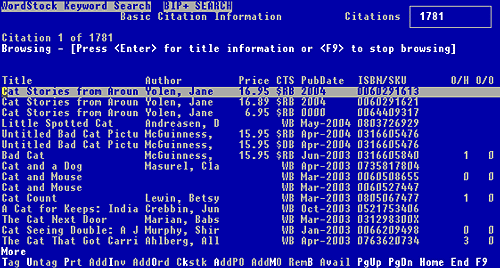
Figure 5-16, BIP+ Search Results for 'cat'
BIP+ Keyword Search Outcome Command Menu
You can use the Command Menu (see Figure 517 below) at the bottom of the BIP+. Search Outcome screen to:
- View detailed information for an item in a Search Outcome
- Print all or some of the Search Outcome
- Create a Special Order for an item on a Search Outcome
- Add a title form the BIP+. database to your WordStock database
- Place one or more items from a Search Outcome on a PO
- Access Help
![]()
Figure 5-17, BIP+ Search Results Command menu
Viewing Detailed Information for an Item
1. Use the keyboard arrows to highlight a title, and press the <Enter> key. An Expanded Citation Information box is displayed. See Figure 518 below.
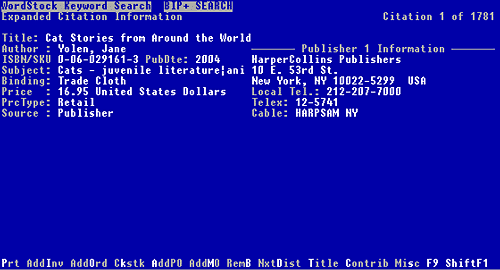
Figure 5-18, expanded citation file information box
The Expanded Citation Information Box Menu Items
You can use the Command Menu at the bottom of the Inventory file information box to view more information about the history of the title.
Select 'P=Print' to print the Expanded Citation Information box.
Select 'O=Order' to create a Special Order for the title. See Chapter 12 Special Orders.
Select 'I=AddInv' to create an Inventory record for a title.
Select 'A=Add PO' to put the displayed title onto a new or existing PO.
When you are done with the Expanded Citation Information box, select 'F9=Stop' to return to the BIP+ Search Outcome.
Printing the Search Outcome
You can print your BIP+ Search Outcome on your regular printer paper (standard format) or on a receipt (receipt format).
1. With the result of your search displayed on the WordStock Keyword Search Program screen, press <p> or use the keyboard arrows to select 'Print' from the Command Menu.
2. To print the entire Search Outcome, press <Enter>. To print a single page of the Search Outcome, select 'Single page'.
A "Format:" pop-up menu field appears above the search outcome list, and 'Receipt' is highlighted.
3. To print the Search Outcome in receipt format at a POS terminal, press <Enter>. You are asked whether you want to 'Send the report to this terminal's printer'.
To print the Search Outcome in standard format, select 'Standard format'. Skip to step 5.
4. To use your POS terminal's receipt printer, press <y>. To view printer options, press <n>. A Printers Menu box is displayed in the upper right corner of the screen and your default printer is highlighted. Select a printer. Your Search Outcome is printed.
5. If there is only one printer in your store, your Search Outcome is printed. If there is more than one printer in your store, a Printers Menu box is displayed in the upper right corner of the screen and your default printer is highlighted. Select a printer.
Creating a Special Order for an Item
1. With the result of your search displayed on the WordStock Keyword Search Program screen, use the keyboard arrows to highlight the item for which you want to make a Special Order.
2. Use the keyboard arrow method or the hot key method to select 'Order' from the Command Menu. A new Special Order Screen is displayed with the highlighted item's information entered into the appropriate fields.
3. See the Special Order chapter for instructions.
Adding a Title from the BIP+ Database
to Your Inventory File
You can use the 'AddInv' function to create an Inventory record for a title:
1. With the result of your search displayed on the WordStock Keyword Search Program screen, use the keyboard arrows to highlight an item that you want to add to your Inventory file.
2. Select 'AddInv'. If the item is already in your Inventory file: 'This item is already in inventory updating with BIP info' is displayed. Start over at step 1.
Otherwise, the Products Lookup box is superimposed on the screen, and the cursor is flashing there. See Figure 519 below.
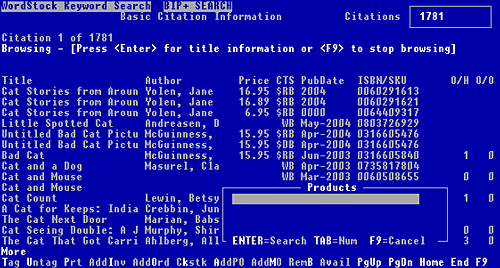
Figure 5-19, Product Lookups box
3. Type the Product name that you want to assign to the item and press <Enter>. The closest alphabetical match to the Product name you entered is displayed. You can now scroll alphabetically through your Products by using the keyboard arrows.Keyword Search
4. When you have found the Product name that applies to the item, press <Enter>. The Sections Lookup box is superimposed on the screen, and the cursor is flashing there.
5. Type the Section name that you want to assign to the item, and press <Enter>. The closest alphabetical match to the Section name you entered is displayed. You can now use the keyboard arrows to scroll (alphabetically by name) through your Sections.
6. When you have found the Section name that applies to the item, press <Enter>.
An Inventory record has been created for the item, and it has been assigned the Product code and the Section code that you selected in steps 3 through 5.
Tagging a Group of Items to Produce
a Customized Printout
You can use the 'Tag' function to print a list of specific items from your Search Outcome without printing the entire Search Outcome.
1. With the result of your search displayed on the WordStock Keyword Search Program screen, use the keyboard arrows to highlight an item that you want to include on your printed list.
2. Select 'Tag'. The highlighted item is 'tagged' for your list.
3. Repeat steps 1and 2 for each item you want to include on your printed list.
4. When you are done, select 'Print'. A Print menu is displayed, and 'Taggedall' is highlighted. See Figure 520 below.
![]()
Figure 5-20, BIP+ Search Results Print menu
5. To print a list of all the tagged items, press <Enter>.
To print a list of all the tagged items on the displayed page, select 'Pagetagged'.
To print the entire Search Outcome, or a single page of the Search Outcome:
A "Format:" pop-up menu field appears above the search outcome list, and 'Receipt' is highlighted.
6. To print the search outcome in receipt format at a POS terminal, press <Enter>. You are asked whether you want to 'Send the report to this terminal's printer'. To print the search outcome in standard format: Select 'Standard format'. Skip to step 8.
7. Press <y> to use your POS terminal's receipt printer: Press <n> for printer options: A Printers Menu box is displayed in the upper right corner of the screen and your default printer is highlighted. Select a printer. Your selection is printed.
8. If there is only one printer in your store, your selection is printed. If there is more than one printer in your store, a Printers Menu box is displayed in the upper right corner of the screen and your default printer is highlighted. Select a printer.
Placing an Item from a Search Outcome
on a Purchase Order
1. With the result of your search displayed on the WordStock Keyword Search Program screen, use the keyboard arrows to highlight the item that you want to order.
2. Press <a> (the command for 'AddPO'). 'Enter how many copies to order:' is displayed across the screen, and '1' is entered by default.
3. If you want to order one of the item, press <Enter>. If you want to order more than one of the item, type the number that you want to order and then press <Enter> You are prompted to enter the PO to add the item to, and 'NEW' is entered by default.
4. If you want the system to assign the next available PO#, press <Enter>.
If you want to assign a PO#, type <apo> and press <Enter>. You are prompted to 'Enter the new PO# to assign'. Type the PO# and press <Enter>.
If you want to add the item to an existing PO, type the PO# and then press <Enter> You are notified that the item has been added to the PO, and prompted to 'press the ENTER key to continue'. Skip to step 8.
You are prompted to 'Enter the type for the new PO', and PO (Purchase/Publisher Order) is entered by default.
| Please Note See Chapter 8 Ordering for a description of PO types. |
5. If 'PO' is the correct PO type, press <Enter>. Otherwise, type the PO type and press <Enter>. You are prompted to 'Enter the costing method for the new PO', and 'DE' (Discount Entry) is entered by default.Keyword Search
6. If the costing method is DE (discount entry): Press <Enter>. If the costing method is CE (cost entry): Type <ce> and press <Enter>. You are prompted to 'Enter the discount for the new PO'.
7. Type the discount percentage (4 digits to accommodate a decimal point) and press <Enter>. You are notified that the item has been added to the PO, and prompted to 'press the ENTER key to continue'. Press <Enter>.
8. Press <Enter>. Your Search Outcome is displayed with the cursor flashing on the ordered title.
Accessing Help
1. With the result of your search displayed on the WordStock Keyword Search Program screen, hold down the <Shift> key and press <F1>. A Help pop-up menu is superimposed on the Search Outcome screen. See Figure 521 below.

Figure 5-21, BIP+ Search results Help menu
2. Make a selection from the menu, or press <F8> to return to the WordStock Keyword Search Program screen.
| Books-in-Print+ and BIP+ are trademarks of RR Bowker. |
|
|||||||||||||||||||||||||||