| Getting Started with WordStock |
You can use WordStock's Reports program to generate reports based on virtually any of the fields in any of the data files in the Lookups sub-menu.
WordStock's comprehensive Report generation strategy is designed to provide you with the ability to extract specific information from your WordStock system and organize it into a useful format so that you can make the most informed choices about how to manage your inventory (including but not limited to: ordering, returning merchandise to Vendors, facilitating customer service, and measuring the profitability of your merchandising methods).
Once you familiarize yourself with the concepts behind generating reports, you will find that the reports process is a straightforward method of extracting valuable information from your WordStock databases.
In Your Store
This chapter is designed to help you make the most of WordStock's Reports program. Wherever possible, we use examples to explain core processes, with the understanding that the information provided can be applied to a variety of report situations.
WordStock also provides commonly-used reports in standardized form so that you can access your most frequently run reports easily.
You will use the information in this chapter to:
1. Become familiar with the concept of reporting on your data files.
2. Design custom reports:
- Create Sort Include Specifications.
- Create Sort Order Specifications.
- Sort a data file.
- Create Report Formats.
- Print custom reports.
3. Become familiar with WordStock 4's standard reports.
The Restocking Report
- Printing a Restocking Report.
- Viewing a Restocking Report on the screen.
- Adding Restocking quantities to a PO.
The Standard Inventory Report.
- Printing a Standard Inventory Report.
- Viewing an Inventory Sort on the screen.
- Adding a sorted record to a PO.
- Adding a sorted record to a Return Order.
The Basic Inventory Report.
- Printing an Item List fo a customer.
Vendor, Product, Section, Special Order, & Customer Reports.
Reports based on custom sorts.
Reports based on all records in your data file.
The Cost of Inventory Report.
Understanding Creating Reports
Simply put, you generate a report in order to obtain information about your data files and to organize it in such a way that it tells you what you want to know about a specific aspect of your business.
Once you determine the purpose of the report (for example, you may want to generate a report to tell you what items you need to order from the Random House Children's Representative) ask yourself three basic questions:
1. What information do you need to extract [sort] from your data files in order to achieve the stated purpose of the report?
The answer to this question constitutes your Sort Include Specification which determines which records you tell WordStock to extract from your data files for your report.
For example, if you want to determine what to order from the Random House Children's representative, you will need to tell WordStock to search your Inventory file for all the Random House titles in your Children's Section.
2. In what order would like WordStock to extract [sort] the information from your data files?
The answer to this question determines your Sort Order Specification which defines the order in which WordStock will present the information in your Sort Include.
For example, if you want the titles to be presented in the same order that they appear on your shelves, and your Sections are organized alphabetically by author, and within each author alphabetically by title, you will need to tell WordStock to organize the titles in the report in that fashion.
At this point, WordStock 4 will have sorted the records you want in the order in which you want them, but because it is rarely useful to print the information in every field in the records you've sorted, you need to answer a third question in order to narrow the scope of the report:.
3. What information do you need from the data files in your Sort Include in order to best meet the purpose of the report?
The answer to this question determines your Report Format which defines which fields in the data files in your Sort Include Specification will be represented in the report.
For instance, if you are determining what to order from the Random House Children's Representative, you will most likely want WordStock to print information from the following fields of the Inventory records of your Random House titles in your Children's Section:
- ISBN/ SKU
- Title
- Author
- On Hand Quantity
- On Order Quantity
- Current Year Purchases
- Current Year Sales
- Current Year Returns and
- Sales for the last two months.
You assign a name to each Sort Include Specification, Sort Order Specification, and Report Format that you design, and each is saved in a WordStock file so that you can reuse them whenever you want to generate a report.
Our sample Sort Include (all Random House titles in your Inventory file that are in your Children's Section) could be named "RH_childrens" (report names can be up to 16 characters, and may not contain spaces), and you could use it whenever you want to extract the Random House children's books from your Inventory file. Our sample Sort Order (alphabetically by author , and within each author alphabetically by title) could be named "author_title", and you could use it whenever you want to organize a report in alphabetical order by author.
Our sample Report Format (ISBN/SKU, Title, Author, On Hand Quantity, On Order Quantity, Current Year Purchases, Current Year Sales, Current Year Returns, and Sales for the last two months) could be called "Ordering", and you could use it whenever you want to place an order with a Vendor or a wholesaler.
Designing Custom Reports
There are four major steps to generating a report:
1. Create a new (or select an existing) a Sort Include Specification to tell WordStock what records you'd like to include in the report.
2. Create a new (or select an existing) a Sort Order Specification to tell WordStock the order in which to present the information.
3. Sort a data file to tell WordStock to actually sort out the records you want to examine.
4. Create (or select an existing) a Report Format to tell WordStock what information from the records in your Sort Include Specification to include on the printout, or to be viewed on the screen.
Creating a Sort Include Specification
Your Sort Include Specifications tell WordStockwhat information you want it to retrieve from your data files.
As in our example Sort Include Specification, you may want to search your Inventory file for every item that has Random House as its Vendor, and is in the Children's Section.
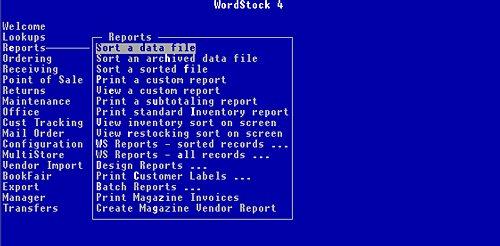
1. Use the keyboard arrow method or the hot key method to select 'Reports' from the Main Menu. The Reports sub-menu is opened, and 'Sort a data file' is highlighted.
2. Select 'Design Reports'. The 'Design Reports'sub-menu is opened, and 'Create sort includes' is highlighted.
3. Press <Enter>.
The PROGRAM TO CREATE A SORT INCLUDE SPECIFICATION is displayed and the Data Files Menu box is opened. See Figure 7–1 below.
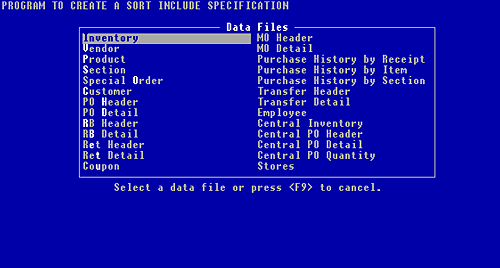
Figure 7-1, Sort Include Specification data files menu box
| Hint The Data Files Menu box lists all of the data files on which a report can be based. In our example Sort Include Specification, we want to extract records from the Inventory file, so we would select 'Inventory' from the Data Files Menu box. |
4. Use the keyboard arrows to select a data file on which to base your report, and press <Enter>. You are prompted to 'Enter the name of the specification to create'.
| Remember Once you create, name, and save your Sort Include Specifications, they are stored in a file and can be used again whenever you want to create a report. |
5. Type the name for the Sort Include Specification (something recognizable about the Sort - up to 16 characters, no spaces) and press <Enter>.
| Hint Our sample Sort Include (all Random House titles in your Inventory file that are in your Children's Section) could be named "RH_childrens", and you could use it whenever you want to extract the Random House children's books from your Inventory file. |
A Fields list box is opened and an Include Conditions box is displayed in the bottom portion of the screen. You are prompted to 'Please pick the field you want to compare against'. See Figure 7–2 below.
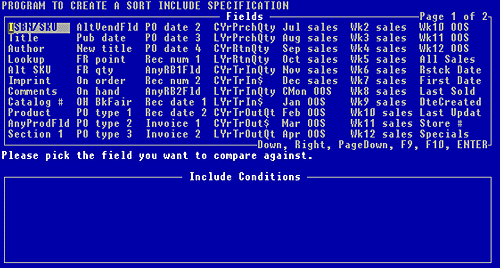
Figure 7-2, List of reportable Inventory File fields
| Hint The Fields List box displays all of the sortable fields from the file you selected (including some fields not visible when a record is displayed on the screen). You can select as many fields as you want. |
In our example Sort Include Specification, we want to search the Vendor field (to extract all the Random House titles) so we would first select 'Vendor#' from the Fields List box.
The Include Conditions box will display all the fields that you select for your Sort Include and the conditions you apply to each field.
6. Use the keyboard arrows to select the first field on which you'd like to sort your files, and press <Enter>. The field name appears in the Include Conditions box, and the Operators pop-up menu is opened. See Figure 7–3 below.
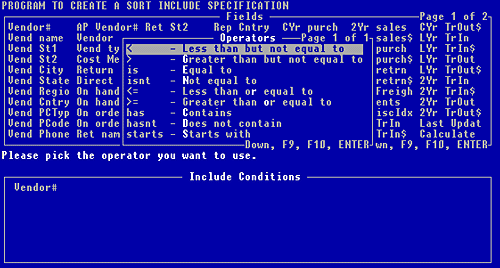
Figure 7-3, 'Operators' pop-up menu
| Hint The Operators pop-up menu contains a list of symbols (operators) which allow you to tell WordStock which records to extract from the data file based on the contents of the field you selected from the Fields List box. In our example Sort Include Specification, we want to extract all the titles that have Random House as their Vendor from the Inventory file, so we want the Vendor # to equal Random House's Vendor number (394). We would select 'is' from the Operators pop-up menu. |
7. Use the keyboard arrows to select an operator, and press <Enter>. The operator symbol appears to the right of the field name in the Include Conditions box, and you are asked whether you want to 'compare against a constant'. See Figure 7–4 below.
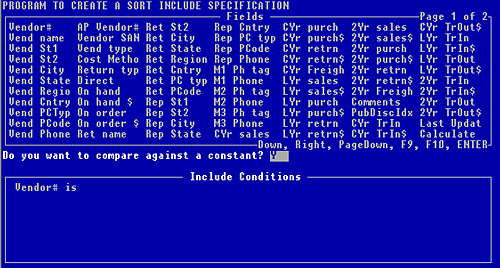
Figure 7-4, Include Conditions box showing the first report field and its Operator
| Hint You can either compare against a constant value of your choice, or against the value in another field. In our example Sort Include Specification, we want to extract all the titles that have Random House as their Vendor from the Inventory file (we want the Vendor # to equal Random House's Vendor number) so we would compare against a constant (Vendor #394). |
You would compare against another field if you wanted your report to display a comparison of two field values. For example, you may want WordStock 4 to extract data about all titles for which the current year sales are less than last year sales so that you can observe sales trends.
In that case you would select 'CYSls$' (current year sales) from the Inventory Fields List box, and 'less than but not equal to' from the Operators pop-up menu. Then you would answer <n> when asked if you want to compare against a constant, and instead select "LYSLS$" as the field to compare against.
8. If you want to compare the field value to a constant value of your choice, press <y>. You are prompted to 'Please Enter the constant value:'
If you want to compare the field value to another field value, p ress <n>. You are prompted to 'Please pick the field you want to compare against:'
9. Type the constant value and press <Enter>. Use the keyboard arrows to select a field from the Fields Menu box and press <Enter>.
You are asked 'Do you have any additional conditions?', and 'N' is entered by default.
See Figures 7-5 and 7-6 below
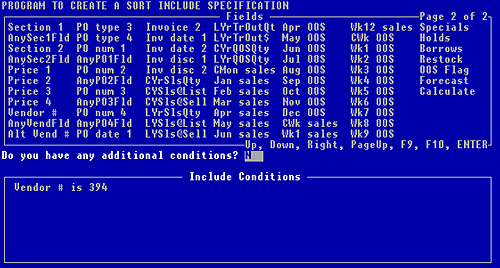
Figure 7-5, Selecting a constant value
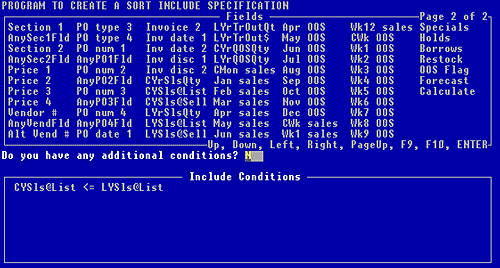
Figure 7-6, Comparing one field against another
10. If you want your report to be based on an additional criteria, press <y>.
If your Sort Include is complete, press <n>. 'and' appears to the right of your last condition in the Include Conditions box and you are prompted to 'Please pick the field you want to compare against'.
Repeat steps 6–9 until you have Entered all additional conditions. You are asked 'Do you have any additional conditions?'. Press <n>.
You are asked 'Do you have any alternate conditions?', and 'N' is entered by default. See Figure 7–7 below.
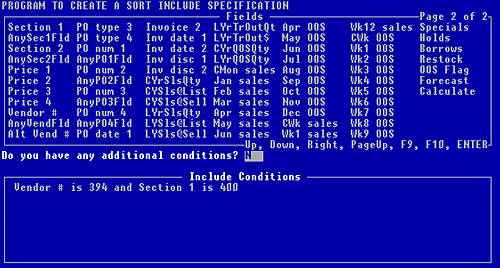
Figure 7-7, an Include Specification with an Additional Condition
| Hint You can apply alternate criteria to a Sort Include Specification: In our example Sort Include Specification, we want to extract all the titles that have Random House as their Vendor from the Inventory file AND that are in the children's Section of the store. Since Random House has another Vendor number, we would want WordStock to extract all the children's titles that have EITHER 394 OR 679 as their Vendor number. See Figure 7–8 below. |
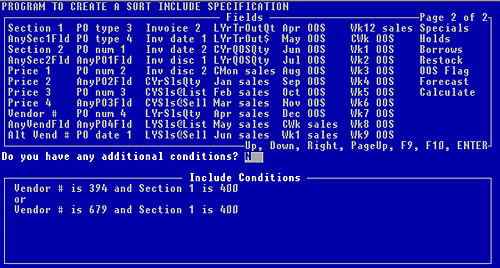
Figure 7-8, an Include Specification with an Alternative Condition
11. If you want your report to be based on an alternate criteria, press <n>.
If your Sort Include is complete, press <y>. 'or' appears beneath your Sort Include criteria in the Include Conditions box and you are prompted to 'Please pick the field you want to compare against'. Repeat steps 6–9 until your Sort Include is complete.
Your Sort Include Specification is now complete .
(Our sample Sort Include Specification would be complete as long as Random House has no other Vendor numbers, and 400 is the only children's Section in the store).
You are asked 'Would like to save the Sort Include?'.
12. To save the Sort Include, press <y>. Your Sort Include is saved.
To return to the Main Menu without saving the Sort Include, press <n>.
The Main Menu is displayed with the Reports and the Design Reports sub-menus opened.
| Please Note You can press the backspace key or <d> to delete the information in the last field you Entered. You can press <F8> at any time to quit without saving. |
Creating a Sort Order Specification
A Sort Order Specification defines the order in which WordStock will present the information in your Sort Include.
For example, if you want the titles in your report to be presented in the same order that they appear on your shelves, and your Sections are organized alphabetically by author and then alphabetically by title, you will need to tell WordStock to organize the titles in the report in that fashion.
The following directions describe how to create a Sort Order Specification. Once you create and save your Sort Order Specifications, they are stored in a file and can be used whenever you want to create a report.
WordStock is equipped with 30 pre-designed Sort Order Specifications based on the most commonly used Sort Orders (see Appendix 6).
1. Use the keyboard arrow method or the hot key method to select 'Reports' from the Main Menu. The Reports sub-menu is opened, and 'Sort a data file' is highlighted.
2. Select 'Design Reports'. The 'Design Reports' sub-menu is opened, and 'Create sort includes' is highlighted.
3. Select 'Create sort orders'. The PROGRAM TO CREATE A SORT ORDER SPECIFICATION is displayed and a Data Files Menu box is opened. See Figure 7–9 below.
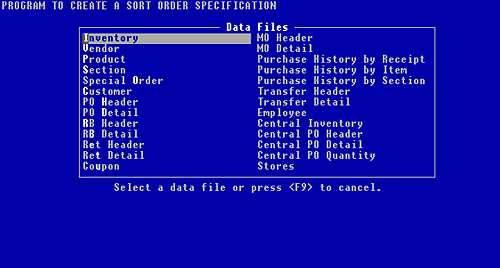
Figure 7-9, the Sort Order Specification data files menu box
| Hint The Data Files Menu box lists all of the data files on which a report can be based. In our example Sort Order Specification, we want to extract records from the Inventory file, so we would select 'Inventory' from the Data Files Menu box. |
4. Use the keyboard arrows to select a data file on which to base your report, and press <Enter>. You are prompted to 'Enter the sort order specification name:'
| Remember Once you create, name, and save your Sort Order Specifications, they are stored in a file and can be used whenever you want to create a report. |
5. Type the name for the Sort Order Specification (something recognizable about the Sort – up to 16 characters, no spaces) and press <Enter>.
| Hint Our sample Sort Order Specification (alphabetically by author, and within each author alphabetically by title) could be named "author_title", and you could use it whenever you want to order a report in this fashion. |
A Fields List box is opened and a Sort Order Fields box is displayed in the bottom portion of the screen. You are prompted to 'Please select the first field you wish to sort on.' See Figure 7–10 below.
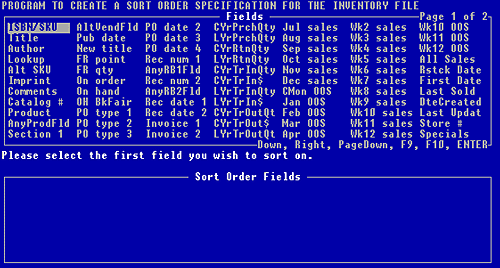
Figure 7-10, the fields available for an Inventory file report
| Hint The Fields List box displays all of the sortable fields from the file you selected (including some fields not visible when a record is displayed on the screen). You can select as many fields as you want. |
In our example Sort Order Specification, we want to sort the all the Random House titles in the children's Section alphabetically by author , and within each author alphabetically by title, so we would first select 'Author' from the Fields List box.
The Sort Order Fields box will display all the fields that you select for your Sort in the order in which you select them.
6. Use the keyboard arrows to select the first field on which to base your report, and press <Enter>.
You are asked whether the field 'should be sorted in ascending order (lowest to highest)?'
| Hint Depending upon whether the field value is expressed in words or numbers, WordStock will sort each field either alphabetically or numerically. |
You can sort the field in ascending or descending order:
A field sorted in ascending order will be presented on the report from lowest letter or number to highest (A–Z).
A field sorted in descending order will be presented on the report from highest letter or number to lowest (Z–A).
7. If you want to sort in ascending order, oress <y>. The field name is displayed in the Sort Order Fields box with 'Ascending' to its right.
If you want to sort in descending order, press <n>. The field name is displayed in the Sort Order Fields box with 'Descending' to its right.
You are prompted to 'Please select the next field you want to sort on'.
8. Repeat steps 6 and 7 until your Sort Order is complete.
9. When your Sort Order is complete, press the <F10> key. You are asked whether you 'would like to save the Sort Order Specification?'.
10. To save the Sort Order, press <y>. Your Sort Include is saved.
To return to the Main Menu without saving the Sort Order, press <n>. The Main Menu is displayed with the Reports and the Design Reports sub-menus opened.
Sorting a Data File
While the Sort Include Specification tells WordStock what information to retrieve from your data files, and the Sort Order Specification tells WordStock 4 how to arrange the information once it is retrieved, you still need to tell WordStockwhen to perform the sort and assemble the information according to your specifications.
1. Use the keyboard arrow method or the hot key method to select 'Reports' from the Main Menu. The Reports sub-menu is opened, and 'Sort a data file' is highlighted.
2. Press <Enter>.
The PROGRAM TO SORT A DATA FILE is opened and a Data Files Menu box is displayed. See Figure 7–11 below.
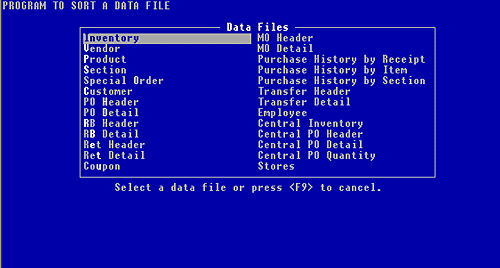
Figure 7-11, the Sort a Data File menu box
| Hint The Data Files Menu box lists all of the data files on which a report can be based. In our example report, we want to extract records from the Inventory file, so we would select 'Inventory' from the Data Files Menu box. |
3. Use the keyboard arrows to select the data file you'd like to sort, and press <Enter>. An Include Specifications Menu box is displayed and you are prompted to 'Please select an include specification'
| Hint Your Include Specifications Menu box contains the names of all the Sort Include Specifications that are on file in your system. In our example, we would select 'RH_childrens". |
4. Use the keyboard arrows to select the Sort Include Specification you'd like to use to sort your database, and press <Enter>. An Order Specifications Menu box is displayed and you are prompted to 'Please select an order specification'.
| Hint Your Order Specifications Menu box contains the names of all the Sort Order Specifications that are on file in your system. In our example, we would select 'author_title'. |
5. Use the keyboard arrows to select the Sort Order Specification with which to arrange your report, and press <Enter>. You are prompted to 'Enter a name for this sort output:'.
6. Type the name for the Sort Output (something recognizable about the Sort – up to 16 characters, no spaces) and press <Enter>.
| Hint While you can use any name for the Sort Output, we recommend that you choose a unique and immediately recognizable name since there may be multiple Sorts Outputs on WordStocksimultaneously. |
There is a delay while your data file is sorted according to your specifications. A series of messages is displayed while the sort is processed.
When the sort is complete, you are prompted to 'Press <Enter> to return to the menu'. See Figure 7–12 below.
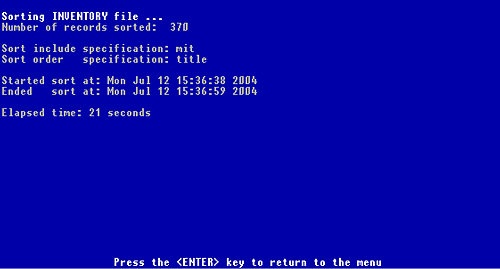
Figure 7-12, sample of a Sort Output
7. Press <Enter>. The Main Menu is displayed with the Reports sub-menu opened.
Please Note
|
Creating a Report Format
Report Formats are necessitated by the fact that each line of your report is 132 characters long (including spaces) and can accommodate information about one record. When you create a Report Format you are telling WordStock how much space to allocate to each field to be presented on the report.
Your Report Format tells WordStock which fields to include, the order in which to display them, and how many characters to dedicate to each field represented on each line of your report.
Once you create and save your Report Formats, they are stored in a file, and can be used when ever you want to print a report.
1. Use the keyboard arrow method or the hot key method to select 'Reports' from the Main Menu. The Reports sub-menu is opened, and 'Sort a data file' is highlighted.
2. Select 'Design Reports'. The 'Design Reports' sub-menu is opened, and 'Create sort includes' is highlighted.
3. Select 'Create report formats'.
The PROGRAM TO SET UP CUSTOM REPORT FORMATS is opened and a Data Files Menu box is displayed. See Figure 7–13 below.
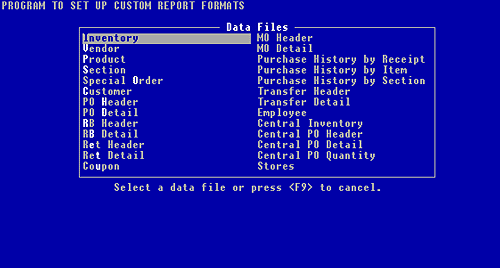
Figure 7-13, report format data file menu box
| Hint The Data Files Menu box lists all of the data files on which a report can be based. In our example Report, we want to extract records from the Inventory file, so we would select 'Inventory' from the Data Files Menu box. |
4. Use the keyboard arrows to select a data file from which to extract records for your report, and press <Enter>. You are prompted to 'Enter the name of the report format you want to create:'.
| Hint Because you are likely to reuse your Report Formats, we recommend that you anticipate what information will appear on the report and try to name your Report Format accordingly. Our sample Report Format could be called "Ordering", since the information to be presented on the report will be useful for any ordering you may do. |
5. Type the name for the Report Format (something recognizable about the Sort – up to 16 characters, no spaces) and press <Enter>. A Fields Menu box is displayed on the top of your screen, with an empty box beneath it, and you are informed that 'The current report width is (0).', and prompted to 'Select a field'. See Figure 7–14 below.
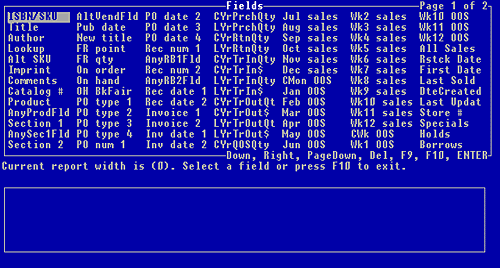
Figure 7-14, report format fields menu box for the Inventory file
| Hint The empty box (Header box) beneath the Fields Menu box is essentially a header for the Report Format; it contains a list of the fields that you have chosen to appear on your report. |
Keep in mind that maximum Report width is 132 characters.
WordStock will keep a running total of the Report length (beneath the Fields Menu box) so you will always know how much space is left.
6. Select the first field to be displayed on the report. Information from this field will be displayed in the first column of your report. The field you selected is displayed in the Header box and the current report width is updated.
In our example Report Format, we want to identify which titles to order from the Random House Children's Representative, so we would select "ISBN/SKU" as the first field on the report. See Figure 7–15 below.
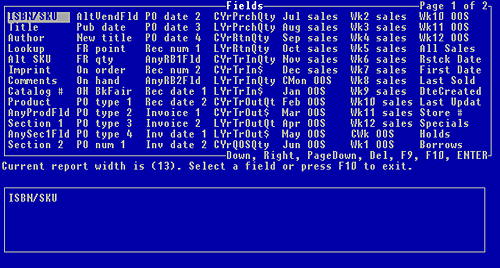
Figure 7-15, report format fields menu box for the Inventory file
Please Note 1. Fields for which a fixed number of characters is required. (ISBN/SKU for example). 2. Fields for which the number of characters is variable. (Title and Author, for example). Fields which do not require a fixed number of characters to express their values can be abbreviated at your discretion (you can decide how may characters to dedicate) in order to maximize the amount of information that can be displayed on the report. If the field you selected has a fixed width: You are informed of the 'Current report width' (in characters, includingspaces), and prompted to Select a field or press <F10> to exit. If the field you selected can be abbreviated: You are prompted to 'Enter desired width for this field or <CR> (the <Enter> key) for full width', and the full width of the field is displayed. Skip to step 8. |
7. To shorten the field width: Type the number of characters that you want to dedicate to this field
To display the full field width: Press <Enter>. (keeping in mind that your report can accommodate 132 total) and press <Enter>.
You are informed of the 'Current report width' (in characters, including spaces), and prompted to 'Select a field or press <F10> to exit'.
8. Repeat step 6 & 7 until all the fields that you want represented on the report have been selected.
9. When your Report Format is complete, press the <F10> key. You are asked whether you want to save this Report Format, and 'Y' is Entered by default.
10. To save the Report Format, press <Enter>. Your Report Format is saved.
To return to the Main Menu without saving the Report Format, press <n> and press <Enter>. You are notified that the Report Format was not saved. The Main Menu is displayed with the Reports and the Design Reports sub-menus opened.
| Please Note You can press the backspace key or <d> to delete the information in the last field you Entered. You can press the <F8> key at any time to quit without saving. |
Printing a Custom Report
Now that you've designed a Report Format, you need to tell WordStockto use the Report Format to print a report for you.
1. Make sure that your printer is turned on and that it is loaded with paper.
2. Use the keyboard arrow method or the hot key method to select 'Reports' from the Main Menu. The Reports sub-menu is opened, and 'Sort a data file' is highlighted.
3. Select 'Print a custom report'. The PROGRAM TO SELECT AND PRINT A CUSTOM FORMAT REPORT is opened and a Data Files Menu box is displayed. See Figure 7–16 below.
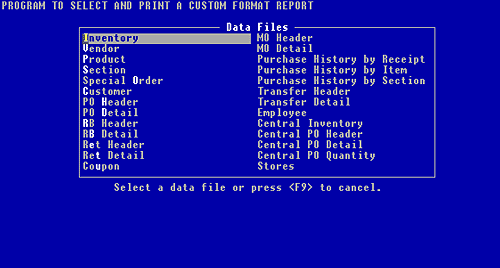
Figure 7-16, program to sort and print a custmo report format
| Hint The Data Files Menu box lists all of the data files on which a report can be based. In our example Report, we want to extract records from the Inventory file, so we would select 'Inventory' from the Data Files Menu box. |
4. Use the keyboard arrows to select a data file from which to extract records for your report, and press <Enter>. A list of all the Sort Outputs for the data file you selected is displayed chronologically. See Figure 7-17 below.
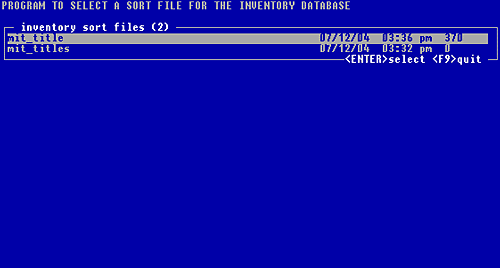
Figure 7-17, sample list of sorted Inventory data files
5. Use the keyboard arrows to select a Sort Output and press <Enter>. A Report Formats List box listing all your Report Formats is displayed and you are prompted to 'Please select a report format'. See Figure 7–18 below.
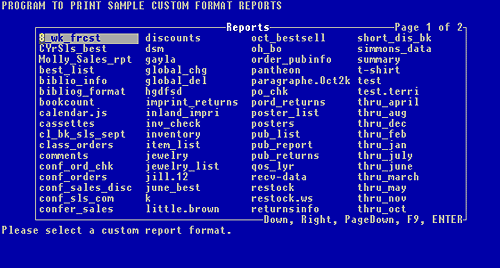
Figure 7-18, sample Reports Formats List box
6. Use the keyboard arrows to select a Report Format and press <Enter>. You are prompted to 'Enter a title for the report'. (This is just a title for the printed report, and is not saved by WordStock.) Our example report is designed to help determine what to order from the Random House Children's Representative, so we might call it 'Random House Children's titles June 1997'.
7. Type a title for the report (up to 50 characters) and press <Enter>. If there is only one printer in your store, your report is printed. If there is more than one printer in your store, you are asked if you want to use your default printer.
8. If you want to use your default printer, press <y> and press <Enter>. Otherwise, press <n> and press <Enter>. A Printers Menu box is opened. Use the keyboard arrows to select a printer and press <Enter>. Your report is printed, and then the Main Menu is displayed with the Reports sub-menu opened.
|
|||||||||||||||||||||||||||