| Getting Started with WordStock |
All of the Vendor returns for your store are managed by the Returns file. Whenever you return books to a Vendor for a refund, you will create a Return Order. A Return Order (RO) is very similar to a Purchase Order (PO); a PO is a list of items (books) that you wish to purchase from a Vendor, while a Return Order is a list of books that you wish to return to the Vendor for a refund.
In Your Store
The Returns Program is used to create or modify a Return Order. When you enter an ISBN or SKU into the Return Order, all the information necessary for the Return Order is automatically retrieved from the Inventory file.
You will use the information in this chapter to:
1. Become familiar with WordStock's Return Order statuses.
2. Create a new Return Order.
3. Look up existing Return Orders.
4. Modify existing Return Orders.
5. Print Return Orders.
6. Remove items on Return Orders from your WordStock files.
Return Order Statuses
A Return Order Status indicates the Return Order's position in the Returns procedure.
There are six Return Order statuses:
A status of '0' indicates that the Return Order has just been created. '0' is automatically entered in the "Status" field when you create a Return Order.
A status of '1' indicates that the newly created Return Order has been printed, and, if necessary, sent to the Vendor in order to obtain permission to return the books that are listed on it. The "Status" field is automatically updated to '1' the first time you print the Return Order.
A status of '2' indicates that the Vendor has granted you permission to return the books listed on the Return Order. You must manually enter "2" in the status field when permission is granted.
A status of '3' indicates that you have made changes to the Return Order (annotated it, sorted it, etc.) and are ready to reprint it and send it back to the Vendor with the books you are returning. You must manually enter '3' in the "Status" field when (if) you make changes to the Return Order.
A status of '4' indicates that you have printed the Return Order a second (final) time, and that you are sending it with the books. If the Vendor does not require that you obtain permission to return books, and you only print the Return Order once, the "Status" field will not be automatically updated to '4', and you will have to update it manually. See CHANGING THE RETURN ORDER STATUS on page 10–21.
A status of '5' indicates that the books have been removed from your inventory. The "Status" field is automatically updated to "5" (from 4) when you remove the books on the Return Order from your inventory. See REMOVING RETURNED ITEMS FROM YOUR FILES on page 10–24. When the Return Order status is changed to '5', WordStock removes the number of items in the "Qty" field on the Return Order from the "On Hand" fields of the corresponding Inventory, Vendor, Product, and Section records.
Creating a New Return Order
1. Use the keyboard arrow method or the hot key method to select 'Returns' from the Main Menu.
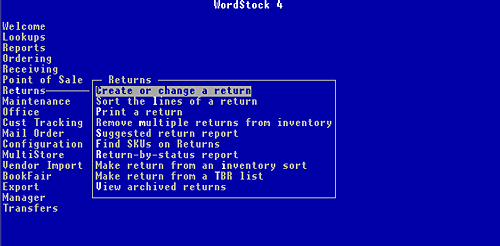
The Returns sub-menu is opened and 'Create or change a return' is highlighted.
2. Press <Enter>. An empty Return Order screen is displayed and the cursor is flashing in the Command: box. See Figure 10–1 below.
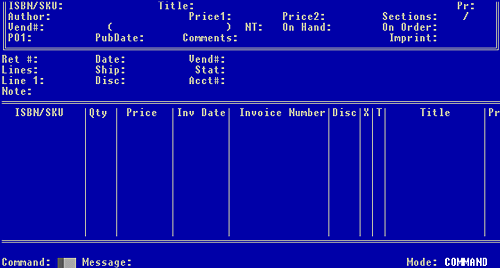
Figure 10-1, empty Receiving screen
| Please Note The Return Order screen is divided into three sections: •The top section displays inventory information about whichever item is being added to the Return Order. •The middle section (the Return Order header) is used to enter Vendor information, and to keep track of the Return Order as a whole. •The bottom section is used to enter the items (the detail line) which are to be included on the Return Order. |
3. To have the Return # assigned by the system:
•Type <new> and press <Enter>. The next available Return# is displayed in the "Ret #" field. To assign your own Return #:
•Type <art> and press <Enter>.
•Type the Return # and press <Enter>.
Your Return # is displayed in the "Ret #" field.
The current date is displayed in the "Date" field, and the cursor is flashing in the "Vend #" field.
4. Type the Vendor number of the supplier to whom you are returning the merchandise, and press <Enter>.
If there is a Vendor record for the Vendor: The Vendor's name, is retrieved from the Vendor's record and If there is not a Vendor record for the Vendor: 'Unknown vendor number' is displayed in the Message: box. displayed to the right of the Vendor number. If there is an account number in the Vendor record, it is automatically entered in the "Acct#" field.
The cursor is flashing in the "Status" field, and '0' is entered by default to indicate that the Return Order is new. Detailed information about Return Order Statuses is provided on page 10–2. Skip to step 8.
5. If you are at a computer: Switch to another window (see Hint page 4–5) and then follow the directions on page 3–2:
If you are at a terminal, press <F9>. The cursor is flashing in the Command: box. "CREATING NEW VENDOR RECORDS". Start over at step 4.
6. Press <q> and press <Enter>. The Main Menu is displayed with the Returns sub-menu opened.
7. Follow the directions on page 3–2: "CREATING NEW VENDOR RECORDS", and start again at step 1.
8. Press <Enter>. The cursor is flashing in the "Disc" field.
9. If the Vendor uses a standard refund discount percentage regardless of the invoice discount: Otherwise: Leave this field blank and press <Enter>. Type the blanket discount percentage. (For example: if the list price of the book is $12.00, and the Vendor will refund $6.00, type 5000 {50 percent} in the "Disc" field.). Press <Enter>. The cursor is flashing in the "Note" field.
10. Type a note about this return (why returned, etc.) or leave this field blank. Press <Enter>. You have completed the Return Order header section, and are ready to enter the items you want to return in the detail line section. The cursor is flashing in the "ISBN/SKU" field.
11. Type or scan the ISBN or the SKU of the first item to be placed on this Return Order. Information for the "Price", "Inv Date" (Invoice Date), "Invoice Number", "Disc" (Invoice Discount) "Title", and "Pr" ( Product code) is entered automatically from an invoice on which the item was received. See note below for details. The cursor is flashing in the "Qty" field.
| Please Note WordStock automatically retrieves invoice information from the invoice on which you were given the smallest discount so that you can receive the maximum refund amount. |
If you would like to change the default so that the most recent invoice is retrieved regardless of its discount, please call WordStock Support @ (800)–444–7224.
12. If you are using an electronic scanner: •Scan all the items that you want to return. The cursor is still flashing in the "Qty" field. To change the value in any of the subsequent fields:
If you are entering items manually: •Type the quantity of that item that you will be returning, and press <Enter>. The cursor is flashing in the "Price" field.
•Use the keyboard arrows to position the cursor in the field(s) you want to change, and type the new value(s).
•When you are done making changes, use the keyboard arrows to position the cursor in the "X" field. Skip to step 17.
13. To accept the displayed price, press <Enter>. To change the price: Type the new price and press <Enter>. key. The cursor is flashing in the "Inv Date" field.
14. To accept the displayed invoice date, press <Enter>. To change the invoice date: Type the correct invoice . date and press <Enter>. The cursor is flashing in the "Invoice Number" field.
15. To accept the displayed invoice number, press <Enter>. To change the invoice number: Type the correct invoice number and press <Enter>. The cursor is flashing in the "Disc" field.
16. If the displayed invoice discount is correct, press <Enter>. If the displayed invoice discount is incorrect: Type the correct invoice discount and press <Enter>. The cursor is flashing in the "X" (delete Inventory record) field.
| Please Note If you are returning all your on hand copies of the book, and none are on order, you can tell the system to delete the book's Inventory record once the books are returned to the Vendor. |
17. If you want to delete the book's Inventory record once you return the book(s) to the Vendor, press <x> and press <Enter>. Otherwise, press <Enter>. The cursor is flashing in the "ISBN/SKU" field.
18. If you are using an electronic scanner: Skip to step 19.
If you are entering items manually, repeat steps 8–14 for all the items that you are returning. The cursor is flashing in the ISBN/SKU field.
19. Press <F10> to save the Return Order.The Return Order Commands Help Menu is displayed. See Figure 10–2 below. OR The cursor is flashing in the Command: box. See Figure 10–3 below.
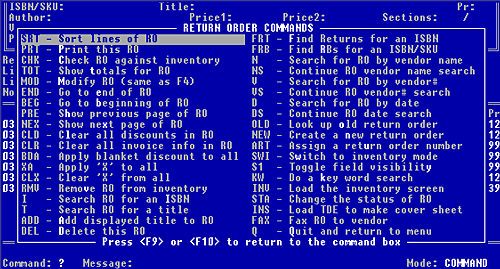
Figure 10-2, Return Order commands help menu
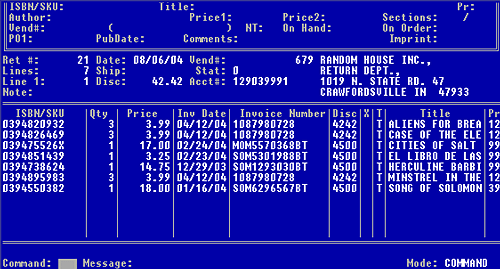
Figure 10-3, sample completed Return Order
| Reminder Whenever a Command Help Menu is opened or the cursor is flashing in the Command: box, you can initiate any of the available commands. Detailed instructions for the commands most frequently executed after creating a new Return Order are provided below. |
To Create another Return Order
In the Command: box: Type <new> and press <Enter>. From the Command Help Menu: Select 'Create a new return order'. A Return Order screen is displayed with the screen fields cleared. Start again at step 3.
To Print the Return Order
Once you create a Return Order, you may need a printed copy to send to the Vendor in order to get permission to return the books.
If you want to print more than one Return Order, see the instructions on page 10–13.
1. Make sure your printer is on and that it has paper.
2. In the Command: box: Type <prt> and press <Enter>.
From the Command Help Menu: Select 'Print this RO'. 10-11
If there is more than one printer in your store: If there is only one printer in your store: You are asked if you want to use your default printer.Press <y> and press <Enter> to select your main printer
OR .Press <n> to display a list of your printers and select a printer from the list. You are prompted to enter the number of copies of the Return Order that you'd like printed.
3. To print one copy of the Return Order, press <Enter>. To print more than one copy of the Return Order: Type the number of copies that you want to print, and press <Enter>.
You are prompted to 'Enter the number of labels to print for the return number'.
| Please Note Return labels are printed on your regular printer paper; you cut them out with scissors and tape them on the shipping box(es). |
4. If you want to print label(s) for the Return Order: Otherwise Press <Enter>. Type the number of labels that you want to print, and press <Enter>.
The Return Order is printed, and its "Status" field is updated to '1' to indicate that it has been printed. The cursor is flashing in the Command: box.
TO GO BACK TO THE MAIN MENU:
In the Command: box: Type <q> and press <Enter>. From the Command Help Menu: Select 'Quit and return to menu'. The Main Menu is displayed with the Returns sub-menu opened.
Printing Multiple Return Orders
1. Make sure your printer is on and that it has paper.
2. Use the keyboard arrow method or the hot key method to select 'Returns' form the Main Menu.
3. Select 'Print a return' from the Returns sub-menu. The PROGRAM TO PRINT A RETURN is opened. If there is more than one printer in your store: If there is only one printer in your store: You are asked if you want to use your default printer.Press <y> and press <Enter> to select your main printer.
OR .Press <n> to display a list of your printers and select a printer from the list.
THE PROGRAM TO PRINT A RETURN List box is displayed and you are prompted to 'Enter Return Number'. See Figure 10–4 below.
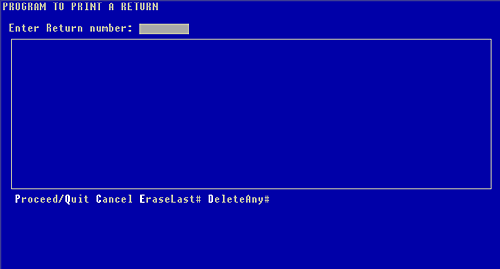
Figure 10-4, list box of the Program to Print a Return
4. Type the Return number and press <Enter>. You are prompted to 'Enter the number of copies to print for the return number'.
5. If you want to print one copy of the Return Order, press <Enter>. If you want to print more than one copy of the Return Order: Type the number of copies that you want to print and press <Enter>.
You are prompted to 'Enter the number of labels to print for the return number'.
| Please Note Return labels are printed on your regular printer paper; you cut them out with scissors and tape them on the shipping box(es). |
6. If you want to print labels for the Return Order: Type the number of labels that you want to print and press <Enter>. If you do not want to print any labels for the Return Order, press <Enter>. The status is changed to '1' to indicate that the Return Order has been printed. You are prompted to 'Enter a Return Number'.
7. If you want to print another Return Order: Repeat steps 4–6. If you do not want to print another Return Order:
•Press <p> or <q> (the hot keys for Proceed and Quit from the Command Menu), and press <Enter>. When the Return Order(s) and label(s) are printed, the Main Menu is displayed with the Returns sub-menu opened.
Changing the Return Order Status
You can change the Return Order status directly from a Return Order screen when the cursor is flashing in the Command: box.
Unless you have just created a Return Order, and it is still displayed on the screen, you will have to access an existing PO.
There are four ways to access an existing Return Order:
- By Vendor name.
- By Vendor number.
- By date.
- By number.
Looking Up Existing Return Orders
OPEN THE RETURN ORDER SCREEN:
1. Use the keyboard arrow method or the hot key method to select 'Returns' from the Main Menu.
2. Select 'Create or change a return' from the Returns sub-menu. A blank Return Order screen is displayed and the cursor is flashing in the Command: box. See Figure 10–1 above.
Looking Up a Return Order by Vendor Number
1. To enter a command in the Command: box, press <v> and press <Enter>. To use the Return Order Commands Help Menu, hold down <Shift> and press <F1>. Select 'Search for RO by vendor#'. A blank Return Order screen is displayed and the cursor is flashing in the "Vend #" field.
2. Type the Vendor number that appears on the Return Order you are looking for, and press <Enter>. The most recent Return Order for the Vendor you entered is displayed, and the cursor is flashing in the "Vend #" field. You can now use the keyboard arrows to scroll (numerically by Vendor number, and within each Vendor by Return Order number) through your Return Orders.
3. When you find the Return Order you are looking for press <F10>. The Return Order Commands Help Menu is opened. Press <F9> or the <F10>. The corresponding Return Order is displayed, and the cursor is flashing in the Command: box.
Looking Up a Return Order by Vendor Name
1. To enter a command in the Command: box, press <n> and press <Enter>. To use the Return Order Commands Help Menu: Hold down the <Shift> and press <F1>. •Select 'Search for ROs by vendor name'. The cursor is flashing in the field to the right of the "Vend#" field.
2. Type the name of the Vendor that appears on the Return Order you are looking for, and press <Enter>. The Return Order for the closest alphabetical match to the Vendor you entered is displayed, and the cursor is flashing in the field to the right of the "Vend#" field. You can now use the keyboard arrows to scroll (alphabetically by Vendor, and within each Vendor by Return Order number) through your Return Orders.
3. When you find the Return Order you are looking for, press <F10>. The Return Order Commands Help Menu is opened. Press <F9> or the <F10>. The corresponding Return Order is displayed, and the cursor is flashing in the Command: box.
Looking Up a Return Order by Date
1. To enter a command in the Command: box, press <d> and press <Enter>. To use the Return Order Commands Help Menu: Hold down <Shift> and press <F1>. Select 'Search for RO by date'. The cursor is flashing in the "Date" field.
2. Type the date of the Return Order you are looking for (<MM/DD/YY>), and press <Enter>. The first Return Order (numerically by Return #) from the date closest to the date you entered is displayed. You can now use the keyboard arrows to scroll (by date, and within each date numerically by Return Order) through your Return Orders.
3. When you find the Return Order you are looking for press <F10>. The Return Order Commands Help Menu is opened.
Press <F9> or <F10>. The corresponding Return Order is displayed, and the cursor is flashing in the Command: box.
Looking Up a Return Order by Return Number
1. To enter a command in the Command: box, type <old> and press <Enter>.
To use the Return Order Commands Help Menu, hold down <Shift> and press <F1>. Select 'Look up old return order'. The cursor is flashing in the "Ret#" field.
2. Type the Return number you are looking for, and press <Enter>. The Return Order Commands Help Menu is opened. Press <F9> or <F10>. The corresponding Return Order is displayed, and the cursor is flashing in the Command: box.
Changing the Return Order Status
1. To enter a command: Type <sta> and press <Enter >. To use the Return Order Commands Help Menu: Hold down <Shift> and press <F1>. Select 'Change the status of RO'. The cursor is flashing in the "Status" field.
2. Type the appropriate Status number and press <Enter>.The Return Order Commands Help menu is opened. OR the cursor is flashing in the Command: box.
| Reminder Whenever a Command Help Menu is opened or the cursor is flashing in the Command: box, you can initiate any of the available commands. Detailed instructions for the commands most frequently executed after changing the Return Status are provided below. |
Printing the Return Order
1. Make sure your printer is on and that it has paper.
2. In the Command: box: Type <prt> and press <Enter>. From the Command Help Menu: Select 'Print this RO'.
If there is more than one printer in your store: If there is only one printer in your store: You are asked if you want to use your default printer.Press <y> and press <Enter> to select your main printer OR press <n> to display a list of your printers and select a printer from the list. You are prompted to enter the number of copies of the Return Order that you'd like printed.
3. To print one copy of the Return Order, press <Enter>. To print more than one copy of the Return Order: Type the number of copies that you want to print, and press <Enter>. You are prompted to 'Enter the number of labels to print for the return number'.
| Please Note Return labels are printed on your regular printer paper; you cut them out with scissors and tape them on the shipping box(es). |
4. If you want to print label(s) for the Return Order: Otherwise Press <Enter>. Type the number of labels that you want to print, and press <Enter>. The Return Order is printed, and its "Status" field is updated to '1' to indicate that it has been printed. The cursor is flashing in the Command: box.
TO GO BACK TO THE MAIN MENU: In the Command: box: Type <q> and press <Enter>. From the Command Help Menu: Select 'Quit and return to menu'. The Main Menu is displayed with the Returns sub-menu opened.
Removing Returned Items from Your Files
After you have removed the books from your shelves and sent them back to the Vendor, you will need to inform the system to remove the on hand quantities from the Vendor, Product, Section, and Inventory files. WordStock provides two ways to remove the items on your Return Order(s) from your Inventory, Vendor, Product and Section files.
•You can remove the items directly from the Return Order screen. This is usually done when you want to remove the items on a single Return Order which is displayed on the screen.
•You can remove the items from the Main Menu. This is useful when you want to remove the items from more than one Return Order at a time.
| Please Note The Return Order Status must be '4' in order to remove returned items from your files. If the Return Order Status is not '4', please see CHANGING THE RETURN ORDER STATUS. |
Removing Items on a Single Return Order from Your Files
You can remove the items on a Return Order from your Inventory, Vendor, Product and Section files directly from the Return Order screen when the cursor is flashing in the Command: box. Unless you have a Return Order displayed on the screen, you will have to access an existing Return Order.
1. To enter a command: Type <rmv> and press <Enter >.To use the Return Order Commands Help Menu, hold down <Shift> and press <F1>.
Use the keyboard arrow method or the hot key method to select 'Remove RO from inventory' You are asked 'Do you wish to remove returned quantities from inventory?', and 'N' is entered by default.
2. If you want to remove the returned items from your inventory:
•Press <y> and press <Enter>. 'Removing returned items, please wait' is displayed on the screen. When the items have been If you do not want to remove the returned items from your inventory:
•Press <Enter>. 'Returned items were not removed' is displayed in the Message: box, and the cursor is flashing in the Command: box. removed, the "Status" is updated to 5, and the cursor is flashing in the Command: box.
3. Press <q> and press <Enter>. The Main Menu is displayed with the Returns sub-menu opened.
Removing Items on Multiple Return Orders fromYour Files
You can remove the items on multiple Return Orders from your Inventory, Vendor, Product and Section files.
1. Use the keyboard arrow method or the hot key method to select 'Returns' from the Main Menu. The Returns sub-menu is opened. 'Create or change a return' is highlighted.
2. Select 'Remove multiple returns from inventory' from the Returns sub-menu.
The PROGRAM TO REMOVE RETURN QUANTITIES FROM INVENTORY FILE is opened, a Returns List box is displayed, and the cursor is flashing in the "Return Number" field. See Figure 10–5 below.
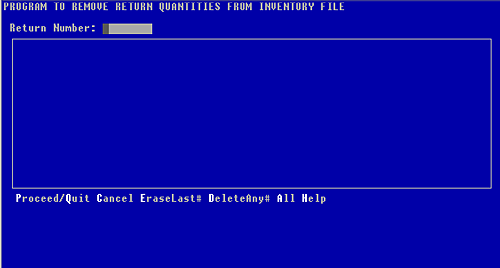
Figure 10-5, list box of the Program to Remove Return Order Quantities
3. Type the number of each Return Order that you that you wish to remove from your files and press <Enter> after each one.
Each Return number is displayed in the List box.
| Please Note The Command Menu at the bottom of the screen lists 4 choices (See Figure 10–6 below). If you make a mistake at any time up to this point, you can select 'EraseLast #' to erase your last entry, or 'DeleteAny#' to erase any entry. |
4. When you are done press <p> or <q> (the commands for Proceed and quit) and press <Enter>. The "Status" field on each Return Order is changed to '5', and the quantity being returned is removed from the "On Hand" field of the corresponding Inventory, Vendor, Product, and Section records.
The Main Menu is displayed with the Returns sub-menu
opened.
|
|||||||||||||||||||||||||||