| Getting Started with WordStock |
WordStock requires that you keep a record of every Vendor (supplier) from whom you order merchandise.
You must also organize your inventory by Product code (merchandise type) and Section number (subject matter or location). A Product indicates a specific type of merchandise, while a Section is made up of items which are grouped together in your store. For many retail stores, Product is analogous to 'department', and Section is analogous to 'class'. For example, in a book store, 'hard cover' describes a Product, while 'science fiction' indicates a Section. In a stationery store, 'paper goods' describes a Product, while 'greeting cards' may indicate a Section.
The Vendor file stores specific information regarding ordering procedures, as well as fields which are updated by WordStock as information accumulates in other parts of the system.
The Product and Section files store information about all the types of merchandise and locations in your store. You enter basic details about the Product or Section and WordStock updates each record as information accumulates in other parts of the system.
You will not be able to enter your inventory into the system until you have assigned Vendor numbers, Product numbers, and Section codes.
You will use the information in this chapter to:
1. Assign Vendor numbers to suppliers.
2. Assign Product codes to merchandise types.
3. Assign Section codes to locations in your store.
4. Enter Vendor numbers into the Vendor file.
5. Enter Product codes into the Product file.
6. Enter Section codes into the Section file.
The Vendor File
The Vendor file is used to store the records of every supplier from whom you order merchandise. Each Vendor is represented by a Vendor number (a one-to-eight digit number assigned by you).
You enter the Vendor number and other basic information about the Vendor into the Vendor screen. Whenever an item is sold, ordered, received, or returned, its Vendor record is automatically updated to tell you the number of items from the Vendor that you have on hand in the store (both quantity and dollar amount) and how many you have on order (both quantity and dollar amount), as well as other information you can use to maximize the productivity of your inventory.
You must create a Vendor record for all your suppliers regardless of how much or how often you order from them.
If you are a bookseller, your system is equipped with a basic list of Vendors in the Vendor File. Retain this list and edit it to suit your needs.
Creating New Vendor Records
1. Use the keyboard arrow method or the hot key method (pages 2-3 through 2-5) to select 'Lookups' from the WordStock Main Menu. The Lookups sub-menu is opened and 'Basic Inventory' is highlighted.
2. Select 'Vendor' from the Lookups sub-menu. A blank Vendor screen is displayed and the cursor is flashing in the Command: box. See Figure 3-1 below.
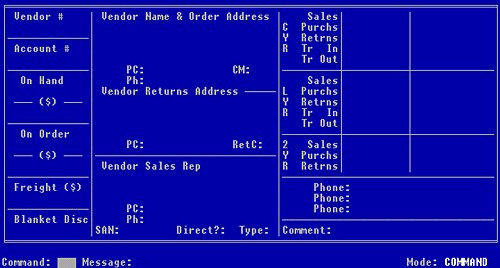
Figure 3-1, Vendor Screen (empty)
3. To enter a command: Type <new> and press <Enter>.
To use the Vendor Commands Help Menu: Hold down the <Shift> key and press <F1>. Use the keyboard arrow method or the hot key method to select 'Create a new vendor'. The cursor is flashing in the "Vendor #" field.
| Please Note The information entered in steps 4-10 will be printed on all Purchase Orders to this Vendor. |
4. BOOKSELLERS: A Vendor number is embedded in all ISBNs. You can enter the ISBN Vendor number or assign your own. See Appendix 3 for information about ISBNs.
OTHERS: Assign your own Vendor numbers.
Type a Vendor number and press <Enter>. 'P' (publisher) is automatically entered in the "Type" (Vendor type) field. The cursor is flashing in the " Vendor name & Order Address" field.
5. Type the name of the Vendor (up to 29 characters), and press <Enter>. The cursor is flashing beneath the Vendor name.
6. Type the Vendor's street address (for placing orders) and press <Enter>. The cursor is flashing beneath the street address.
7. Type any secondary information about the Vendor's street address (suite number, P.O. box number, etc.). If none exists, leave this line blank. Press <Enter>.
The cursor is flashing below this line (in the unlabled city field).
8. Type the name of the Vendor's city and press <Enter>. The cursor is flashing in a small highlighted box (the unlabled state field) on the same line.
9. Type the two letter state abbreviation and press <Enter>. The "PC Types" pop-up menu is opened and 'ZIP CODE' is highlighted.
10. If the Vendor is located in the USA: Press <Enter>.
If the Vendor is not located in the USA: Select a postal code type:
Hold down the <Shift> key and press <F12> to move down one menu choice. Hold down the <Shift> key and press <F11> to move up one menu choice. Press <Enter> when your selection is highlighted.
The cursor is flashing in the "PC" (postal code) field.
11. Type the Postal Code and press <Enter>. The cursor is flashing in the "CM" (costing method) field, and 'DE' (discount entry) is entered automatically.
| Please Note There are two costing methods: Discount Entry (DE) indicates that you receive a discount off of the list price when you order from this Vendor. This usually applies when ordering from a publisher. Cost Entry (CE) indicates that you pay a wholesale price when ordering from this Vendor, and apply a markup in your store. This is the usual method of ordering for a non-book retail store. |
12. To accept "DE" as the costing method for this Vendor: Press <Enter>.
To change the costing method to "CE" for this Vendor: Type <ce> and press <Enter>. The cursor is flashing in the field in front of the "Ph" field. (the phone tag field).
13. (Optional) Type a label (up to 4 characters) for the phone number (i.e. <main>). Press <Enter>. The cursor is flashing in the "Ph" (phone) field.
| Please Note The information entered in steps 14 and15 will be printed on all purchase orders sent to this Vendor. |
14. Type the phone number (with or without area code) and press <Enter>. The cursor is flashing in the "Vendor Returns Address" field.
15. If the Vendor has a separate Returns Address: Repeat steps 5-10 substituting the Vendor's Returns Address.
If the Vendor's Returns Address is the same as the Order Address, leave these fields blank; WordStock will automatically use the Order Address for returns. The cursor is flashing in the "PC" (postal code) field.
16. Type the postal code and press <Enter>. The cursor is flashing in the "RetC" (return code) field.
17. Type the return code if applicable, or leave this field blank. Press <Enter>. The cursor is flashing in the "Vendor Sales Rep" field.
18. If there is a Sales Rep for this Vendor: Type the Sales Rep's name <First Last> and press <Enter>.
Otherwise: Leave this field blank and press <Enter>.
The cursor is flashing beneath the Vendor name.
19. If there is a Sales Rep for this Vendor: Type the Sales Rep's street address and press <Enter>.
OR, leave this field blank and press <Enter>. The cursor is flashing beneath the street address (in the unlabled city field).
20. Type the name of the Vendor's city and press <Enter>.
OR, leave this field blank and press <Enter>.
The cursor is flashing in a small highlighted box (the unlabled state field) on the same line.
21. Type the two letter state abbreviation and press <Enter>.
OR, leave this field blank and press <Enter>.
The "PC Types" pop-up menu is opened and 'ZIP CODE' is highlighted.
22. Select a postal code type: the "PC Types" pop-up menu is opened and 'ZIP CODE' is highlighted.
Hold down the <Shift> key and press <F12> to move down one menu choice. Hold down the <Shift> key and press <F11> to move up one menu choice. Press <Enter> when your selection is highlighted.
OR, leave this field blank and press <Enter>.
If there is a Sales Rep for this Vendor:
23. Type the Postal Code and press <Enter>.
OR, leave this field blank and press <Enter>.
The cursor is flashing in the field in front of the "Ph" field (the phone tag field).
24. (Optional) Type a label (up to 4 characters) for the phone number (i.e. <main>) and press <Enter>.
OR, leave this field blank and press <Enter>.
The cursor is flashing in the "Ph" field.
25. Type the phone number and press <Enter>.
OR, leave this field blank and press <Enter>.
The cursor is flashing in the " SAN" field.
26. Booksellers: Type the Vendor's Standard Address Number (SAN).
Others: Leave this field blank.
Press <Enter>. The cursor is flashing in the "Direct?" field.
27. Canadians: Press <y> if orders to this Vendor go directly to the Vendor. You may leave this field blank or use it to store other information. Press <n> if orders to this Vendor are made through Telebook.
Others: Press <Enter>.
The cursor is flashing in the "CYR Sales" field.
| Important The "CYR", "LYR", and "2YR" fields accumulate their data as it is entered into other files in WordStock and should not be modified unless an inaccuracy is detected. Your system may be configured so that access to these fields is limited. If you have questions about your system configuration, call WordStock Support during business hours. |
28. (Optional) Use the keyboard arrows to position the cursor in front of the first of the three "Phone" fields. Type a label for the phone number, and press <Enter>. The cursor is flashing in the first "Phone" field.
29. Type the phone number and press <Enter>. The cursor is flashing in the
30. Press <F10> to save the Vendor record.
The Vendor Commands Help Menu is displayed. See Figure 3-2 below.
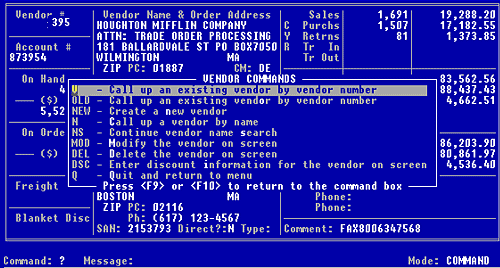
Figure 3-2, Vendor screen Commands Help menu
OR
The cursor is flashing in the Command: box.
See Figure 3-3 below.
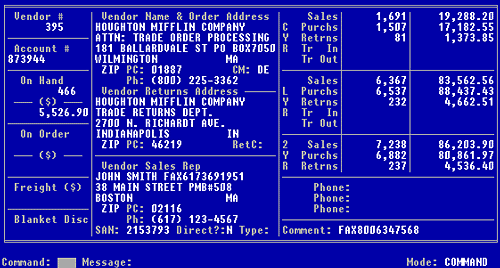
Figure 3-3, completed Vendor Screen
31. REMEMBER: Whenever a Command Help Menu is opened or the cursor is flashing in the Command: box, you can initiate any of the available commands.
Detailed instructions for the commands most frequently executed after entering a new record are provided below.
To enter another Vendor record. In the Command: box: Type <new> and press <Enter>.
From the Command Help Menu: Select 'Create a new Vendor'. A Vendor record is displayed with the screen fields cleared. Start again at step 3.
To go back to the Main Menu: In the Command: box: Type <q> and press <Enter>. From the Command Help Menu: Select 'Quit and return to menu'. The Main Menu is displayed with the Lookups sub-menu opened.
| Please Note Whenever an item is sold, ordered, received, or returned, its Vendor record is automatically updated. Reports can be designed based on any field or combination of fields on the Vendor screen. See Chapter 7: "Reports". |
The Product File and the Section File
While you are free to use any Product and Section codes to represent your various inventory types and merchandise locations, you will find that time spent developing a method for assigning Product and Section codes yields a highly efficient inventory management system that easily accommodates new items, is intuitive to both seasoned users and newcomers to your staff, and provides meaningful financial management data.
To develop Product numbers and Section codes, consider all the general types of merchandise that your store will carry (Products) and where you will display them in your store (Sections) for which you would like to accumulate data for financial analysis.
Please see Appendix 4 for some sample Product code and Section number configurations, and take some time to design a configuration for your store.
Assigning Product Codes
Each Product type is represented by a Product code, a one- or two-digit number (1-99) that you assign.
You enter the Product code and other basic information about the Product type into each Product record. Whenever an item is sold, ordered, received or returned, its Product record is automatically updated to tell you the number of items in the Product category that you have on hand in the store (both quantity and dollar amount) and how many you have on order (both quantity and dollar amount), as well as other information you can use to maximize the productivity of your inventory.
You must create a Product record for all your Product types.
| Please Note WordStock system generates daily, weekly, and monthly reports based on sales activity. It is often a good idea to arrange Product codes to conform to your book-keeping/accounting categories. |
1.Select 'Lookups' from the WordStock Main Menu. The Lookups sub-menu is opened and 'Basic Inventory' is highlighted.
2. Select 'Product' from the Lookups sub-menu. A blank Product screen is displayed and the cursor is flashing in the Command: box. See Figure 3-4 below.
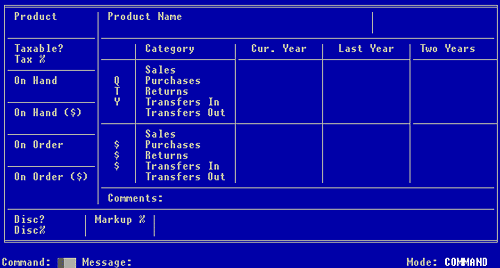
Figure 3-4, Product Screen (empty)
3. To enter a command: Type <new> and press <Enter>.
To use the Inventory Commands Help Menu: Hold down the <Shift> key and press <F1>.
Select 'Create a new product record'. The cursor is flashing in the "Product" field.
4. Type a Product code and press <Enter> > The cursor is flashing in the " Product name" field.
5. Type the name of the Product type (up to 30 characters), and press <Enter>. The cursor is flashing in the "Taxable?" field.
6. If this Product code represents items that are taxable, press <y> and <Enter>. If this Product code represents items that are not taxable, press <n> and <Enter>. The cursor is flashing in the "Tax %" field.
7. If the tax on this Product type is different than the general sales tax where you do business, yype the applicable tax percent and press <Enter>. Otherwise leave this field blank and press <Enter>. The cursor is flashing in the "Cur. Year" field.
| Important The "CYR", "LYR", and "2YR" fields accumulate their data as it is entered into other files in WordStock and should not be modified unless an inaccuracy is detected. Your system may be configured so that access to these fields is limited. If you have questions about your system configuration, call WordStock Support during business hours. |
8. (Optional) Use the keyboard arrows to move the cursor to the "Comments" field and enter a comment about the Product. Type (up to 46 characters), and press <Enter>.The cursor is flashing in the "Discount %" field.
9. If a discount is to be applied to all items represented by this Product code, e.g., if you want to discount all calendars 20%, type the percentage discount (expressed in 4 digits) and press <Enter>. Otherwise, leave this field blank and press <Enter>. The cursor is flashing in the "Markup %" field.
10. If a markup is to be applied to all items represented by this Product code, (for example, text books are often marked up), type the percentage markup (expressed in 4 digits) and press <Enter>.
Otherwise, leave this field blank and press <Enter>.
The cursor is still flashing in the "Markup %" field.
| Please Note The discount or markup entered here will automatically be applied at the Point of Sale (POS). |
11. Press the <F10> key to save the Product record.
The Product Commands Help Menu is displayed.
See Figure 3-5 below.
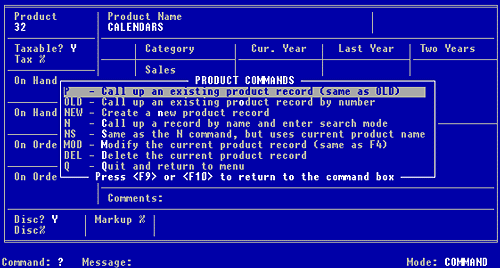
Figure 3-5, Product screen Commands Help menu
OR
The cursor is flashing in the Command: box.
See Figure 3-6 below.
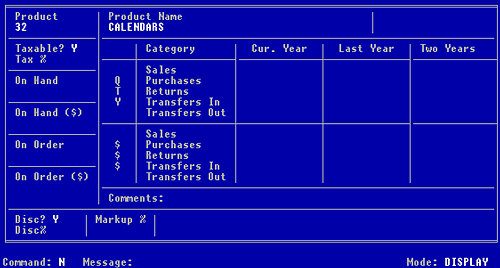
Figure 3-6, completed Product screen
12.
| Reminder Whenever a Command Help Menu is opened or the cursor is flashing in the Command: box, you can initiate any of the available commands. Detailed instructions for the commands most frequently executed after entering a new record are provided below. |
To enter another Product record:
In the Command: box: Type <new> and press <Enter>.
From the Command Help Menu: Select 'Create a new product record'. A Product screen is displayed with the screen fields cleared. Start again at step 3.
To go back to the Main Menu:
In the Command: box: Type <q> and press <Enter>.
From the Command Help Menu: Select 'Quit and return to menu'. The Main Menu is displayed with the Lookups sub-menu opened.
| Please Note Whenever an item is sold, ordered, received, or returned, its Product record is automatically updated. Reports can be designed based on any field or combination of fields on the Product screen. See Chapter 7: Reports. |
Assigning Section Codes
Each Section is represented by a Section number, a one- to- three- digit number (1-999) that you assign.
| Please Note
Section #999 should be reserved for Inventory records (Chapter 4) created at the POS for items that are new to the system. Inventory records created at the POS will be assigned to Section #999 so that they can be examined as a group. Whenever an item is sold, ordered, received, or returned, its Section record is automatically updated. If an item has more than one Section record, ONLY the first Section record is updated, the second Section record is for reference only. For example, the primary Section for an item may be "Albums and Date books" and its secondary Section may be "back stockroom" (often designated Section #998). |
The Section file contains the records of every Section or location in your store. Each Section record tells you the number of items in the Section that you have on hand in the store (in both quantity and dollar amount) and how many you have on order (in both quantity and dollar amount), as well as other information you can use to maximize the productivity of your inventory.
| Hint If you assign your initial Section codes so that they are evenly spread between 1 and 999, you will be able to add new Sections in relation to existing Sections as the need arises. |
Creating New Section Records
1. Select 'Lookups' from the WordStock Main Menu. The Lookups sub-menu is opened and 'Basic Inventory' is highlighted.
2. Use the keyboard arrow method or the hot key method to select 'Section' from the Lookups sub-menu. A blank Section screen is displayed and the cursor is flashing in the Command: box. See Figure 3-7 below.
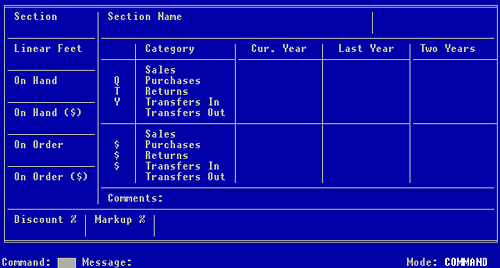
Figure 3-7, Section screen (empty)
3. To enter a command, type <new> and press <Enter>.
To use the Inventory Commands Help Menu:
Hold down the <Shift> key and press <F1>.
Select 'Create a new section record'.
4. The cursor is flashing in the "Section" field. Type a Section code and press <Enter>.
5. The cursor is flashing in the 'Section Name' field. Type the name of the Section (up to 30 characters), and press <Enter>.
6. The cursor is flashing in the "Linear Feet" field. (Optional) Determine the number of linear feet occupied by the Section, and type it here. Press <Enter>.
| Hint Step 6 is optional but very useful for determining the productivity of your shelf space: When you run a Full Section Report (pages 7-77 through 7-80), the "Linear Feet" field is retrieved from each Section record so you can compare each Section and determine how much space each Section merits based on sales figures. We recommend that you take the time to complete this step. |
7. The cursor is flashing under the "Cur. Year" field.
| Important The "CYR", "LYR", and "2YR" fields accumulate their data as it is entered into other files in WordStock and should not be modified unless an inaccuracy is detected. |
(Optional) Use the keyboard arrows to move the cursor to the "Comments" field. To enter a comment about the Section, type up to 46 characters, and press <Enter>.
8. The cursor is flashing in the "Discount %" field. (Optional) If a discount is to be applied to all items represented in this Section (for example all science fiction books 20% off this week) type the percent discount and press <Enter>.
9. The cursor is flashing in the "Markup %" field. (Optional) If a markup is to be applied to all items represented in this Section (for example, foreign language books) type the percent markup and press <Enter>. The cursor is still flashing in the "Markup %" field.
| Please Note The discount or markup entered here will automatically be applied at the POS. |
10. To save the Section record, press <F10>. The Section Commands Help Menu is displayed. See Figure 3-8 below.
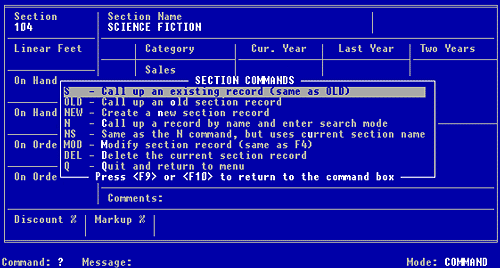
Figure 3-8, Section screen Commands Help menu
OR The cursor is flashing in the Command: box. See Figure 3-9 below.
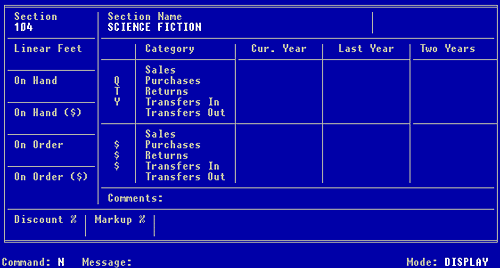
Figure 3-9, completed Section screen
11. REMEMBER: Whenever a Command Help Menu is opened or the cursor is flashing in the Command: box, you can initiate any of the available commands.
Detailed instructions for the commands most frequently executed after entering a new record are provided below.
To enter another Section record: In the Command: box: Type <new> and press <Enter>. From the Command Help Menu: Select 'Create a new section record'. A Section screen is displayed with the screen fields cleared. Start again at step 3.
To go back to the Main Menu: In the Command: box: Type <q> and press <Enter>. From the Command Help Menu: Select 'Quit and return to menu'. The Main Menu is displayed with the Lookups sub-menu opened.
| Reminder
- Whenever an item is sold, ordered, received, or returned, its Section record is automatically updated. - If an item has more than one Section record, ONLY the first Section record is updated. - Reports can be designed based on any field or combination of fields on the Section screen. See Chapter 7: "Reports". |
By completing the instructions in this chapter, you have set the stage for WordStock to accept your inventory information. You are now ready to move on to the Inventory file.
|
|||||||||||||||||||||||||||