| Getting Started with WordStock |
Menus and screens are involved in every aspect of entering data into and retrieving information from WordStock
Computer menus are like restaurant menus: both tell you what's available. In WordStock, you choose the tasks you want to perform by selecting them from a menu.
WordStock menus are comprehensive: if an item does not appear in the menu, it is not a valid choice for the task at hand.
A screen is a display of information that is grouped together because of its relevance to a common topic or task.
Screens are composed of fields. Each field contains one piece of information.
In Your Store
In general, you will begin working with WordStock by making a selection from a menu. You will enter information into and retrieve it from a screen.
You will use the information provided in this chapter to:
1. Recognize the four basic types of WordStock menus:
- The Main Menu
- Sub-menus
- Command Help Menus
- Pop-up Menus
2. Learn the two methods of selecting an item from a menu.
- The Keyboard arrow method
- The Hot key method
3. Open and close screens using menus.
4. Move among the fields in a screen.
5. Become familiar with WordStock function keys (F-keys).
6. Become familiar with Stock Keeping Units ( SKUs).
7. Become familiar with standard WordStock Commands, Menus and Screens.

Navigating WordStock
This section will familiarize you with the basic methods of moving around through WordStock's menus and screens.
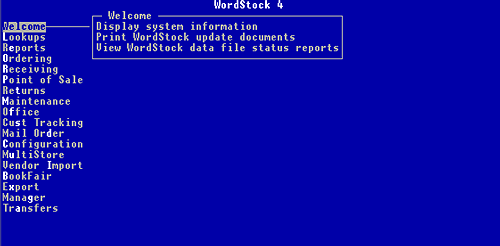
After you log in to the system, the WordStock Main Menu is displayed with the Welcome sub-menu opened. See Figure 2-1 below.

Figure 2-1, WordStock's Main Menu
• The Main Menu displays all of WordStock's major program headings. It is made up of sub-menus and pop-up menus which offer a selection of all the programs in WordStock.
• Sub-menus list the items available under each major heading. A sub-menu is opened whenever you make a selection from the Main Menu, or from another sub-menu.
The Welcome sub-menu offers two choices:
- You can display basic information about your WordStock system.
- You can print information about the features included in the latest WordStock updates.
| Please Note Additional menu items are displayed if your system has optional modules. |
Making a Selection from the Main Menu
In this section you will open the Inventory screen by making a selection from the Main Menu. In doing so you will acquire all the skills you will need to navigate the Main Menu as well as WordStock's sub-menus. There are two ways to select an item from a menu:
- The keyboard arrow method
- The hot key method
Using the Keyboard Arrow Method
The keyboard arrows are located between the keyboard letters and the number pad on your keyboard.
1. Press the down-pointing arrow key. The 'Lookups' menu item is highlighted.
2. Press the up-pointing arrow key. The item 'Welcome' is now highlighted.
3. Press the down pointing arrow key. The item 'Lookups' is highlighted again.
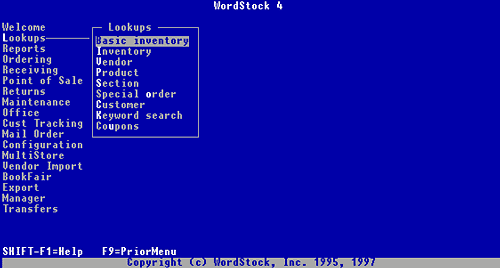
4. Press the <Enter> key. The item 'Basic Inventory' is highlighted. See Figure 2-2 below.

Figure 2-2, Main Menu with Sub-menu
5. Press the down-pointing arrow key. The item 'Inventory' is now highlighted.
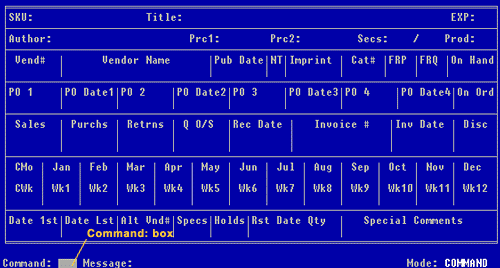
6. Press the <Enter> key. The Inventory screen is now displayed, and the cursor is flashing in the Command: box. See Figure 2-3 below.

Figure 2-3, WordStock's Inventory Screen
7. Press <q> and press < Enter >. The Main Menu is displayed with the Lookups sub-menu opened.
Using the Hot Key Method
Hot keys simplify menu selection by eliminating the steps required in using the keyboard arrows. A hot key is the keyboard key that corresponds to the single highlighted letter in each menu item.
Pressing a hot key automatically selects a menu item with a single keystroke.
| Please Note If the hot keys do not appear highlighted, you may have to adjust your monitor's contrast. If you are unsure how to adjust the contrast, see your computer manual or call WordStock Support. |
1. Press <i> to open the Inventory screen. ('i' is the hot key for the Inventory screen). The Inventory screen is displayed. See Figure 2–3 above.
2. Press <q> and press <Enter> to quit out of the Inventory screen.
The Inventory screen is now closed and the Main Menu is displayed with the Lookups sub-menu open, and the item 'Inventory' highlighted.
3. Press the <Enter> key. A blank Inventory screen is displayed and the cursor is flashing in the Command: box.
Navigating the Screen
In this section you will navigate the Inventory screen by making menu selections and moving among the screen fields. In doing so you will acquire all the skills you will need to open and navigate all of WordStock's screens.
Please Note • The space after the word 'Command:' is the Command: box. Whenever you want to perform a task, you will enter a command in the Command: box, or select a command from a Command Help Menu. Whenever you work in a screen, you can move the cursor to the Command: box by pressing <F8> or <F10>. • The space after the word 'Message' is the Message: box. Whenever there is an error or information about a record you are working on, it will appear in this box. • The space after the word 'Mode' is the Mode: box. There are 3 modes:
|
Using Commands
As noted above, you begin all tasks in WordStock screens by entering a Command. There are two ways to initiate a Command:
• Selecting a command from the Command Help Menu.
• Typing a command into the Command: box.
| Please Note All subsequent sections require the use of F-(function) keys. F-keys are numbered F1–F12 and are located across the top of your keyboard. When pressed alone, or in combination with the Shift key, F-keys perform some of WordStock's basic functions. |
Eight F-key functions are standard throughout all WordStock programs:
Press <F8> to return from the screen fields to the Command: box (or the Command Help Menu) without saving changes you made in the displayed record.
<F10> saves your changes and returns from the screen fields to the Command: box (or the Command Help Menu).
Hold down <Shift> and press <F1> to access the WordStock Help system: you can access a Command Help Menu from the Command: box, or field specific help from a field.
<F3> deletes information from the field in which the cursor is positioned.
<F4> (in the Command: box) switches to MODIFY mode and allows you to modify a displayed record. When in MODIFY mode:
<F1> moves backward within a field.
<F2> moves forward within a field.
Hold down <Shift> press <F1> to get help for the field in which the cursor is positioned; if help is available it is displayed. If no help is available for a field, 'No Help available is displayed.
Screen-specific F-keys are described in the appropriate chapters. Please see Appendix 2 for a full description of all F-key functions.
The Commands 'Help' Menu
All screens in WordStock are equipped with a secondary menu called the Command Help Menu. Command Help Menus contain the commands, and a description of the commands that apply to the screen in which you are working. This section describes how to use the Inventory Commands Help Menu.
Selecting Commands from the Command Help Menu
1. Open a Command Help Menu from the Command: box:
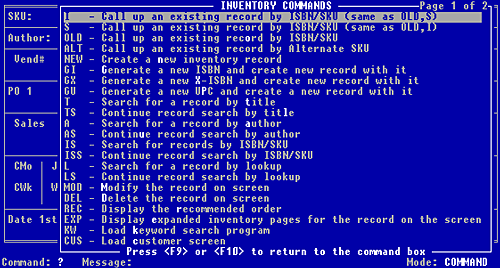
• Hold down the <Shift> key and press <F1>. The Inventory Commands Help Menu is displayed. See Figure 2-4 below.

Figure 2-4, Inventory Commands Help Menu
2. Use the keyboard arrow method or the hot key method to select 'Call up an existing record by ISBN/SKU' from the Command Help Menu.
An empty Inventory screen is displayed. 'OLD' is displayed in the Command: box, the ISBN/SKU field is highlighted, and the cursor is flashing there.
Please Note There are three kinds of SKUs that can be entered into the ISBN/SKU field: • ISBNs (International Standard Book Numbers) are book specific SKUs. ISBNs appear on all books and some other items of significance to bookselling. • UPC ( Universal Product Code) numbers appear on many kinds of non-book merchandise and mass market paperbacks. • XISBNs are a type of SKU developed by WordStock. An XISBN consists of an "x' followed by up to five digits. You can assign XISBNs (X1-X99999) to items which do not have a UPC or ISBN, or to any item in your store. Please see the glossary for more details about the SKUs listed above. Please see Appendix 3 for information about the relationship between SKUs and barcodes. |
3. Type <0836222474> [The ISBN for 'Photo Album: Small Yellow Polka Dotted' by Mary Engelbreit], and press <Enter>.
The Inventory record for 'Photo Album: Small Yellow Polka Dotted' by Mary Engelbreit is displayed behind the Inventory Commands Help Menu.
4. Select 'Modify the record on the screen' using the hot key method or the keyboard arrows. 'MODIFY' appears in the Mode: box.
5. Use the keyboard arrows to position the cursor in the "Prc1" (price 1) field. Notice that $9.95 is displayed in the "Prc1" field.
6. Press <F3> (the F-key that deletes information from the field in which the cursor is positioned). Notice that the price has been deleted from the "Pr1" field.
7. Type <$7.95> (a new price for the item) and press <Enter>. $7.95 is now displayed in the "Prc1" field.
You have changed the price in the 'Prc1' field; you can apply the methods introduced in steps 5 and 6 to change the information in any other modifiable fields.
8. Press <F10> to save your changes and return to the Command Help Menu. The Inventory Commands Help Menu is displayed.
9. Use the keyboard arrow method or the hot key method to select 'Quit and return to menu'. The Main Menu is displayed with the Lookups sub-menu opened.
The 'Command:' box
You can also execute a command without opening a Command Help Menu.
The left column of the Command Help Menu (see Figure 2-4 above) is a list of command abbreviations that you can enter directly into the Command: box.
If you know the command you want to execute, type it instead of opening the Command Help Menu.
Basic commands are standard throughout WordStock :
• Type <new> to create a new record.
• Type <old> to review an existing record.
• Type <mod> to modify the displayed record.
• Press <q> to quit out of a screen and return to a menu.
• Press <?> to open the Command Help Menu.
• Type <del> to delete the displayed record.
You must press <Enter> after typing a command.
| WARNING When you delete a record, affiliated information remains stored in related files. Deleting records using the <del> command may lead to discrepancies in your system. Please see 'REBUILDING DATA FILES' in Chapter 14 for information on how to clear up these discrepancies. |
Entering a Command in the Command: box
1. Open the Inventory screen: Use the keyboard arrow method or the hot key method to select 'Lookups' from the Main Menu. 'Basic Inventory' is highlighted.
2. Use the keyboard arrow method or the hot key method to select 'Inventory' from the Lookups sub-menu. An Inventory screen is displayed and the cursor is flashing in the Command: box. See Figure 2-3 above.
3. Type <old> (the command to review an existing record), and press <Enter>. 'OLD' appears in the Command: box, the ISBN/SKU field is highlighted, and the cursor is flashing there.
4. Type <0836222474> (The ISBN for 'Photo Album: Small Yellow Polka Dotted' by Mary Engelbreit), and press <Enter>. The Inventory record for 'Photo Album: Small Yellow Polka Dotted' by Mary Engelbreit is displayed and the cursor is flashing in the Command: box.
5. Type <mod> (the command to modify the displayed record), and press <Enter>. 'MODIFY' appears in the Mode: box.
6. Use the keyboard arrows to position the cursor in the "Prc1" (price 1) field. Notice that $7.95 is displayed in the "Prc1" field.
7. Type <$11.95> and press <Enter>. $11.95 is now displayed in the 'Prc1' field.
8. Press the <F8> key (the F-key to return to the Command: box [or the Command Help Menu] without saving the changes you made in the displayed record).
'Restore original data? (Y or N)' is displayed in the Message: box.
9. Press <y>. $7.95 (the original price) is displayed in the "Pr1" field. The cursor is flashing in the Command: box. OR The Inventory Commands Help Menu is opened.
| Please Note Whether the cursor is flashing in the Command: box or the Command Help Menu is opened depends on how your system is configured. To change your system configuration call WordStock Support during business hours. |
10. If the cursor is flashing in the Command: box: Press <q> and press <Enter>.
If the Inventory Commands Help Menu is opened: Select 'Quit and return to menu' using the hot key method or the keyboard arrows.
You have quit out of the Inventory screen. The Main Menu is displayed with the Lookups sub-menu opened.
| Please Note Although the information in this section applies to the Inventory file, these procedures are used to navigate all WordStock programs. |
|
|||||||||||||||||||||||||||