| Getting Started with WordStock |
Unlike other WordStock menus, which effect one file at a time, WordStock's Maintenance menu contains programs that effect your entire computer system.
Running Maintenance programs keeps your overall system up to date and operating smoothly so that WordStock can function at maximum efficiency.
Some Maintenance programs are designed to be run on a routine basis, while others are to be used only as needed.
In Your Store
You will use the information in this chapter to:
1. Calculate an ISBN check digit.
2. Maintain historical data:
Roll (weekly, monthly and yearly) sales;
Recreate your Vendor, Product and Section data.
3. Understand when to rebuild your data files.
4. Become familiar with the concept of making global changes and deletions to your database.
5. Understand when to delete old sorts.
6. Understand when to delete files in your home directory.
7. Create system backups: Make copies of your system that can be removed from the store for safe-keeping (i.e,. in the event of disaster).
8. Format a diskette.
9. Reset the modem.
10. Reset the system.
11. Install WordStock updates.
12. Start and stop the File Manager.
13. Reset optional CDROM programs.
14. Install BIP+. updates.
15. Recreate your Keyword database.
Please see Appendix 8 for a list of scheduled maintenance.
Calculating an ISBN Check Digit
This program is to be run on an as-needed basis.
The ISBN check digit is the last number in the ISBN. An ISBN is a coded numeric string, the check digit of which is the result of a calculation involving the other numbers in the ISBN.
If any of the first 9 digits in the ISBN is misprinted, the check digit will be incorrect and WordStock will not accept the ISBN.
In the event that a publisher misprints an ISBN, WordStock will tell you that the ISBN is not valid, and will not allow you to enter it into the system. You can then use WordStock's PROGRAM TO CALCULATE AN ISBN to correct the check digit.
| Please Note If the error in the ISBN is somewhere other than the check digit, you will have a different ISBN than the publisher. |
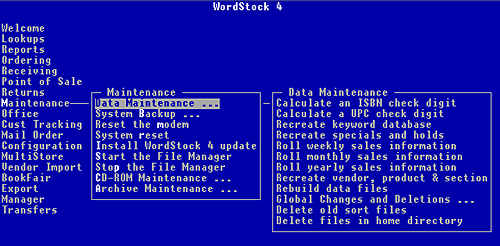
1. Select 'Maintenance' from the Main Menu. The Maintenance sub-menu is opened, and 'Data Maintenance' is highlighted.
2. Press <Enter>. The Data Maintenance sub-menu is opened, and 'Calculate an ISBN check digit' is highlighted.
3. Press <Enter>. The PROGRAM TO CALCULATE AN ISBN CHECK DIGIT is opened and you are prompted to 'Enter the ISBN to check:'.
4. Type the first 9 digits of the ISBN for which you'd like to calculate a check digit, and press <Enter>. The check digit is calculated and the complete ISBN is displayed.
| Please Note The ISBN will be displayed with correct hyphenation whenever possible. If WordStock is unable to determine the correct hyphenation, the ISBN will be preceded by an asterisk. |
You cannot calculate a check digit for an X-ISBN.
If you type less than 6 digits, WordStock will not calculate a check digit.
If you type 68 digits, WordStock will add zeros to the beginning of the number you enter until there are nine digits total, and will calculate a check digit for those nine numbers.
You are asked whether you want to 'calculate another ISBN?'.
5. If you want to calculate another ISBN check digit, press <y> and press <Enter>. You are prompted to 'Enter the ISBN to check:'.
Repeat steps 4 and 5 until all ISBNs which need new check digits are entered.
If you do not want to calculate another ISBN check digit, press <n> and press <Enter>.
The Main Menu is displayed with the Maintenance and the Data Maintenance sub-menus opened.
Maintaining Historical Data
Rolling Weekly Sales Information
You must run this program on a weekly basis.
Rolling the weekly sales information moves the weekly sales information from the "CWk" (current week) field to the "Wk1" field of your Inventory records (and moves the Week 1 sales to Week 2, etc.) so that current week sales information can begin accumulating anew each week.
| Please Note To assure accuracy, you must roll the weekly sales at the same time each week (e.g. every Monday morning or every Sunday night). Make sure that no other programs are running while you roll weekly sales. |
1. Select 'Maintenance' from the Main Menu. The Maintenance sub-menu is opened, and 'Data Maintenance' is highlighted.
2. Press <Enter>. The Data Maintenance sub-menu is opened, and 'Calculate an ISBN check digit' is highlighted.
3. Select 'Roll weekly sales information'. The PROGRAM TO ROLL WEEKLY SALES is opened and the date that you last rolled the weekly sales is displayed. You are asked if you'd like to continue.
| Important Check the date to make sure that the weekly sales have not already been rolled. |
4. If you want to roll the weekly sales, press <y> and press <Enter>. A series of messages is displayed as the weekly sales figures are rolled.
After the weekly sales information has been rolled, you are notified how many inventory records were processed. You are prompted to 'Press <Enter> to return to the menu.' Press <Enter>.
If you do not want to roll the weekly sales, press <n> and press <Enter>. You are notified that 'The weekly sales figures will not be rolled.', and prompted to 'Press <Enter> to return to the menu.' Press <Enter>.
The Main Menu is displayed with the Maintenance and the Data Maintenance sub-menus opened.
Rolling Monthly Sales Information
You must run this program on a monthly basis.
There are thirteen months represented on the Inventory screen (the current month and the 12 previous months) so that you can compare the current month to the same month last year.
Rolling the monthly sales information clears the "CMo" (current month) field and moves its information into the month that just passed, so that current month sales information can begin accumulating anew each month.
For example, if it is January 31 at the end of the business day, and you are rolling your monthly sales, the figures in the "Jan" field are cleared, and the figures in the "CMo" (current month) field are moved into the "Jan" field, leaving the "CMo" field empty so that February sales figures can begin accumulating there the next day.
| Please Note Because the Current Month field of your Inventory records is cleared and starts accumulating again when the monthly sales are rolled, you should roll the monthly sales information at the end of your business day on the last day of the month, or at the beginning of your business day on the first day of the month. Make sure that no other programs are running while you roll monthly sales. |
1. Select 'Maintenance' from the Main Menu. The Maintenance sub-menu is opened, and 'Data Maintenance' is highlighted.
2. Press <Enter>. The Data Maintenance sub-menu is opened, and 'Calculate an ISBN check digit' is highlighted.
3. Select 'Roll monthly sales information'. The PROGRAM TO CLEAR INVENTORY SALES FIGURES FOR A SELECTED MONTH is opened and the process of rolling monthly sales is described.
The date that you last rolled the monthly sales, and the month that you cleared on that date, are displayed and you are asked whether you'd like to continue.
| Important Check the date and the month rolled to make sure that the monthly sales have not already been rolled. |
4. If you want to roll the monthly sales, press <y> and press <Enter>. You are prompted to 'Enter the month which has just ended:'.
If you do not want to roll the monthly sales, press <n> and press <Enter>. You are notified that 'The monthly sales figures will not be cleared', and prompted to 'Press the <ENTER> key to return to the menu'. Skip to step 12.
5. Type the name of the month which has just ended (full name or standard abbreviation) or the number of the month, and press <Enter>. You are asked to verify that you want to clear the monthly sales figures for the month you entered.
6. If you want to clear the monthly sales figures for the month you entered, press <y> and press <Enter>. A series of messages is displayed as the monthly sales figures are rolled. After the monthly sales information has been rolled, you are notified how many Inventory records were processed.
If you do not want to clear the monthly sales figures for the month you entered, press <n> and press <Enter>. You are prompted to 'Press <Enter> to return to the menu'.
7. Press <Enter>. The Main Menu is displayed with the Maintenance and the Data Maintenance sub-menus opened.
Rolling Yearly Sales Information
You must run this program on an annual basis.
Rolling the yearly sales information effects the sales data in the Inventory, Customer, Vendor, Product, and Section files.
When you roll the yearly sales information, the information in the "CYR" (current year) fields is moved into the "LYR" (last year) fields, and the information from the "LYR" fields is moved into the "2YR" (two years ago) fields.
| Please Note You may roll your yearly sales based on either a calendar year or a fiscal year. Make sure that no other programs are running before rolling yearly sales. You must print your Daily, Weekly, and Monthly Sales Summary Reports before rolling yearly sales. Once you roll your yearly figures, you cannot go back and print those reports. |
1. Select 'Maintenance' from the Main Menu. The Maintenance sub-menu is opened, and 'Data Maintenance' is highlighted.
2. Press <Enter>. The Data Maintenance sub-menu is opened, and 'Calculate an ISBN check digit' is highlighted.
3. Select 'Roll yearly sales information'. The PROGRAM TO ROLL YEARLY SALES, PURCHASES, AND RETURNS FOR DATA FILES is opened, the date that you last rolled the yearly sales is displayed and you are asked whether you'd like to continue.
| Important Check the date to make sure that the yearly sales have not already been rolled. |
4. If you want to roll the yearly figures, press <y> and press <Enter>. You are asked if you have printed your Daily, Weekly, and Monthly Sales Summary by Product Reports.
If you do not want to roll the yearly figures, press <n> and press <Enter>. You are notified that 'The yearly sales figures will not be cleared', and prompted to 'Press the <ENTER> key to return to the menu'. Skip to step 6.
| Important Do not answer "yes" unless you have actually printed your Daily, Weekly, and Monthly Sales Summary Reports and made sure that they printed ok. Once you roll your yearly figures, you cannot go back and print those reports. |
5. If you have printed those reports, press <y> and press <Enter>. The File Manager is stopped, and a series of messages is displayed as the yearly sales figures are
Otherwise, p ress <n> and press <Enter>. You are notified that 'You will need to print these reports before rolling the yearly sales'. rolled.
After the yearly sales information has been rolled, you are notified how many Inventory, Vendor, Product, Section, and Customer records were processed.
The File Manager is started, and the Product Summary Reports are initialized. You are prompted to 'Press <Enter> to return to the menu'.
6. Press <Enter>. The Main Menu is displayed with the Maintenance and the Data Maintenance sub-menus opened.
Recreating Vendor, Product, and Section Data
This program is run on an as-needed basis.
Although the Vendor, Product, and Section files share information with the Inventory file, they are not automatically updated when you make global changes or deletions to your Inventory file.
If you make a lot of global or manual changes to your Inventory records, we recommend that you periodically recreate the "On Hand" and "On Order" fields of your Vendor, Product, and Section records.
When you run the program to recreate the On Hand and On Order data, WordStock adds the On Hand and On Order information from your Inventory records for each Vendor, Product, and Section, and recreates the On Hand and On Order fields of your Vendor, Product, and Section records.
| Please Note This program recalculates based on the exact value in the "On Hand" and "On Order" fields of your Inventory records; any negative values will be calculated into your Vendor, Product, and Section records. We recommend that you print Daily, Weekly, and Monthly Product Summary Reports before and after recalculating your Vendor, Product, and Section files so you will have a record of the changes you've made. Make sure that no other programs are running before recreating your Vendor, Product, and Section data. You should run this program at the end of the day when the system is not needed. If you are unsure whether to recreate the Vendor, Product, and Section files, please call WordStock Support. This program should only be run from your main computer. |
1. Select 'Maintenance' from the Main Menu. The Maintenance sub-menu is opened, and ' Data Maintenance' is highlighted.
2. Press <Enter>. The Data Maintenance sub-menu is opened, and 'Calculate an ISBN check digit' is highlighted.
3. Select 'Recreate vendor, product, and section'. The PROGRAM TO RECALCULATE VENDOR, PRODUCT, AND SECTION DATA is opened, you are warned that no other programs should be running during recalculation, and you are asked whether you'd like to continue.
4. If no other programs are running, press <y> and press <Enter>. You are asked whether you want to recalculate just the on hand and on order data.
If other programs are running, press <n> and press <Enter>. You are prompted to 'Press <Enter> to return to the menu'. Press <Enter>. The Main Menu is displayed with the Maintenance and the Data Maintenance sub-menus opened. Quit out of any programs that are running, and Start over at step 1.
| Hint We recommend that you recalculate only the On Hand and On Order information. If you are considering recalculating the information in any other fields, you must call WordStock Support. |
5. If you want to recalculate just the on hand and on order data, press <y> and press <Enter>. The PROGRAM TO RECALCULATE VENDOR, PRODUCT, AND SECTION DATA is opened, and you are asked to verify that you want to recalculate the On hand and On order data for Vendor, Product and Section from the Inventory file
If you want to recalculate other data, please call WordStock Support before proceeding.
6. Press <y> and press <Enter>. Once the records are cleared, the recalculation proceeds, and you are notified how many Inventory records are processed.
When the recalculation is done, you are notified that all files were processed successfully. After a brief delay, you are notified how many records in each file were cleared. You are prompted to 'Press <Enter> to Return to the menu'.
7. Press <Enter>. The Main Menu is displayed with the Maintenance and the Data Maintenance sub-menus opened.
Rebuilding Data Files
This program is run on an as-needed basis.
If your computer is repeatedly turned off without stopping the File Manager, your data files will become out of synch with their indices. If this happens you will notice that your files are behaving strangely (missing titles, non alphabetical searches, etc.). Rebuilding a data file corrects any problems, and restores the file's integrity.
Rebuilding your data files on a regular basis also helps to ensure the integrity of your keyword search database, and keeps your hard disk running efficiently.
• This program should only be run from your computer.
| Important Once a Rebuild is started, it cannot be stopped, and it may take hours to run. |
Please call WordStock Support for information before attempting to rebuild a data file.
Making Global Changes and Deletions to Your Data Files
This program is run on an as-needed basis.
From time to time, you may want to make a global change to a certain field in a sorted group of records (e.g., if the Vendor changes or if you want to move a group of items to a different Section, etc.), or you may want to delete a group of sorted records.
| Important Making global changes or deletions to your data files effects your system in a variety of important ways, and should not be done without a full understanding of the process. Please call WordStock Support for information before attempting to make global changes or deletions. |
Deleting Old Sorts
This program is run on an as-needed basis.
Your named sorts are automatically deleted from WordStock after 7 days.
Occasionally, you may run many sorts in a short period of time. If you are trying to run a sort and you get a message that there may not be enough space on your hard disk to run the sort, it is because the disk is almost full. When this happens, you can run the program to delete old sort files to see if you can free up enough space.
Please call WordStock Support if you think you need to run this program.
Deleting Files in Your Home Directory
Whenever you are logged into WordStock, whatever word processor files you create are written into your home directory. From time to time, you may want to delete some of these word processor files.
1. Select 'Maintenance' from the Main Menu. The Maintenance sub-menu is opened, and 'Data Maintenance' is highlighted.
2. Press <Enter>. The Data Maintenance sub-menu is opened, and 'Calculate an ISBN check digit' is highlighted.
3. Select 'Delete files in home directory'. The PROGRAM TO DELETE FILES FROM YOUR HOME DIRECTORY is opened, and a List box of your home directory files is displayed.
4. If you want to delete any of your home directory files, use the keyboard arrows to highlight the file(s) you want to delete and press <Enter> after highlighting each one, to delete it.
If you do not want to delete any of your home directory files, press <F9> . You are asked 'Do you want to leave this program?'. Press <y> and press <Enter>.
When all the files that you want to delete are highlighted, press <F10> . You are prompted to 'Press <Enter> to return to the menu'.
5. Press <Enter>. The Main Menu is displayed with the Maintenance sub-menu opened.
Running a System Backup
Running a System Backup makes a copy of the essential files on your computer's hard disk (hard drive).
It is essential that you copy your hard disk on a daily basis so that you do not lose the information on your system in the event that your hard drive is damaged and data is lost.
If your hard drive is damaged, and you have not backed your system up for a week, you will only be able to restore week-old data from your backup, and will have lost valuable sales and purchasing information.
There are three types of System Backup:
1. Full System Backup: to back up your data files and your configuration files. We recommend that you run a Full System Backup daily.
| Please Note While we recommend that you run a Full System Backup on a daily basis, we have divided the Full Backup into two parts (the Daily and the Weekly System Backups) in case you do not have time to run a Full Backup every day. |
2. Daily System Backup: to back up just your key data files on a daily basis. If you are unable to run a Full Backup, we recommend that you run a Daily System Backup at the end of each business day.
3. Weekly System Backup: to back up your configuration files and basic software on a weekly basis. If you are unable to run a Full Backup, we recommend that you run a Weekly System Backup at the end of each week.
There are four ways to back up your hard drive:
1. Back up to Zip disks.
2. Back up to a tape drive (a minidata cartridge).
3. Back up to another hard disk (if you have two hard disks).
4. In the event that your Zip drive and/or your tape drive is out of service, you can run a daily backup onto diskettes.
Running a ZIP Drive Backup
This program is to be run on a routine basis.
You can run a Daily Backup, a Weekly Backup, or a Full Backup onto your Zip drive. A Zip cartridge can hold 100 megabytes of data (as much data as fits on 50 to 60 diskettes). Make sure that no other programs are running before you run a Zip backup.
This program should be run only from your main computer.
1. Select 'Maintenance' from the Main Menu. The Maintenance sub-menu is opened, and 'Data Maintenance' is highlighted.
2. Select 'System Backup'. The System Backup sub-menu is opened, and 'Format a diskette' is highlighted.
3. Select 'Zip drive Backup'. The PROGRAM TO SELECT TYPE OF ZIP BACKUP is displayed, and a List box of the types of System Backups is opened.
See the following three sections for instructions on running each of the three types of System Backups.
Running a Full Backup onto a Zip Drive
1. Select 'FULL' (Complete) and press <Enter>.The PROGRAM TO SAVE SYSTEM FILES TO ZIP DRIVE is displayed. The last dates that weekly and monthly sales were rolled are displayed along with information about the Full Backup. You are asked 'Do you wish to continue?'
2. If you want to back up all of your files onto a Zip cartridge, press <y> and press <Enter>. The date that you last recreated your keyword database is displayed. You are asked You are asked 'Do you wish to recreate the Key-word database after the backup?'.
If you do not want to back up all of your files onto a Zip cartridge, press <n> and press <Enter>. You are notified that 'The zip drive backup will not take place' and prompted to 'Press <Enter> to return to the menu'. word database after the backup?'. Skip to step 7.
| Hint In order to keep your keyword database up to date and accurate, we recommend that you recreate your keyword database every time you backup your data files. |
3. If you want to recreate your keyword database, press <y> and press <Enter>.
If you do not want to recreate your keyword database, press <n> and press <Enter>.
You are asked 'Do you wish to verify this backup after it takes place?'.
| Hint Although it takes about as much time as running the backup itself, we recommend that you have the system verify the backup to compare the data on the diskette with the data on the hard disk in order to verify that the copy is true to the original. |
4. If you want to verify the backup after it takes place, press <y> and press <Enter>. You are prompted to 'Please insert the first backup cartridge in the zip drive and press <Enter>'.
If you do not want to verify the backup after it takes place, press <n> and press <Enter>.
5. Insert the first backup cartridge in the zip drive and press <Enter>. A series of messages is displayed while the system prepares for the backup, and as the backup is run. You are notified if more than one cartridge is required for the backup. Insert a new disk if instructed to do so. When the backup is done, 'FULL BACKUP COMPLETE' is displayed.
6. If you chose to verify the backup, you are informed whether the backup is OK. A series of messages is displayed as your system is set up after the backup is complete.
If you did not choose to verify the backup, you are prompted to 'Press <Enter> to return to the menu'.
| Important If you get a message that the backup is not OK, write it down and call WordStock Support. |
7. Press <Enter>. The Main Menu is displayed with the Maintenance and the Data Maintenance sub-menus opened.
Running a Daily Backup onto Your ZIP Drive
1. Select 'DAILY' (Data ONLY) and press <Enter>. The PROGRAM TO SAVE SYSTEM DATA FILES TO ZIP DRIVE is displayed. The last dates that weekly and monthly sales were rolled are displayed along with information about the Daily Backup. You are asked 'Do you wish to continue?'.
2. If you want to back up your data files onto a Zip cartridge, press <y> and press <Enter>. The date that you last recreated your keyword database is displayed. You are asked 'Do you wish to recreate the Key-word database after the backup?'
If you do not want to back up your data files onto a Zip cartridge, press <n> and press <Enter>. You are notified that 'The zip drive backup will not take place' and prompted to 'Press <Enter> to return to the menu'. Skip to step 6
| Hint In order to keep your keyword database up to date and accurate, we recommend that you recreate your keyword database every time you backup your data files. |
3. If you want to recreate your keyword database, press <y> and press <Enter>.
If you do not want to recreate your keyword database, press <n> and press <Enter>.
You are asked 'Do you wish to verify this backup after it takes place?'
| Hint Although it takes about as much time as running the backup itself, we recommend that you have the system verify the backup to compare the data on the diskette with the data on the hard disk in order to verify that the copy is true to the original. |
4. If you want to verify the backup after it takes place, press <y> and press <Enter>. You are prompted to 'Please insert the first backup cartridge in the zip drive and press <Enter>'.
If you do not want to verify the backup after it takes place, press <n> and press <Enter>.
5. Insert the first backup cartridge in the zip drive and then press <Enter>. A series of messages is displayed while the system prepares for the backup, and as the backup is run.
When the backup is done, 'DAILY BACKUP COMPLETE' is displayed. If you chose to verify the backup: If you did not choose to verify the backup: You are informed whether the backup is OK. A series of messages is displayed as your system is set up after the backup is complete.
You are prompted to 'Press <Enter> to return to the menu'.
| Important If you get a message that the backup is not OK, call WordStock Support. |
6. Press <Enter>. The Main Menu is displayed with the Maintenance and the Data Maintenance sub-menus opened.
Running a Weekly Backup onto Your Zip Drive
1. Select 'WEEKLY' (Setup ONLY) and press <Enter>. The PROGRAM TO SAVE SYSTEM SETUP FILES TO ZIP DRIVE is displayed. The last dates that weekly and monthly sales were rolled and that data files were backed up are displayed along with information about the Weekly Backup. You are asked 'Do you wish to continue?'
2. If you want to back up your setup files onto a Zip cartridge, press <y> and press <Enter>. The date that you last recreated your keyword database is displayed. You are asked 'Do you wish to recreate the Key-word database after the backup?'.
If you do not want to back up your setup files onto a Zip cartridge, press <n> and press <Enter>. You are notified that 'The zip drive backup will not take place' and prompted to 'Press <Enter> to return to the menu'. Skip to step 5.
| Hint In order to keep your keyword database up to date and accurate, we recommend that you recreate your keyword database every time you backup your data files. |
3. If you want to recreate your keyword database, press <y> and press <Enter>.
If you do not want to recreate your keyword database, press <n> and press <Enter>.
You are asked 'Do you wish to verify this backup after it takes place?'
| Hint Although it takes about as much time as running the backup itself, we recommend that you have the system verify the backup to compare the data on the cartridge with the data on the hard disk in order to verify that the copy is true to the original. |
4. If you want to verify the backup after it takes place: Press <y> and press <Enter>. You are prompted to 'Please insert the first backup cartridge in the zip drive and press <Enter>'.
If you do not want to verify the backup after it takes place, press <n> and press <Enter>.
5. Insert the first backup cartridge in the zip drive and press <Enter>. A series of messages is displayed while the system prepares for the backup, and as the backup is run. You are notified if more than one cartridge is required. Insert additional cartridges if instructed to do so. When the backup is done, 'WEEKLY BACKUP COMPLETE' is displayed.
If you chose to verify the backup, a series of messages is displayed as the backup is verified.You are informed whether the backup is OK.
If you did not choose to verify the backup, a series of messages is displayed as your system is set up after the backup is complete. You are prompted to 'Press <Enter> to return to the menu'.
| Important If you get a message that the backup is not OK, write it down and call WordStock Support. |
6. Press <Enter>. The Main Menu is displayed with the Maintenance and the Data Maintenance sub-menus opened.
Running a Tape Backup
This program is to be run from your main computer on a routione basis.
1. Select 'Maintenance' from the Main Menu. The Maintenance sub-menu is opened, and 'Data Maintenance' is highlighted.
2. Select 'System Backup'. The System Backup sub-menu is opened, and 'Format a diskette' is highlighted.
3. Select 'Tape Backup'. The PROGRAM TO SELECT TYPE OF TAPE BACKUP is displayed, and a List box of the types of System Backups is opened.
See the following three sections for instructions on running each of the three types of System Backups.
Running a Full Tape Backup onto Your Tape Drive
1. Select 'FULL' (Complete) and press <Enter>. The PROGRAM TO SAVE SYSTEM FILES TO TAPE is displayed. The last dates that weekly and monthly sales were rolled are displayed along with information about the Full Backup. You are prompted to 'Please make sure the tape unit is on and a tape is in the unit'. You are asked 'Do you wish to continue?'
2. If you want to back up all your files onto a minidata cartridge, make sure that the tape drive is on and a tape is in the drive. Press <y> and press <Enter>. A series of messages is displayed while the system prepares for the backup, and as the backup is run. You are notified if more than one tape is required for the backup.Insert additional tapes if instructed to do so. When the backup is done, 'FULL BACKUP COMPLETE' is displayed. You are prompted to 'Press <Enter> to return to the menu'.
If you do not want to back up all your files onto a mini-data cartridge, press <n> and press <Enter>. You are notified that 'The tape backup will not take place'. You are prompted to 'Press <Enter> to return to the menu'.
| Important If you get a message that the backup is not OK, write it down and call WordStock Support. |
3. Press <Enter>. The Main Menu is displayed with the Maintenance and the Data Maintenance sub-menus opened.
Running a Daily Backup onto Your Tape Drive
1. Select 'DAILY' (Data ONLY) and press <Enter>. The PROGRAM TO SAVE SYSTEM DATA FILES TO TAPE DRIVE is displayed. The last dates that weekly and monthly sales were rolled are displayed along with information about the Daily Backup. You are prompted to 'Please make sure the tape unit is on and a tape is in the unit'. You are asked 'Do you wish to continue?'
2. If you want to back up your data files onto a mini-data cartridge, make sure that the tape drive is on and a tape is in the drive.
Press <y> and press <Enter>. A series of messages is displayed while the system prepares for the backup, and as the backup is run.
When the backup is done, 'DAILY BACKUP COMPLETE' is displayed. A series of messages is displayed as your system is set up after the backup is complete. You are prompted to 'Press <Enter> to return to the menu'.
If you do not want to back up your data files onto a minidata cartridge, press <n> and press <Enter>. You are notified that 'The tape backup will not take place'. You are prompted to 'Press <Enter> to return to the menu'.
| Important If you get a message that the backup is not OK, write it down and call WordStock Support. |
3. Press <Enter>. The Main Menu is displayed with the Maintenance and the Data Maintenance sub-menus opened.
Running a Weekly Backup onto Your Tape Drive
1. Select 'WEEKLY' (Setup ONLY) and press <Enter>. The PROGRAM TO SAVE SYSTEM SETUP FILES TO TAPE is displayed. The last dates that weekly and monthly sales were rolled and that data files were backed up are displayed, along with information about the Weekly Backup. You are prompted to 'Please make sure the tape unit is on and a tape is in the unit'. You are asked 'Do you wish to continue?'
2. If you want to back up your setup files onto a minidata cartridge, make sure that the tape drive is on and a tape is in the drive. Press <y> and press <Enter>.
A series of messages is displayed while the system prepares for the backup, and as the backup is run. You are notified if more than one tape is required. When the backup is done, 'WEEKLY BACKUP COMPLETE' is displayed. A series of messages is displayed as your system is set up after the backup is complete. You are prompted to 'Press <Enter> to return to the menu'.
If you do not want to back up your setup files onto a minidata cartridge, press <n> and press <Enter>. You are notified that 'The zip drive backup will not take place' and prompted to 'Press <Enter> to return to the menu'.
| Important If you get a message that the backup is not OK, write it down and call WordStock Support. |
3. Press <Enter>. The Main Menu is displayed with the Maintenance and the Data Maintenance sub-menus opened.
Formatting a Diskette
This program should be run on your main computer on an as-needed basis.
Before you can run a Daily System Back up of your data files onto 3.5" diskettes, your diskettes must be formatted so that they can accept information from the WordStock system. You can format diskettes each time you run a Daily Backup, or, you can format many diskettes so that you have them available as needed.
1. Select 'Maintenance' from the Main Menu. The Maintenance sub-menu is opened, and 'Data Maintenance' is highlighted.
2. Select 'System Backup'. The System Backup sub-menu is opened, and 'Format a diskette' is highlighted.
3. Press <Enter>. The PROGRAM TO FORMAT DISKETTES is displayed, and you are notified that 'This command formats diskettes and checks them for bad blocks', and that formatted diskettes can be used for any WordStock purpose. You are asked 'Do you want to continue?'.
4. If you want to format a diskette, press <y> and press <Enter>. You are prompted to 'Please insert a diskette in drive 1 and press the <Enter> key'.
If you do not want to format a diskette, press <n> and press <Enter>. You are notified that 'No disks will be formatted', and prompted to 'Press <Enter> to return to the menu'. Skip to step 11.
5. Insert a diskette (silver tab first) into drive 1 (see Appendix 1 if you are unsure how to identify drive 1 on your computer) and press <Enter>. A series of messages is displayed while the diskette is formatted and checked for bad blocks. When the diskette is formatted you are notified that the format is complete and you are asked if you want to format another diskette.
6. Press the button next to the diskette drive to eject the diskette.
7. If you want to format another diskette, press <y> and press <Enter>. You are prompted to 'Press <Enter> to format the next diskette.'
If you do not want to format another diskette, press <n> and press <Enter>. You are notified that 'No more diskettes will be formatted', and prompted to 'Press <Enter> to return to the menu. Skip to step 11.
8. Repeat steps 57 until you have formatted all the diskettes you want and you have answered <n> in step 7. You are and prompted to 'Press <Enter> to return to the menu'.
9. Press <Enter>. The Main Menu is displayed with the Maintenance and the System Backup sub-menus opened.
Running a Diskette Backup
| Important Running a Diskette Backup saves a copy of all your data files onto diskettes. This generally requires dozens of diskettes. A Diskette Backup cannot be left to run on its own as it requires that you insert diskettes into the disk drive as they fill up. It is therefore both labor intensive, and time consuming. Since it requires so many diskettes, it also poses the risk of introducing a bad disk into the backup which could render important information irretrievable. We therefore recommend that you run a diskette backup ONLY if your primary backup method (your tape drive and/or your Zip drive) is out of service. Make sure that no other programs are running before you run a Diskette Backup. This program should be run only on your computer. |
1. Select 'Maintenance' from the Main Menu. The Maintenance sub-menu is opened, and 'Data Maintenance' is highlighted.
2. Select 'System Backup'. The System Backup sub-menu is opened, and 'Format a diskette' is highlighted.
3. Select 'Diskette Backup'. The PROGRAM TO SAVE SYSTEM DATA FILES TO DISKETTE is displayed, along with information about the process of backing up your system onto a diskette. You are asked 'Do you wish to continue?'.
4. If you want to back up your data files onto a diskette, press <y> and press <Enter>. You are reminded to clean your disk drive periodically, and the date that you last recreated your keyword database is displayed. You are asked 'Do you wish to recreate the Key-word database after the backup?'
If you do not want to back up your data files onto a diskette, p ress <n> and press <Enter>. You are notified that 'The diskette backup will not take place', and prompted to 'Press the <Enter> key to return to the menu'. Skip to step 11.
| Hint In order to keep your keyword database up to date and accurate, we recommend that you recreate your keyword database every time you backup your data files. |
5. If you want to recreate your keyword database, press <y> and press <Enter>.
If you do not want to recreate your keyword database, press <n> and press <Enter>. You are asked 'Do you wish to verify this backup after it takes place?'
| Hint Although it takes about as much time as running the backup itself, we recommend that you have the system verify the backup to compare the data on the diskette with the data on the hard disk in order to verify that the copy is true to the original. |
6. If you want to verify the backup after it takes place, press <y> and press <Enter>. You are prompted to 'Insert the first backup diskette in drive 1 and press <Enter>'.
If you do not want to verify the backup after it takes place, press <n> and press <Enter>.
7. Insert a diskette (silver tab first) into drive 1 (see Appendix 1 if you are unsure how to identify drive 1 on your computer) and press <Enter>.
A series of messages is displayed while the system prepares for the backup. You are told approximately how many diskettes are required for the backup.
A series of messages is displayed as the backup is run and you are notified when to replace the diskette in the disk drive. When the backup is done, 'Daily backup complete' is displayed.
If you chose to verify the backup, you are prompted to reinsert the diskettes in the proper order. A series of messages is displayed:
- You are notified that WordStock 4 is allocating space for cash register logs.
- You are notified that WordStock 4 is recalculating the Special Orders and Holds in your Inventory records.
- You are notified that WordStock is archiving old POs and Receiving Batches.
If you chose to back up your Keyword database, the backup is run.
If you did not choose to verify the backup, you are prompted to 'Press <Enter> to return to the menu'.
8. Press <Enter>. The Main Menu is displayed with the Maintenance and the Data Maintenance sub-menus opened.
Resetting the Modem
This program is to be run on an as-needed basis.
In the event that you have trouble communicating to Vendors through your modem, you will need to reset your modem to clear the line.
1. Turn the modem off and on. (See Appendix 1 if you cannot identify your modem.)
2. Select 'Maintenance' from the Main Menu. The Maintenance sub-menu is opened, and 'Data Maintenance' is highlighted.
3. Select 'Reset the modem'. The PROGRAM TO RESET THE MODEM is displayed and you are asked 'Do you want to reset the modem?'.
4. If you want to reset the modem, press <y> and press <Enter>. A series of messages is displayed while the modem is being reset. You are notified when the modem is reset.
If you do not want to reset the modem. press <n> and press <Enter>. You are notified that 'No modem will be reset'.
You are prompted to 'Press <Enter> to return to the menu'.
5. Press <Enter>. The Main Menu is displayed with the Maintenance sub-menu opened.
Resetting the System
This program is to be run on an as-needed basis.
In the event that your computer is turned off while any programs are running, you will need to reset your system before you start the File Manager to insure that no files were adversely effected. If any files were damaged, resetting the system gives WordStock 4 the opportunity to fix them. Important!
If the File Manager is not stopped before the computer is turned off, it is essential that you reset the system before starting the File Manager to ensure that your files are opened properly.
Failure to run a system reset could necessitate running lengthy rebuilds during business hours.
1. Select 'Maintenance' from the Main Menu. The Maintenance sub-menu is opened, and 'Data Maintenance' is highlighted.
2. Select 'System reset'. The PROGRAM TO RESET WORDSTOCK SYSTEM is displayed and you are asked 'Do you wish to continue?'.
If you want to reset the system, press <y> and press <Enter>. 'System files not reset' is displayed. If programs are running, you are notified that 'A critical program is running', and prompted to shut it down before proceeding. Quit out of the active programs, and start over at step 1. A series of messages is displayed while the system is being reset. You are notified when the system is reset.
If you do not want to reset the system, press <n> and press <Enter>.
You are prompted to 'Press <Enter> to return to the menu'.
| Important If any error messages are displayed, write them down and call WordStock Support. |
4. Press <Enter>. The Main Menu is displayed with the Maintenance sub-menu opened.
Installing WordStock 4 Updates
This program is to be run on an as-needed basis.
WordStock is constantly evolvin; occasionally we issue a system update on diskettes. These updates keep your system current with the latest versions of WordStock software, and fix any bugs that may have been present in earlier versions. When you install the diskettes, their information is transferred to your hard disk and becomes a part of your WordStock system.
We include installation instructions with all system updates.
| Important Since each update builds on earlier updates, you must install updates as they are received so that you stay in synch with WordStock Support. |
1. Select 'Maintenance' from the Main Menu. The Maintenance sub-menu is opened, and 'Data Maintenance' is highlighted.
2. Select 'Install WordStock update'. The PROGRAM TO INSTALL WORDSTOCK SOFTWARE FROM DISKETTE is displayed and you are prompted to 'Put the first update diskette in the diskette drive and press the <Enter> key'.
3. Follow the directions that are included with the update until you are prompted to 'Press <Enter> to return to the menu'.
4. Press <Enter>. The Main Menu is displayed with the Maintenance sub-menu opened.
Starting the File Manager
This program is to be run on an as-needed basis.
Generally, you will not have to start the File Manager manually because it is automatically started when you turn on your computer.
There are three occasions after which you will have to start the File Manager:
1. In the event that the File Manager is stopped manually.
2. After running a system reset.
3. After running a system backup.
If you use our optional Credit Card Authorization (CCA) or Books In Print Plus (BIP+.) programs, starting the File Manager automatically starts them as well.
1. Select 'Maintenance' from the Main Menu. The Maintenance sub-menu is opened, and 'Data Maintenance' is highlighted.
2. Select 'Start the File Manager'. The PROGRAM TO START THE FILE MANAGER is displayed and a series of messages is displayed as the File Manager and any optional programs are started. You are notified when the File Manager is started. You are prompted to 'Press <Enter> to return to the menu'.
3. Press <Enter>. The Main Menu is displayed with the Maintenance sub-menu opened.
Stopping the File Manager
This program is to be run on an a routine basis.
You must stop the File Manager before you turn off your computer.
| Important If the File Manager is not stopped before the computer is turned off, you will not be able to start the File Manager until you reset the system. See above. |
If you have the optional Credit Card Authorization (CCA) and Ingram Integrated Books In Print Plus (BIP+.) programs, stopping the File Manager automatically stops them as well.
1. Select 'Maintenance' from the Main Menu. The Maintenance sub-menu is opened, and 'Data Maintenance' is highlighted.
2. Select 'Stop the File Manager'. The PROGRAM TO STOP THE FILE MANAGER is displayed and a series of messages is displayed as the File Manager and any optional programs are stopped. You are notified when the File Manager is stopped. You are prompted to 'Press <Enter> to return to the menu'.
3. Press <Enter>. The Main Menu is displayed with the Maintenance sub-menu opened.
Resetting CD-ROM Programs
This program is to be run on an as-needed basis.
In the event that the CDROM computer gets shut off while the WordStock system is running, or if there was no CD in the CDROM when you turned on your computer, you will need to reset the CDROM programs in order to re-establish the link between WordStock and your CDROM unit.
1. Select 'Maintenance' from the Main Menu. The Maintenance sub-menu is opened, and 'Data Maintenance' is highlighted.
2. Select 'Reset CDROM programs'. The PROGRAM TO RESET CDROM SEARCH PROGRAMS is displayed.
A series of messages is displayed as the CDROM programs are reset. You are notified when the reset is complete, and you are prompted to 'Press <Enter> to return to the menu'.
3. Press <Enter>. The Main Menu is displayed with the Maintenance sub-menu opened.
Installing BIP+ Updates
These programs are run on a routine basis.
If you have the optional BIP+™ software, you will receive monthly and weekly CDROM updates to the BIP+™ database.
The monthly BIP+™ updates contains the latest version of the Books In Print database, and stay in your CDROM drive until you receive the next monthly update, except when you remove them temporarily in order to install the weekly updates.
The weekly BIP+™ updates contain Ingram's stock status for the inventory listed in BIP+™ for your ordering convenience.
Installing Monthly BIP+™ Updates
1. Select 'Maintenance' from the Main Menu. The Maintenance sub-menu is opened, and 'Data Maintenance' is highlighted.
2. Select 'Install BIP+ updates'. The Install BIP+ updates sub-menu is opened, and 'Ingram BIP+ Monthly update' is highlighted.
3. Press <Enter>. The PROGRAM TO INSTALL BOWKER BIP+ MONTHLY FILES TO HARD DISK is opened and you are asked 'Do you wish to continue?'.
4. Press <y> and press <Enter>. 'Stopping the CDROM search programsdone.' is displayed, and you are prompted to 'Please press <Enter> to open the CDROM drive.'
5. Press <Enter>. A series of messages is displayed informing you how to perform the update, and you are prompted to 'Press <ENTER> when ready'.
Follow the on-screen directions:
6. Remove the case from the CDROM drive. The CDROM case houses the CDROM and must be opened in order to remove a CDROM from, or insert a CDROM into the drive.
7. Remove the OLD BLUE BIP+ CDROM from the case.
8. Insert the NEW BLUE BIP+ CDROM into the case.
9. Insert the case into the CDROM drive.
10. Push the case into the CDROM unit.
11. Press <Enter>. A series or messages is displayed while the update is installed.
When the installation is done, 'Bowker BIP+ monthly update installation complete' is displayed, and you are asked whether you want to 'Install Ingram BIP+ Weekly update?'.
12. If you have a BIP+ Weekly update to install, press <y> and press <Enter>. Follow steps 518 below. 'Starting the CDROM search programs done' is displayed and you are prompted to 'Press the <Enter> key to return to the menu'.
Otherwise, press <n> and press <Enter>.
13. Press <Enter>. The Main Menu is displayed with the Maintenance and the Install BIP+ updates sub-menus opened.
Installing Ingram Weekly BIP+ Updates
1. Select 'Maintenance' from the Main Menu. The Maintenance sub-menu is opened, and 'Data Maintenance' is highlighted.
2. Select 'Install BIP+ updates'. The Install BIP+ updates sub-menu is opened, and 'Ingram Monthly update' is highlighted.
3. Select 'Ingram Weekly update'. The PROGRAM TO INSTALL INGRAM WEEKLY UPDATES TO HARD DISK is opened and you are asked 'Do you wish to continue?'.
4. Press <y> and press <Enter>. 'Stopping the CDROM search programs done.' is displayed, and you are prompted to 'Please press <Enter> to open the CDROM drive.'
5. Press <Enter>. A series of messages is displayed informing you how to perform the update, and you are prompted to 'Press <ENTER> when ready'.
Follow the on-screen directions:
6. Remove the case from the CDROM drive. The CDROM case houses the CDROM and must be opened in order to remove a CDROM from, or insert a CDROM into the drive.
7. Remove the blue BIP+ CDROM from the case.
8. Insert the green Ingram update CDROM into the case.
9. Insert the case into the CDROM drive.
10. Push the case into the CDROM unit.
11. Press <Enter>. A series or messages is displayed while the update is installed. When the installation is done, 'Ingram weekly update installation complete' is displayed, and you are prompted to 'Please wait until the case pops out of the CD ROM drive'.
A series of messages is displayed informing you how to replace the BIP+™ monthly CDROM, and you are prompted to 'Press <ENTER> when ready'.
Follow the on-screen directions:
12. Remove the case from the CDROM drive. The CDROM case houses the CDROM and must be opened in order to remove a CDROM from, or insert a CDROM into the drive.
13. Remove the GREEN Ingram update CDROM from the case.
14. Insert the BLUE BIP+ CDROM into the case.
15. Insert the case into the CDROM drive.
16. Push the case into the CDROM unit.
17. Press <Enter>. A series or messages is displayed while the update is installed. When the BIP+ CDROM replacement is done, 'Checking CDROM please waitDone' and then 'Starting the CDROM search programs Done' is displayed, and you are prompted to 'Press <Enter> to return to the menu'.
18. Press <Enter>. The Main Menu is displayed with the Maintenance and the Install BIP+ updates sub-menus opened.
Recreating the Keyword Database
This program is to be run on an as-needed basis.
Because your keyword database is separate from your Inventory file, it is necessary to periodically recreate your keyword database to keep it current with your Inventory file.
| Please Note When you add an item to your Inventory file, the keyword program is not automatically updated; you must recreate your keyword database. When you delete an item from your Inventory file, it will be marked as "deleted" from your keyword database, but you must recreate your keyword database in order to actually delete the information. You are offered the option to recreate your keyword database whenever you do a System Backup; if you recreate your keyword database as part of the Backup process, you will not have to run the separate program to do so. |
1. Select 'Maintenance' from the Main Menu. The Maintenance sub-menu is opened, and 'Data Maintenance' is highlighted.
2. Press <Enter>. The Data Maintenance sub-menu is opened, and 'Calculate an ISBN check digit' is highlighted.
3. Select 'Recreate keyword database'. The PROGRAM TO RECREATE KEYWORD DATABASE is displayed, and you are notified that the system is 'Creating keyword databases'. You are notified when the process is done, and you are prompted to 'Press <Enter> to return to the menu.
4. Press <Enter>. The Main Menu is displayed with the Maintenance and the Data Maintenance sub-menus opened.
|
|||||||||||||||||||||||||||